How I Plan My Moon Photography and Milky Way Photography
Learning how to photograph the moon and milky way can be daunting for beginning photographers, there is so much that goes into making a great photograph that it may seem overwhelming to learn at times. I am here to hopefully make one of those tasks a little easier for you, the planning stage, learning how to use existing tools in order to help plan your photography. This article is not meant for seasoned professionals but for people who want to start dabbling in shooting moon landscape photography and milky way landscape photography and may not know what tools are available to them.
Now before I continue realize that I am not a “expert” in using these tools. I am sure there are far more qualified people that can give much more detailed explanations of how to use these tools. I am just like you, a amateur photographer who wants to continue to make better and better photographs. These are just the tools that I use and the way that I use them, and I know there is still so much I can learn about using these tools, new features or features I was unaware of that I am constantly learning about.
Moon Photography
So lets tackle Moon Photography first. Now I know that there is a saying in the photography world that the equipment is not as important as the photographer in making great photographs, and while this may be true there are some forms of photography where what you are shooting with is as important in what kind of photograph you want to make. If you want great bird or wild life photography your going to need a fast camera and fast, large lens, there is no getting around that. Does that mean you can’t make a great photograph with cheaper normal gear, no but your chances of coming out with a fantastic image is going to greatly increase with a large lens and faster camera. The same goes for Moon Photography, you can still come up with great images with “normal” gear but if you want an image of a landscape with gigantic moon in the background short of using software to place an image of the moon in the background , your going to want a large lens in order to achieve this effect.
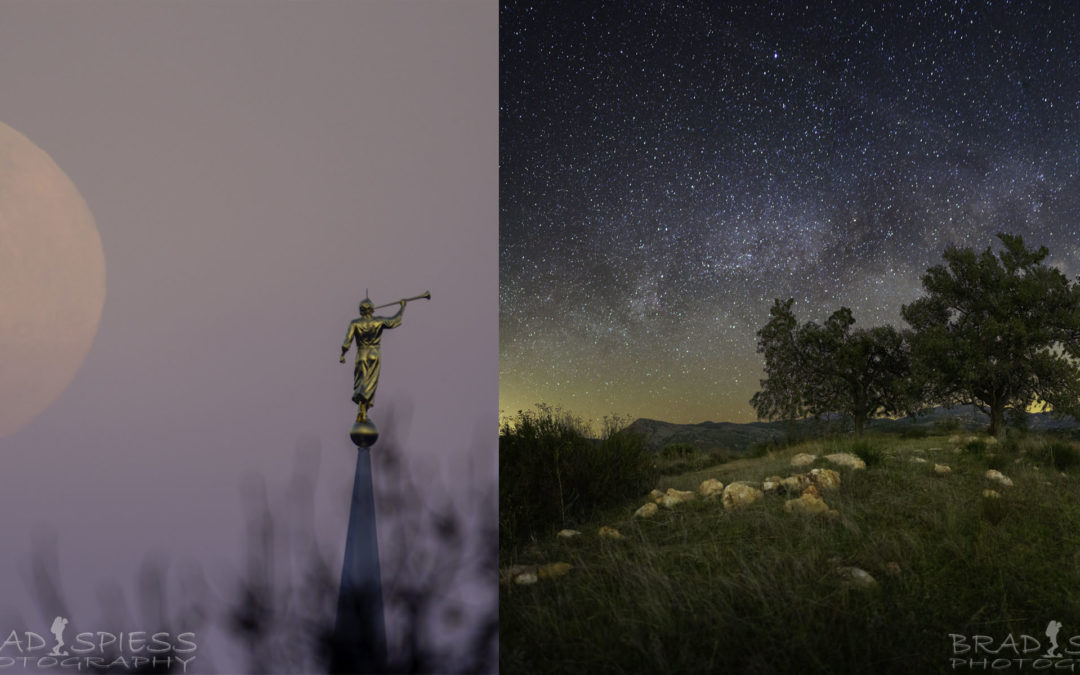
My lens evolution began when I first started shooting the moon and I was using the “Beer Can” lens ( Sony 55-210 mm APS-C lens) and I was happy with the results but then I quickly wanted to make better photos of the moon, so after renting the Tamron 150-600 mm Lens I decided to pick one up and was very happy with the results for my moon photography. Even though I was a happy with the lens for the purpose of moon photography as I started to try to use it for wildlife photography I grew frustrated at the lackluster auto focus performance on my set up ( you have to use it with an adapter on Sony FE mounts and that seems to give bad auto focus performance) so I was ecstatic when Sony came out with their own native long lens for the Sony FE mount. I quickly picked up the new Sony FE 200-600 mm G lens and have been so happy with the performance, but again I started to want more and I decided to pick up the 2X Teleconverter for Sony FE mount. Using the 2X Teleconverter gave me an incredible 1200mm on my Full Frame camera and 1800 mm when using it on my Crop Sensor, freaking awesome ! Now I am not going to use the longest length every time I shoot the moon, but its nice to have the options open to me.
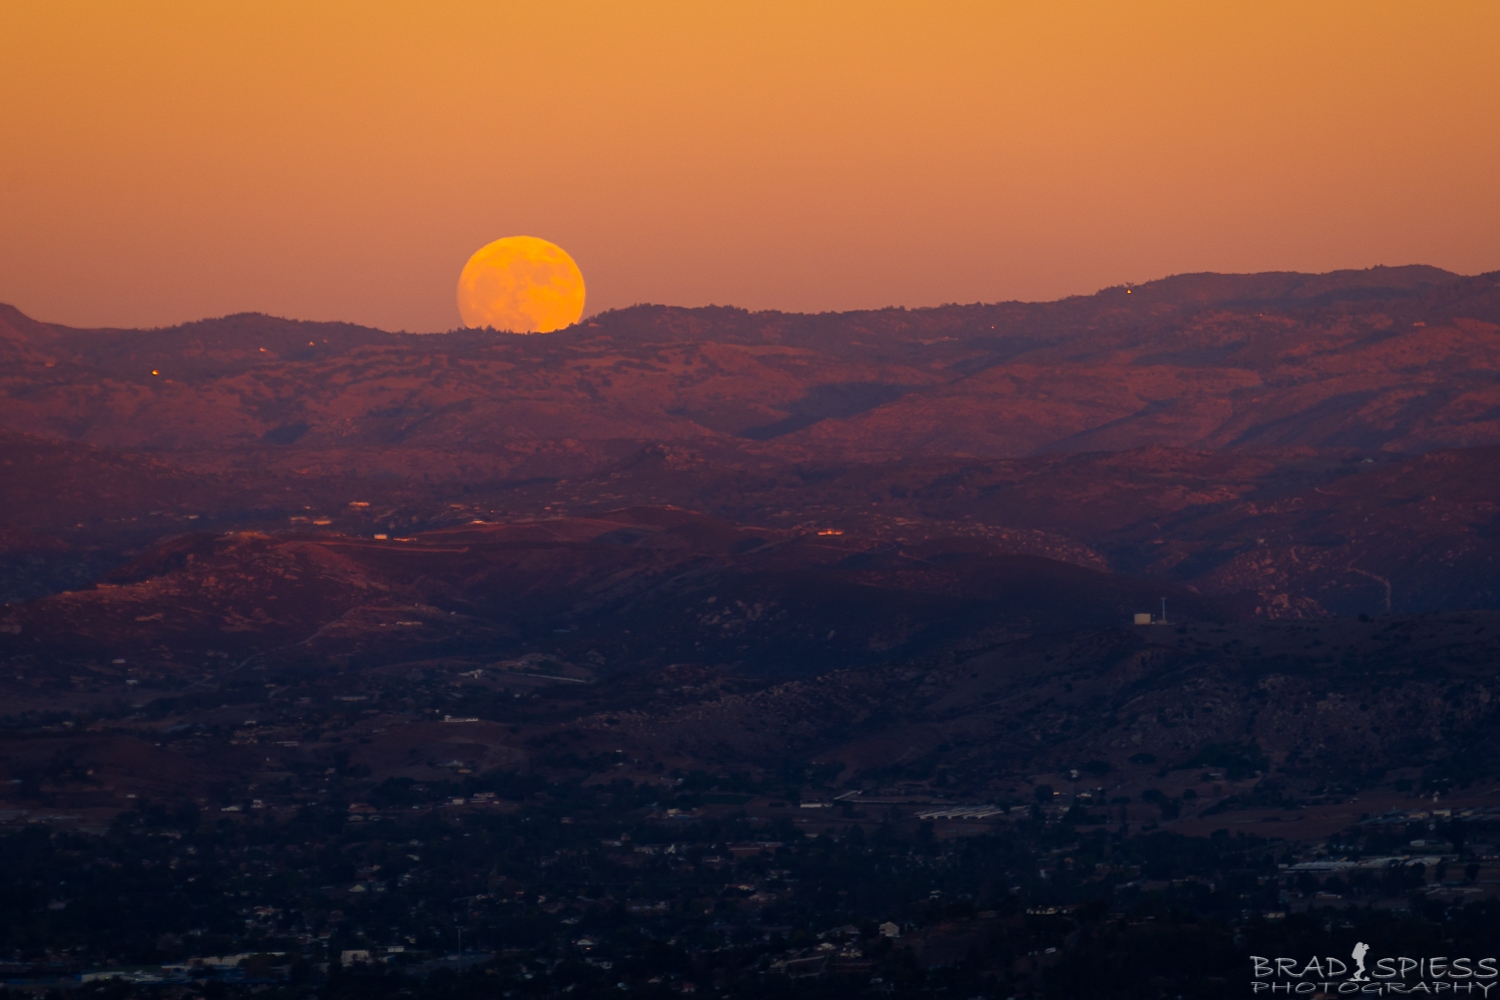
Full Moon rising during sunset shot with my cheap beer can lens at 210 mm.
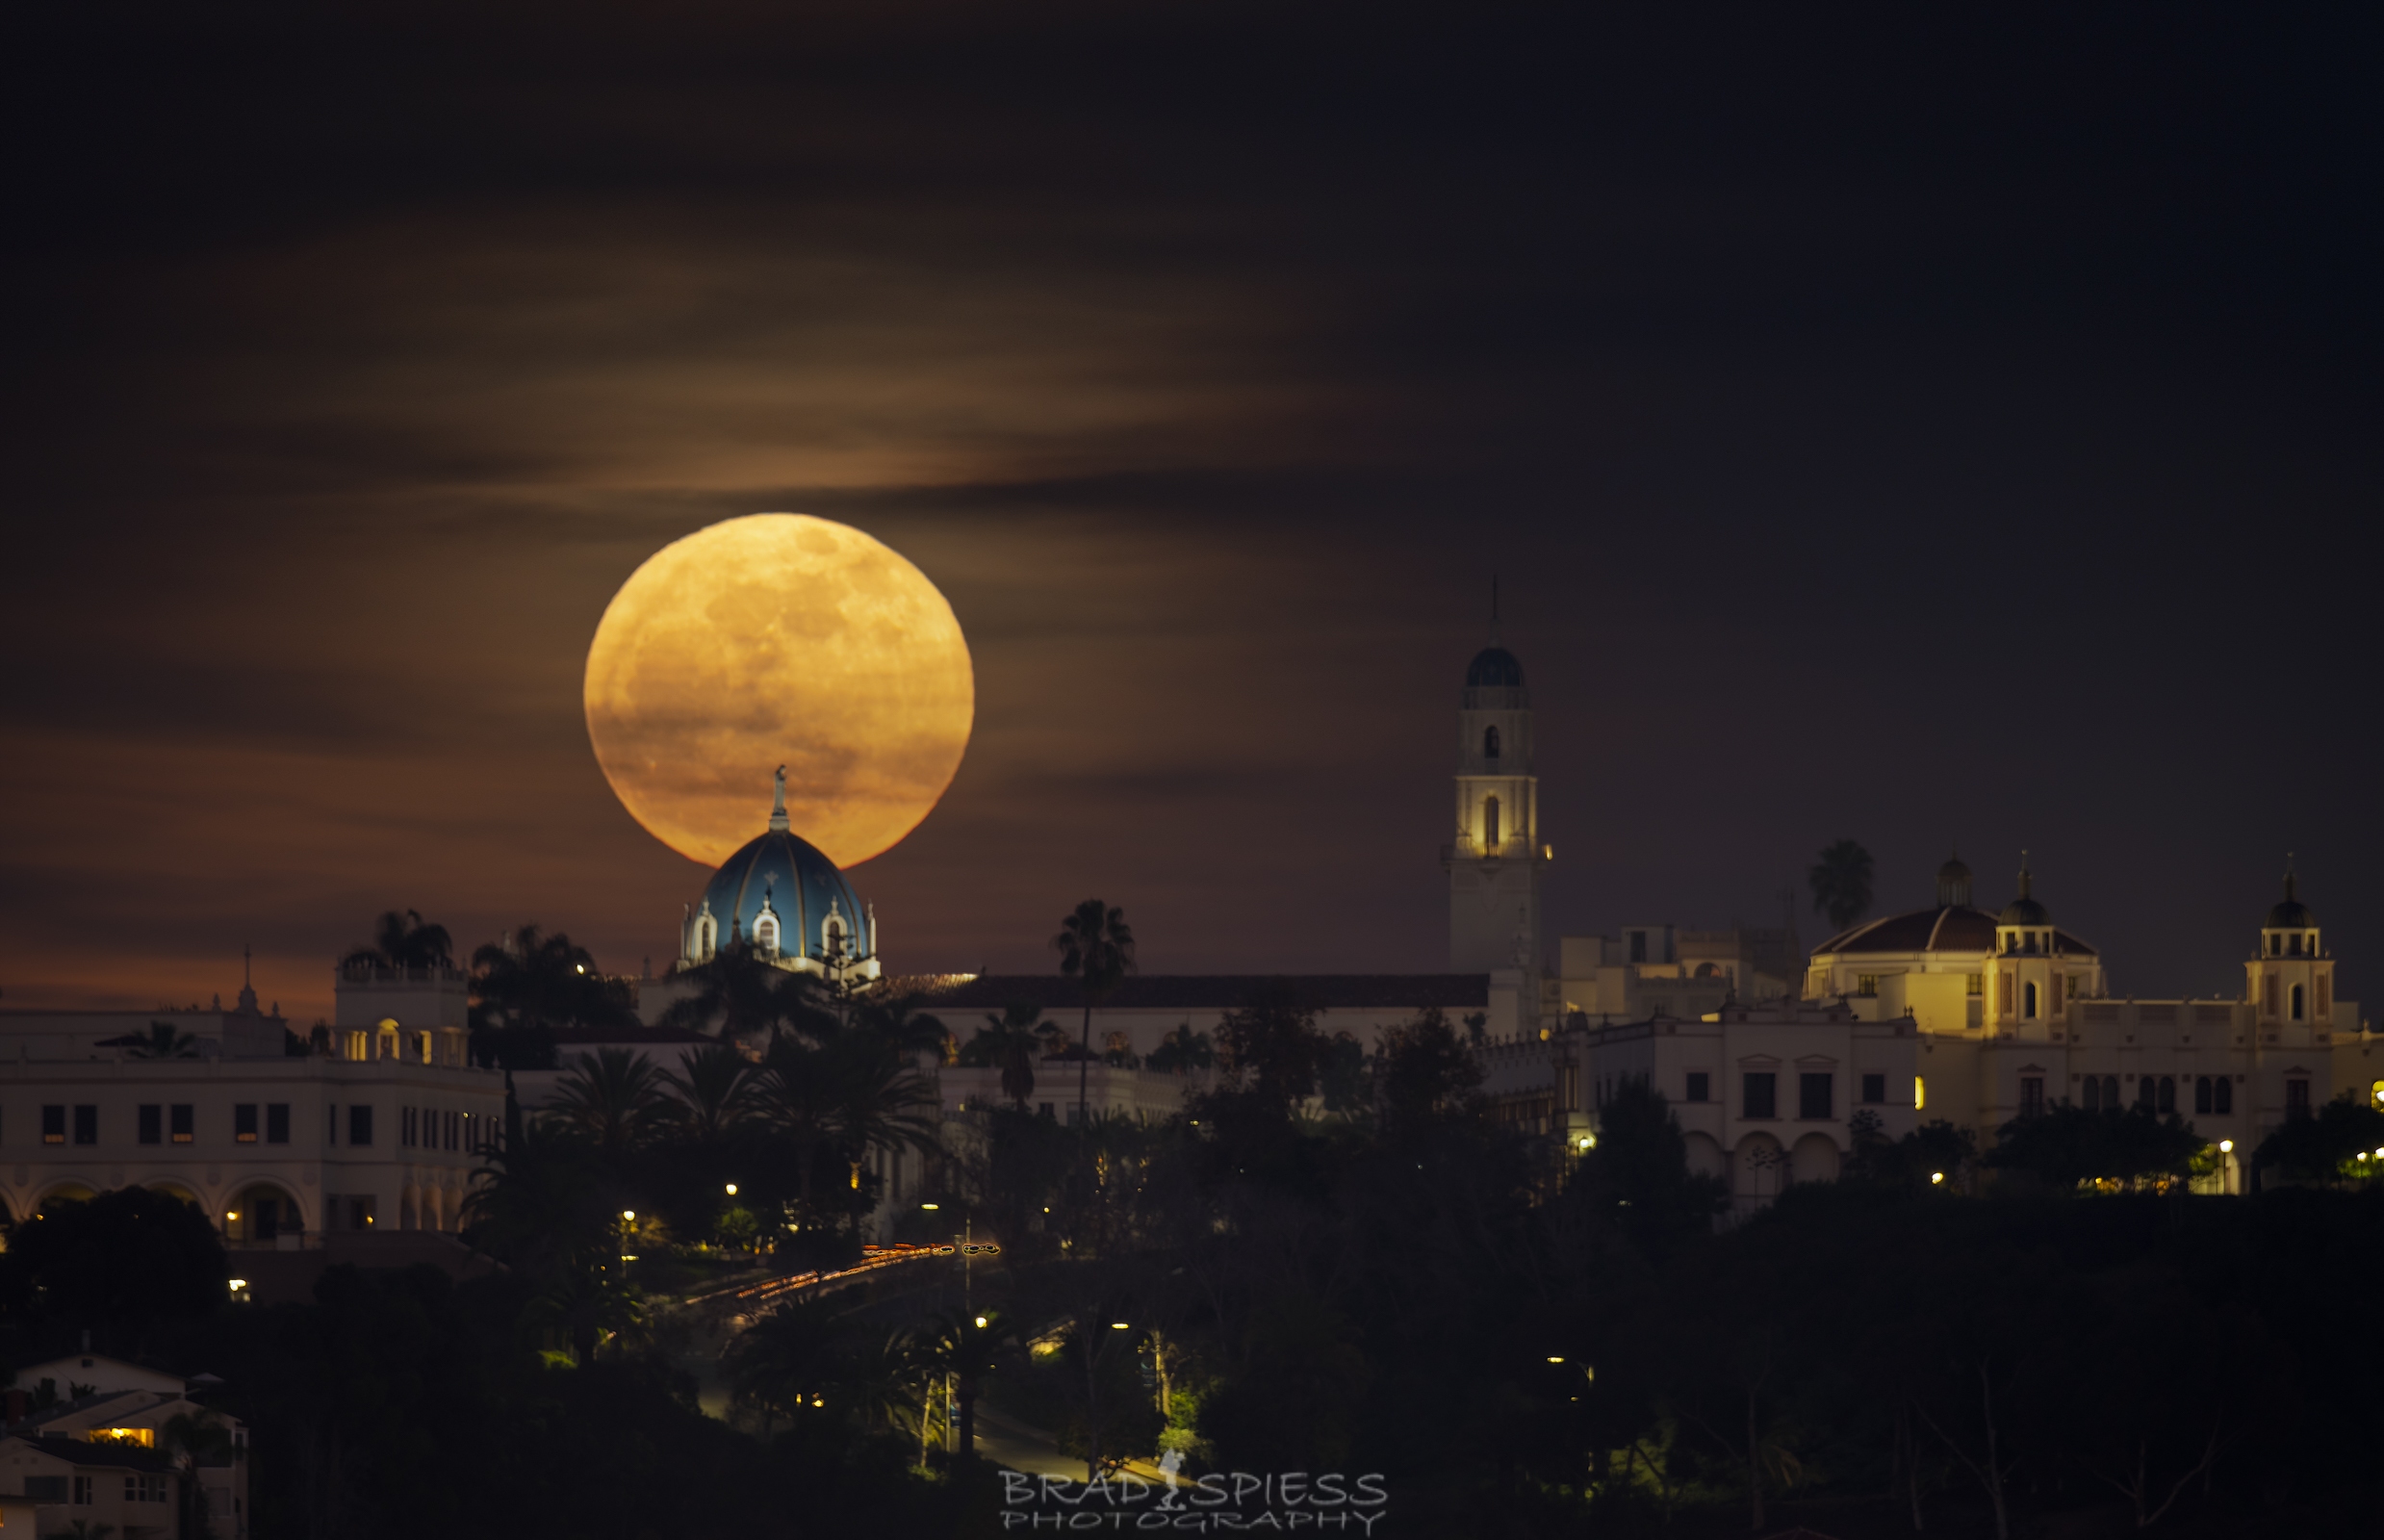
The Full Moon rising behind the USD Church of the Immaculata using the Tamron 150-600 G at 600 mm.
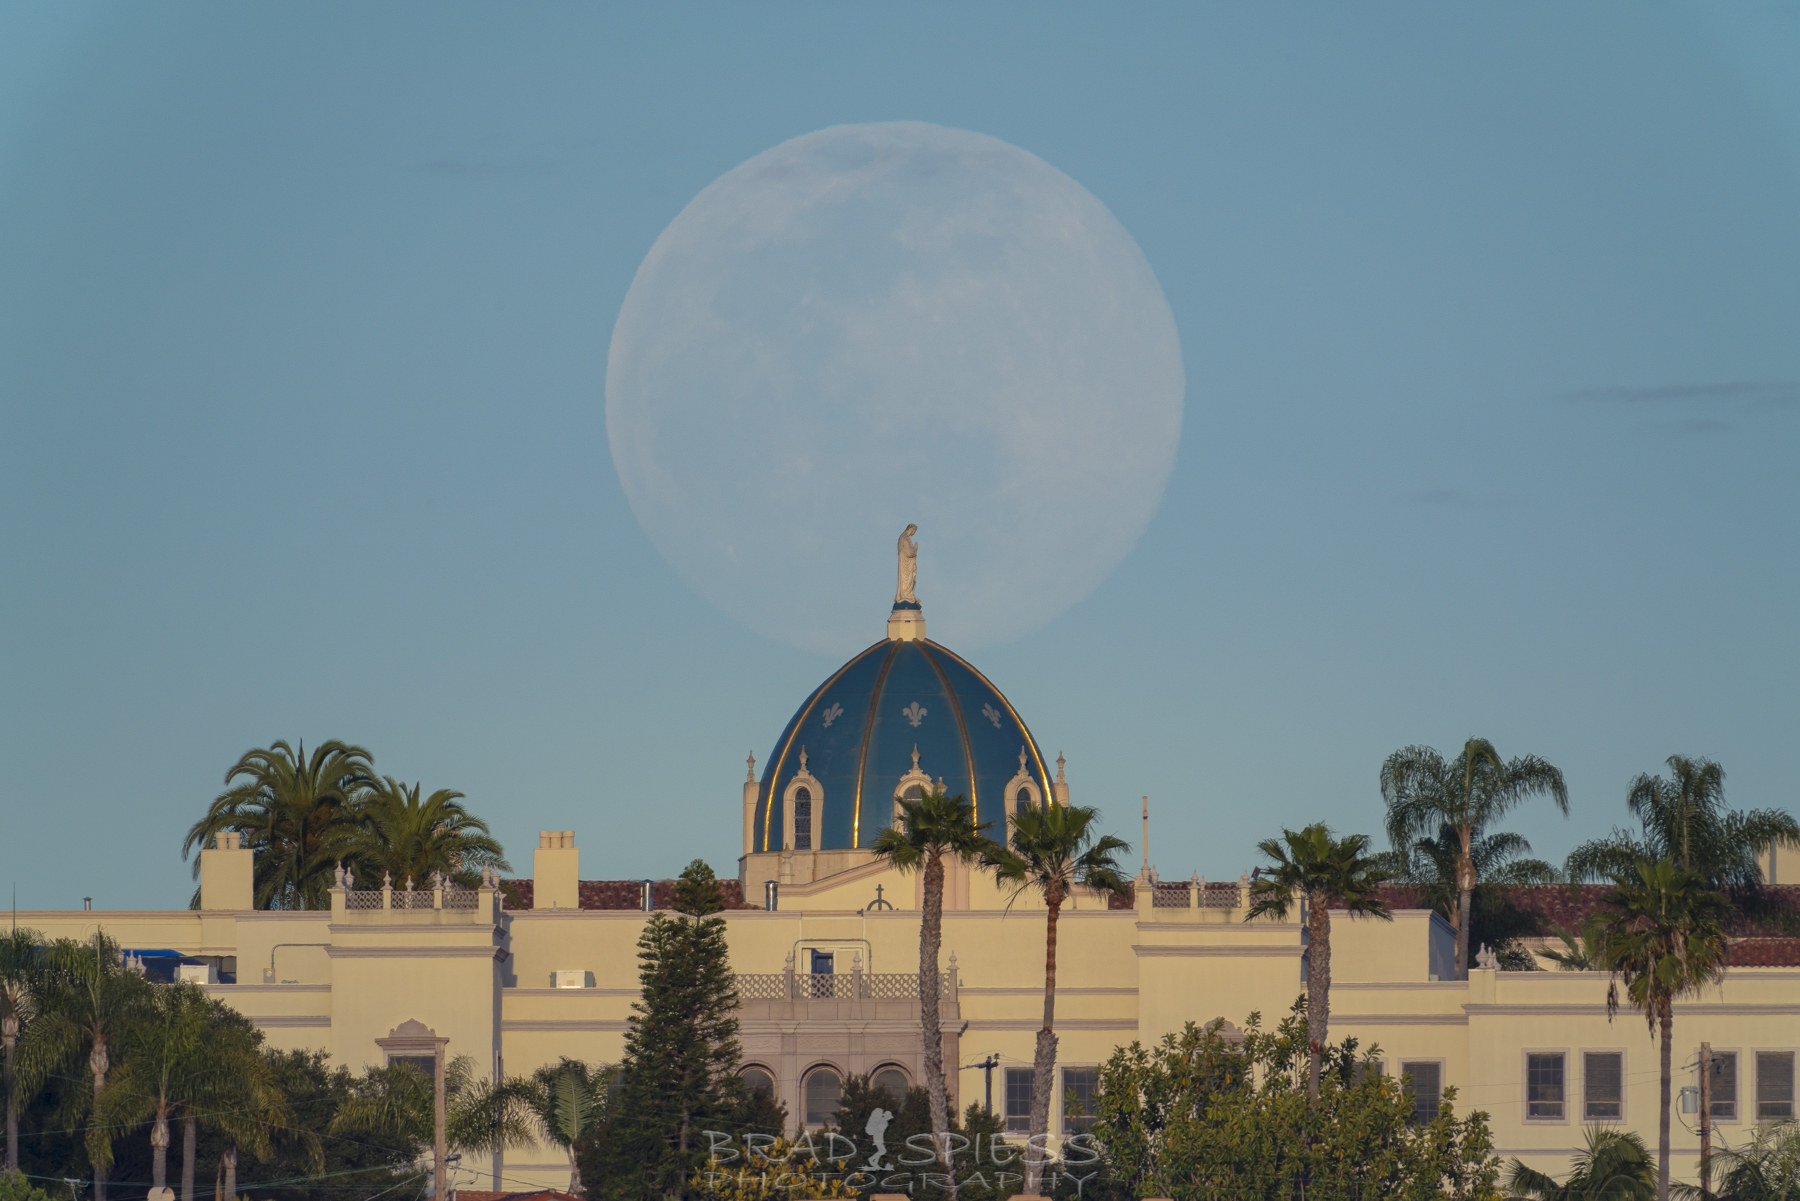
The Full Moon rising over the USD church of the Immaculata using my Sony 200-600 mm and 2X Teleconverter at 1200 mm.
If you are going to shoot the moon as it rises or sets and position is not so important then the planning tools are not quite as important to figuring out where you want to shoot, but if you are going for certain look and want to see the moon line up with a landmark having the moon alignment be off by even a couple of degrees can really ruin your shot. Knowing that planning is key to getting a good alignment of the moon with your landscape there are a couple of tools that I have tried using for this PhotoPills, PlanIt for Photographers, and the Photographers Ephemeris. I have tried using all 3 but currently there is only one that I mainly use for my planning and that is PlanIt for Photographers. For whatever reason I was always was intimidated by using the Photographers Ephemeris so I can’t really say that I have a lot of experience using it. PhotoPills always had a user friendly experience and because of that it was probably the first tool that I used the most. When using PhotoPills for moon photography its nice to use the Augmented Reality feature to see how the landscape is going to look with the moon but I never was able to get it to be precise, even with their instructions for how to calibrate the Augmented Reality. PlanIt for Photographers seemed to be promising but was very intimidating, even the instructional videos that the developer put out, the videos where hard to follow at first. Even through I was initially intimidated by PlanIt for Photographers two things have happened that changed that experience for me. One was when the developer came and gave a presentation to a photography group I belong to and that helped quite a bit. Another was the fact that the developer has continued to improve their instructional videos and now they are much easier to understand and follow. PlanIt for Photographers is a tool that has so much information at your finger tips that it can seem very overwhelming at first. Just like any software such as Lightroom or Photoshop the more you learn about it and use it the more comfortable you will be in using and relying on it. I think the biggest advantage of using PlanIt over the other apps for planning is the ability to use a virtual reality simulation of what your scene will look like that is precise vs using an augmented scene for your planning that would require that you are at the scene to begin with in order to capture the scene on the phone. If you are using PlanIt for Photographers and don’t quite understand it yet check out the instructional videos on Youtube.
How I plan my Moon Photography
So now when I plan out a Moon Photography shot these are typically the steps I will take.
Step 1. Determine what the scene will be, ie…am I shooting the moon aligned with a natural or man made landmark or is there a certain landscape that would be interesting with the moon, maybe even a natural phenomenon such as a solar or lunar eclipse. Don’t limit your imagination I’ve seen some amazing photos recently that took a lot of planning but really panned out for the photographer, such as the Rock Climbing Eclipse Photo, or Camel Solar Eclipse Photo from Joshua Cripps.
Step 2. Find out when the next moon phase that you want to use will be. I still end up using PhotoPills for this as I like the visual representation of the Moon Calendar. When you open up the app under the middle option of “Pills” look two blocks down to the moon category, open that and at the very bottom you will see 5 categories, the 2nd being Calendar. Open Calendar and that will give you a really nice visual representation of the moon phases during each month of the year. PlanIt for Photographers has this function as well but I’ve just grown used to using PhotoPills for it. You can also find this information online by just searching.
Step 3. Using PlanIt for Photographers I will create a plan. The nice thing about this option is the next time I want to shoot something similar all I have to do is open up the plan and input the date I want to shoot and then adjust things until they line up the way I want them to. So in creating a plan I will place a marker on the scene I want to shoot. If its a natural scene the information will be in the app ( I would just download the offline map info at home while you can so you have that info for later, the app should ask you if you want to do it ) if you are shooting something that is not part of the natural landscape like a person or landmark then you need to input that info into the marker to make it more precise. For example the picture above this of the moon rising above the Church of Immaculata at University of San Diego I need to know how tall that building is as well as how wide the dome is going to be and determine how tall the statue is on top of the dome. How tall the dome is your going to have to do some research online to figure out. For the statue if you can’t find that information you can kind of guess and that will get it pretty close. One awesome feature for figuring out the width of a object is to go to Photography tools and place a camera pin down on one edge and then drag the scene out thereby dragging the scene pin out until you reach the other edge and in the information bar you should see the distance between both markers. The reason all this information is so important is that as you input all that information into the marker the app will build a virtual simulation of that marker in the VR simulation and allow you to see how the moon will align with the marker making it easier for you to determine where you need to be in order to get the shot.
Step 4. After you set your marker up, place a scene pin on it and then determine where you want to put your camera pin. I would adjust your focal length in the app to something small like 16-50 mm so that you can see where the moon path is in relation to your marker. If it lines up pretty close, great zoom in and see how it looks, if not keep moving your camera pin until the moon path lines up with your marker. Zoom in to the focal length you want to use in the VR to see what the image will look like, you may need to go back and forth between the VR component and the overall plan readjusting your camera pin until it lines up perfectly with your scene.
Step 5. Now you may want to go into google maps and check to make sure nothing is in the way of your composition. Turn on the satellite view and toggle the 3D option on. Now if you press Control key on the PC ( I’m not sure which one it is on the MAC) and use your mouse you can zoom in and move the scene around to get a 3D view of what its all going to look like. You may be even able to get a real view of the scene ( not always ) by going back into 2D view and placing the little person tool on the map where you are planning to shoot, if the information is there it will turn into an full 360 view of that spot that you can move around using the arrow keys on your keyboard sometimes and then you can also use the scroll wheel on your mouse to zoom the view in. **Make sure you save your file with a name you will remember, such as USD Church Moonrise**Also I did not know this until recently, there is a function in the Menu to add a reminder to your calendar,…not that you can’t just do that yourself, but its still pretty cool**
Step 6. Check weather apps to see if the weather favorable for your shot. If its someplace local you may even want to check local web cams ( if there are some around the area ) to get a view of whats going on before you head out.
Step 7. If you have the time before your going to go shoot, a day, a week, whatever, and your spot is easy to get to go check it out, get a better idea of the lay of the land, nothing beats actually being in the spot and seeing what its really like. You can always readjust your camera pins in your plan to more favorable spots that you have found once you have scouted out the terrain.
*Actions that I should take more often* Make a 2nd or even 3rd plan for the event your going to shot. You never know whats going to happen when you go to shoot your event. As an example I drove 20-30 minutes to shoot the moon coming up behind the Church of the Immaculata at the University of San Diego. I was going to shoot the scene from Mission Bay and when I checked the weather everything looked ok. As I drove down to the spot I started to notice the Marine Layer ( thick fog bank ) moving in and obscuring the scene. I drove all the way down and determined the shot was not going to work and turned around and drove back home, but on the way home I decided to stop by another spot that I had a plan for, and even at that spot I was thinking it might not work because of so much haze in the sky, but was pleasantly surprised when the moon popped up exactly where I wanted it to. It pays to plan ahead and have different options to shot from.
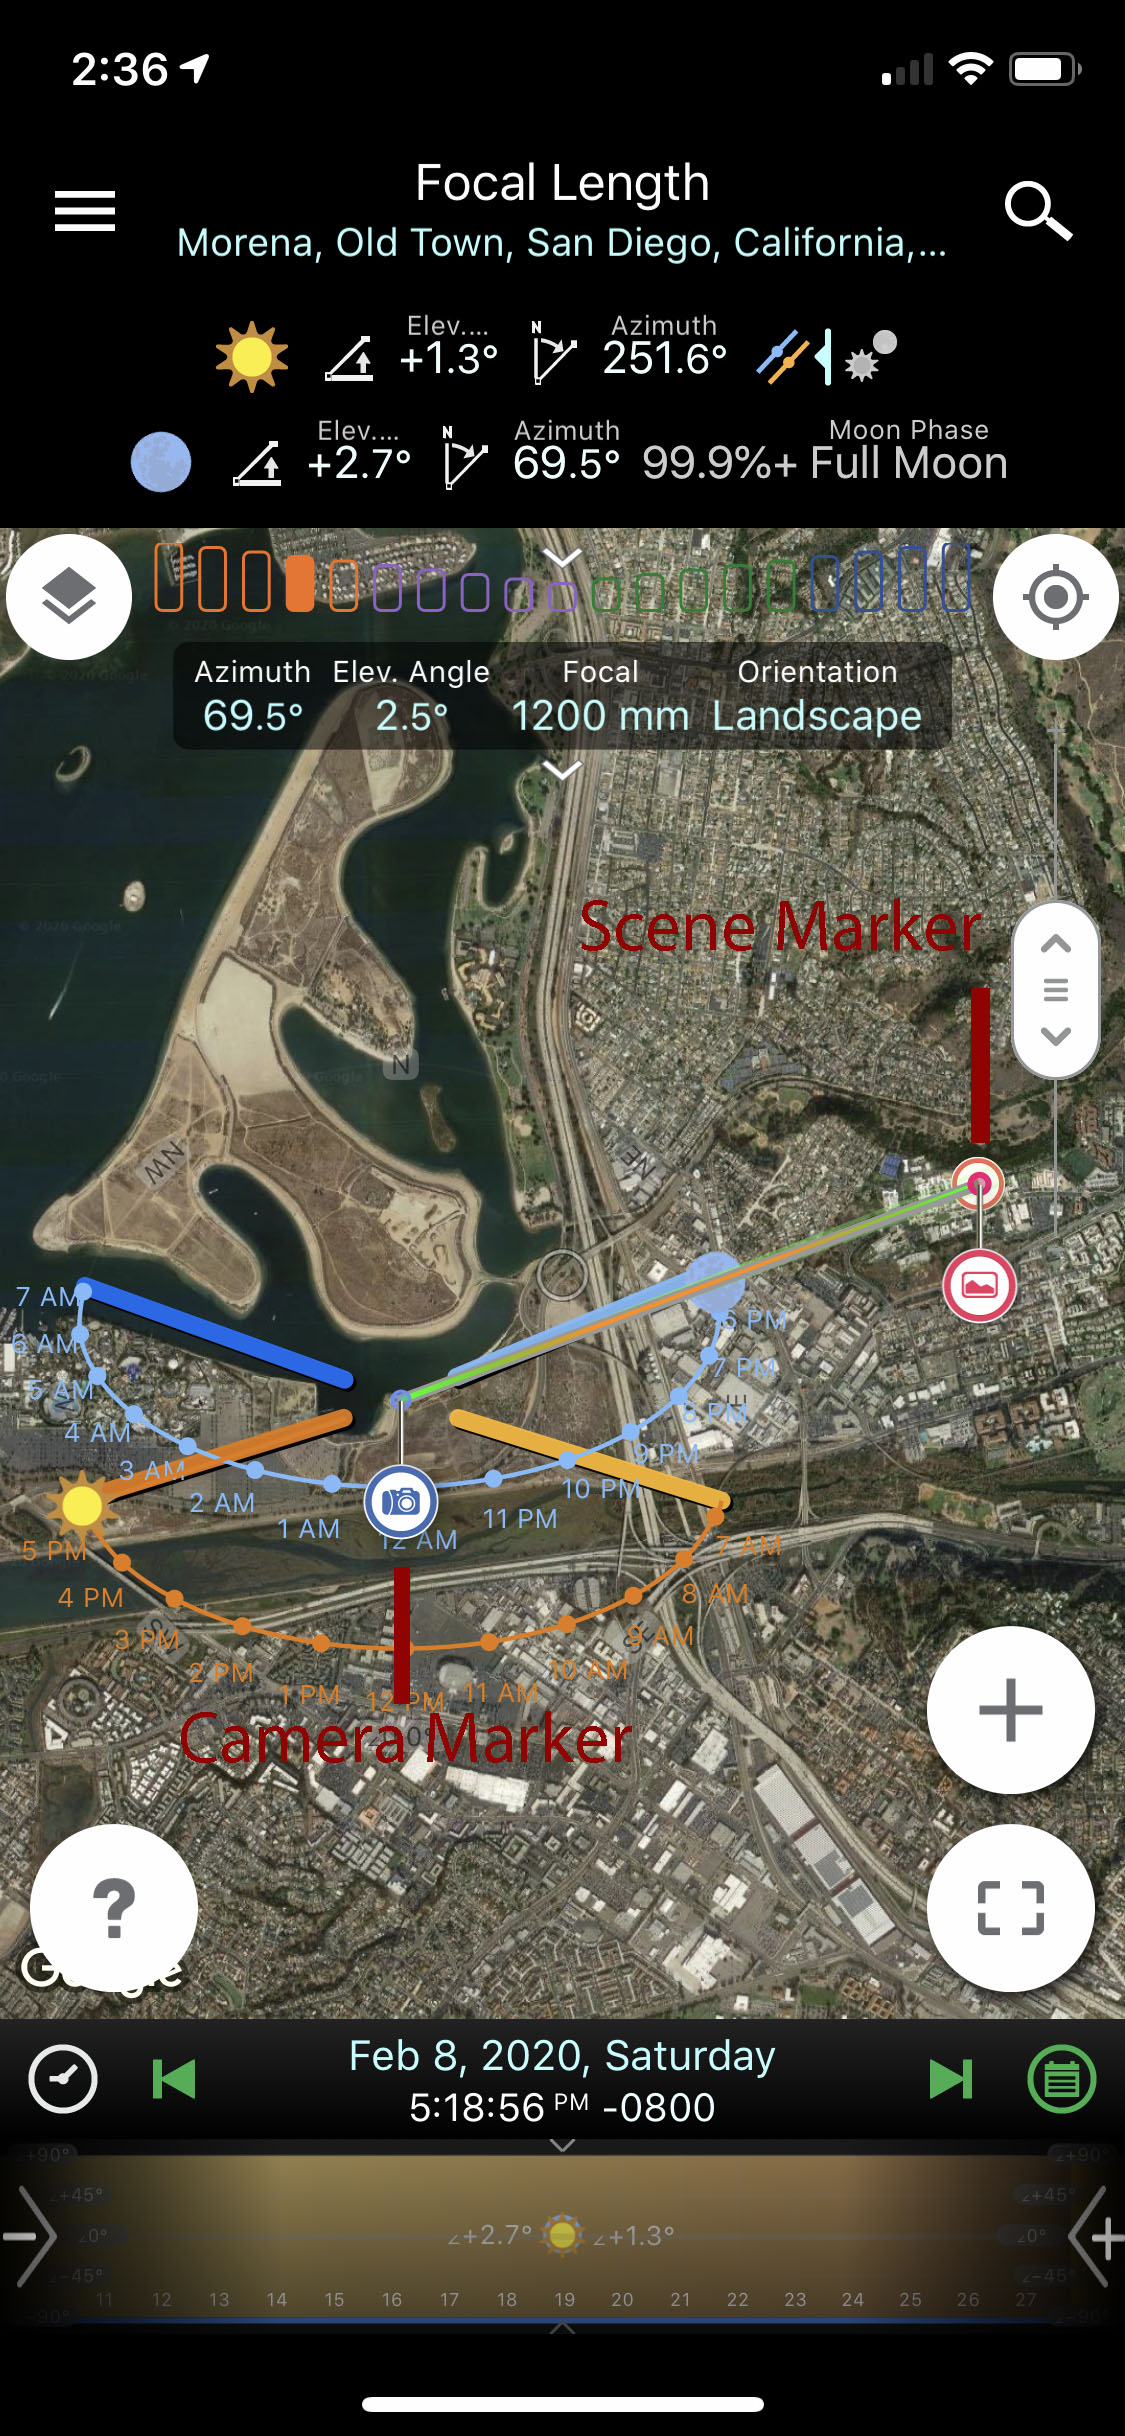
Map view in PlanIt with camera and scene pins and markers
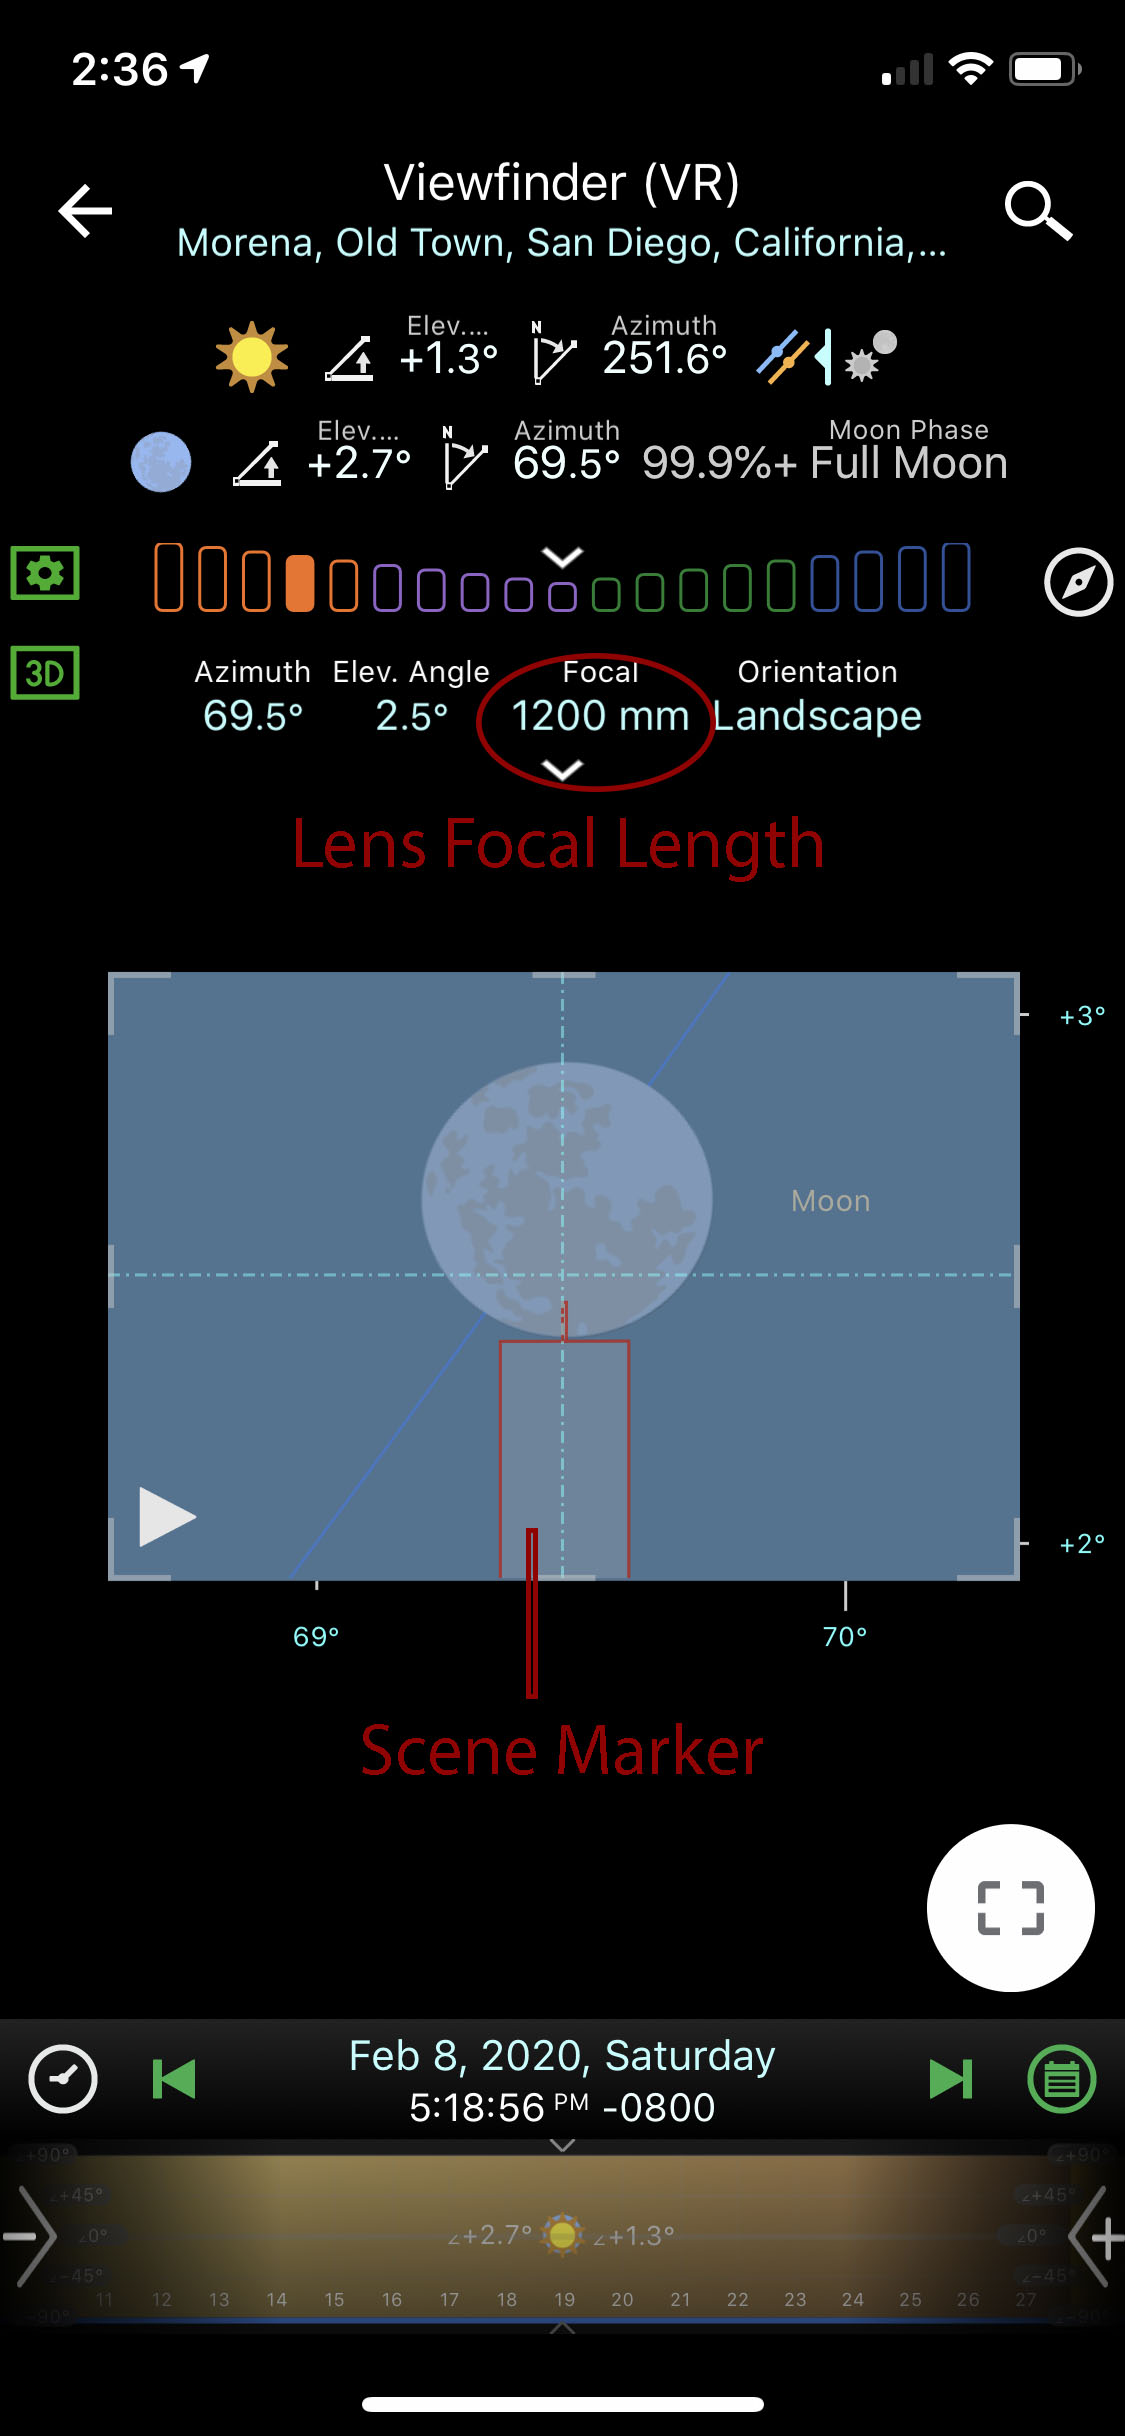
The VR View in PlanIt with the scene marker and the path of the moon with a representation of what the moon would look like based on the focal length.
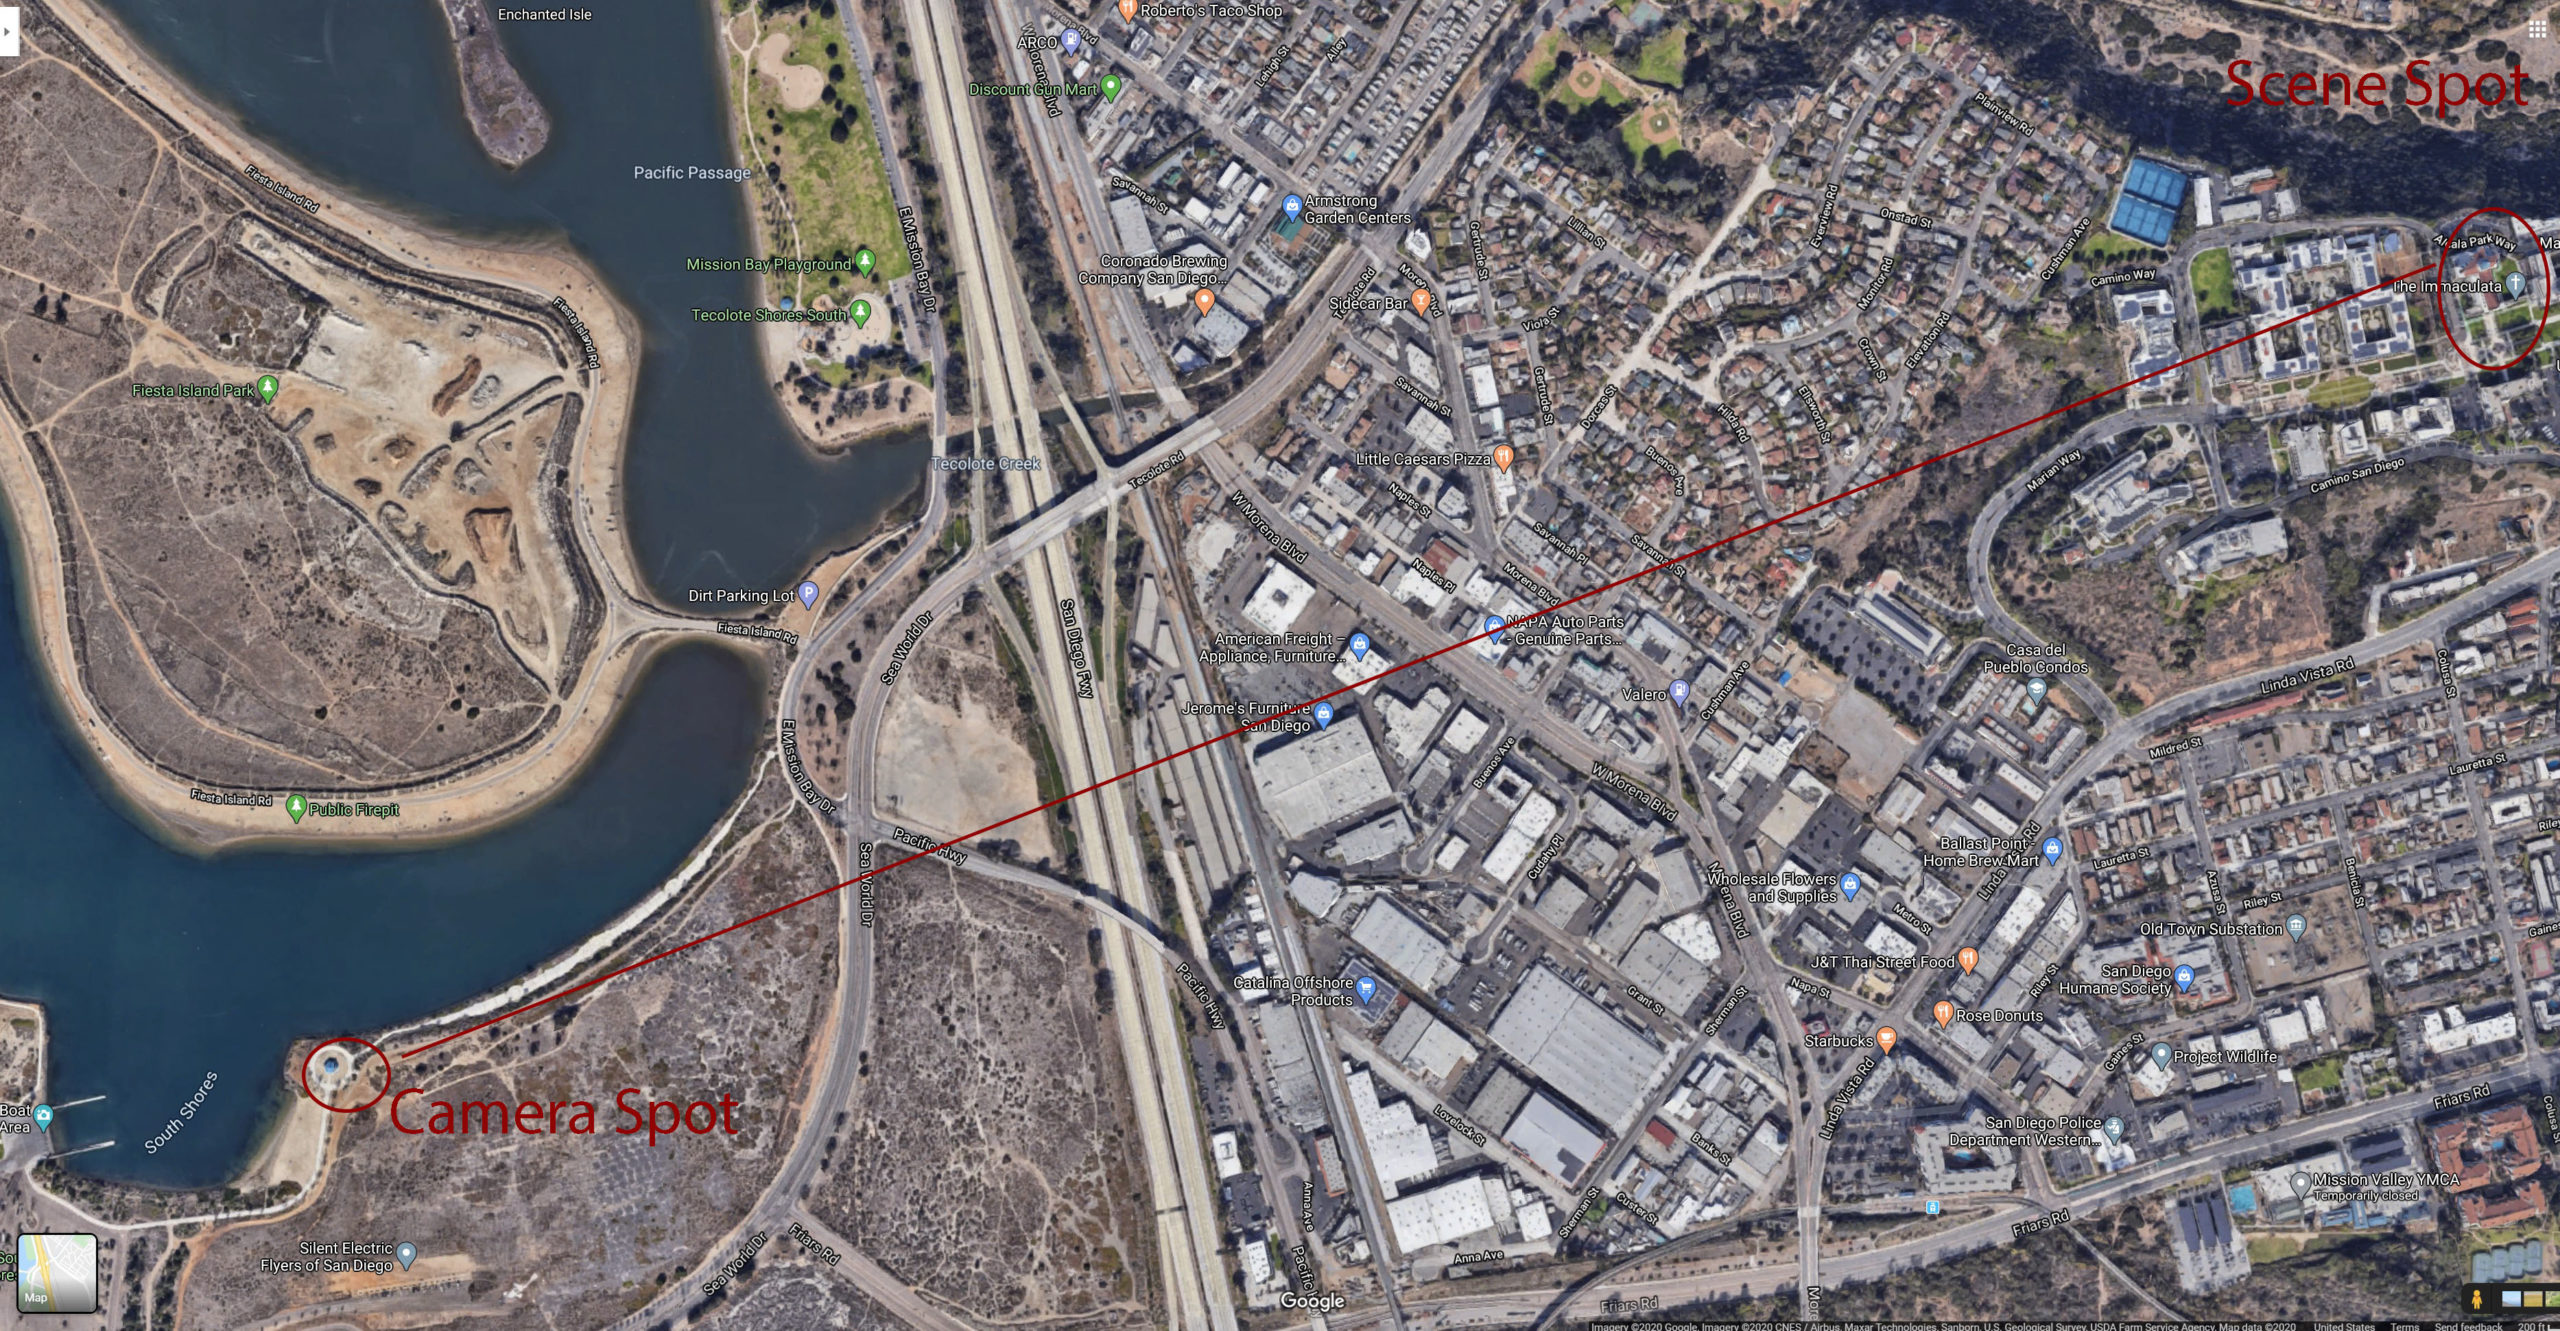
A Google Maps top down view of the area I am shooting for the moon.
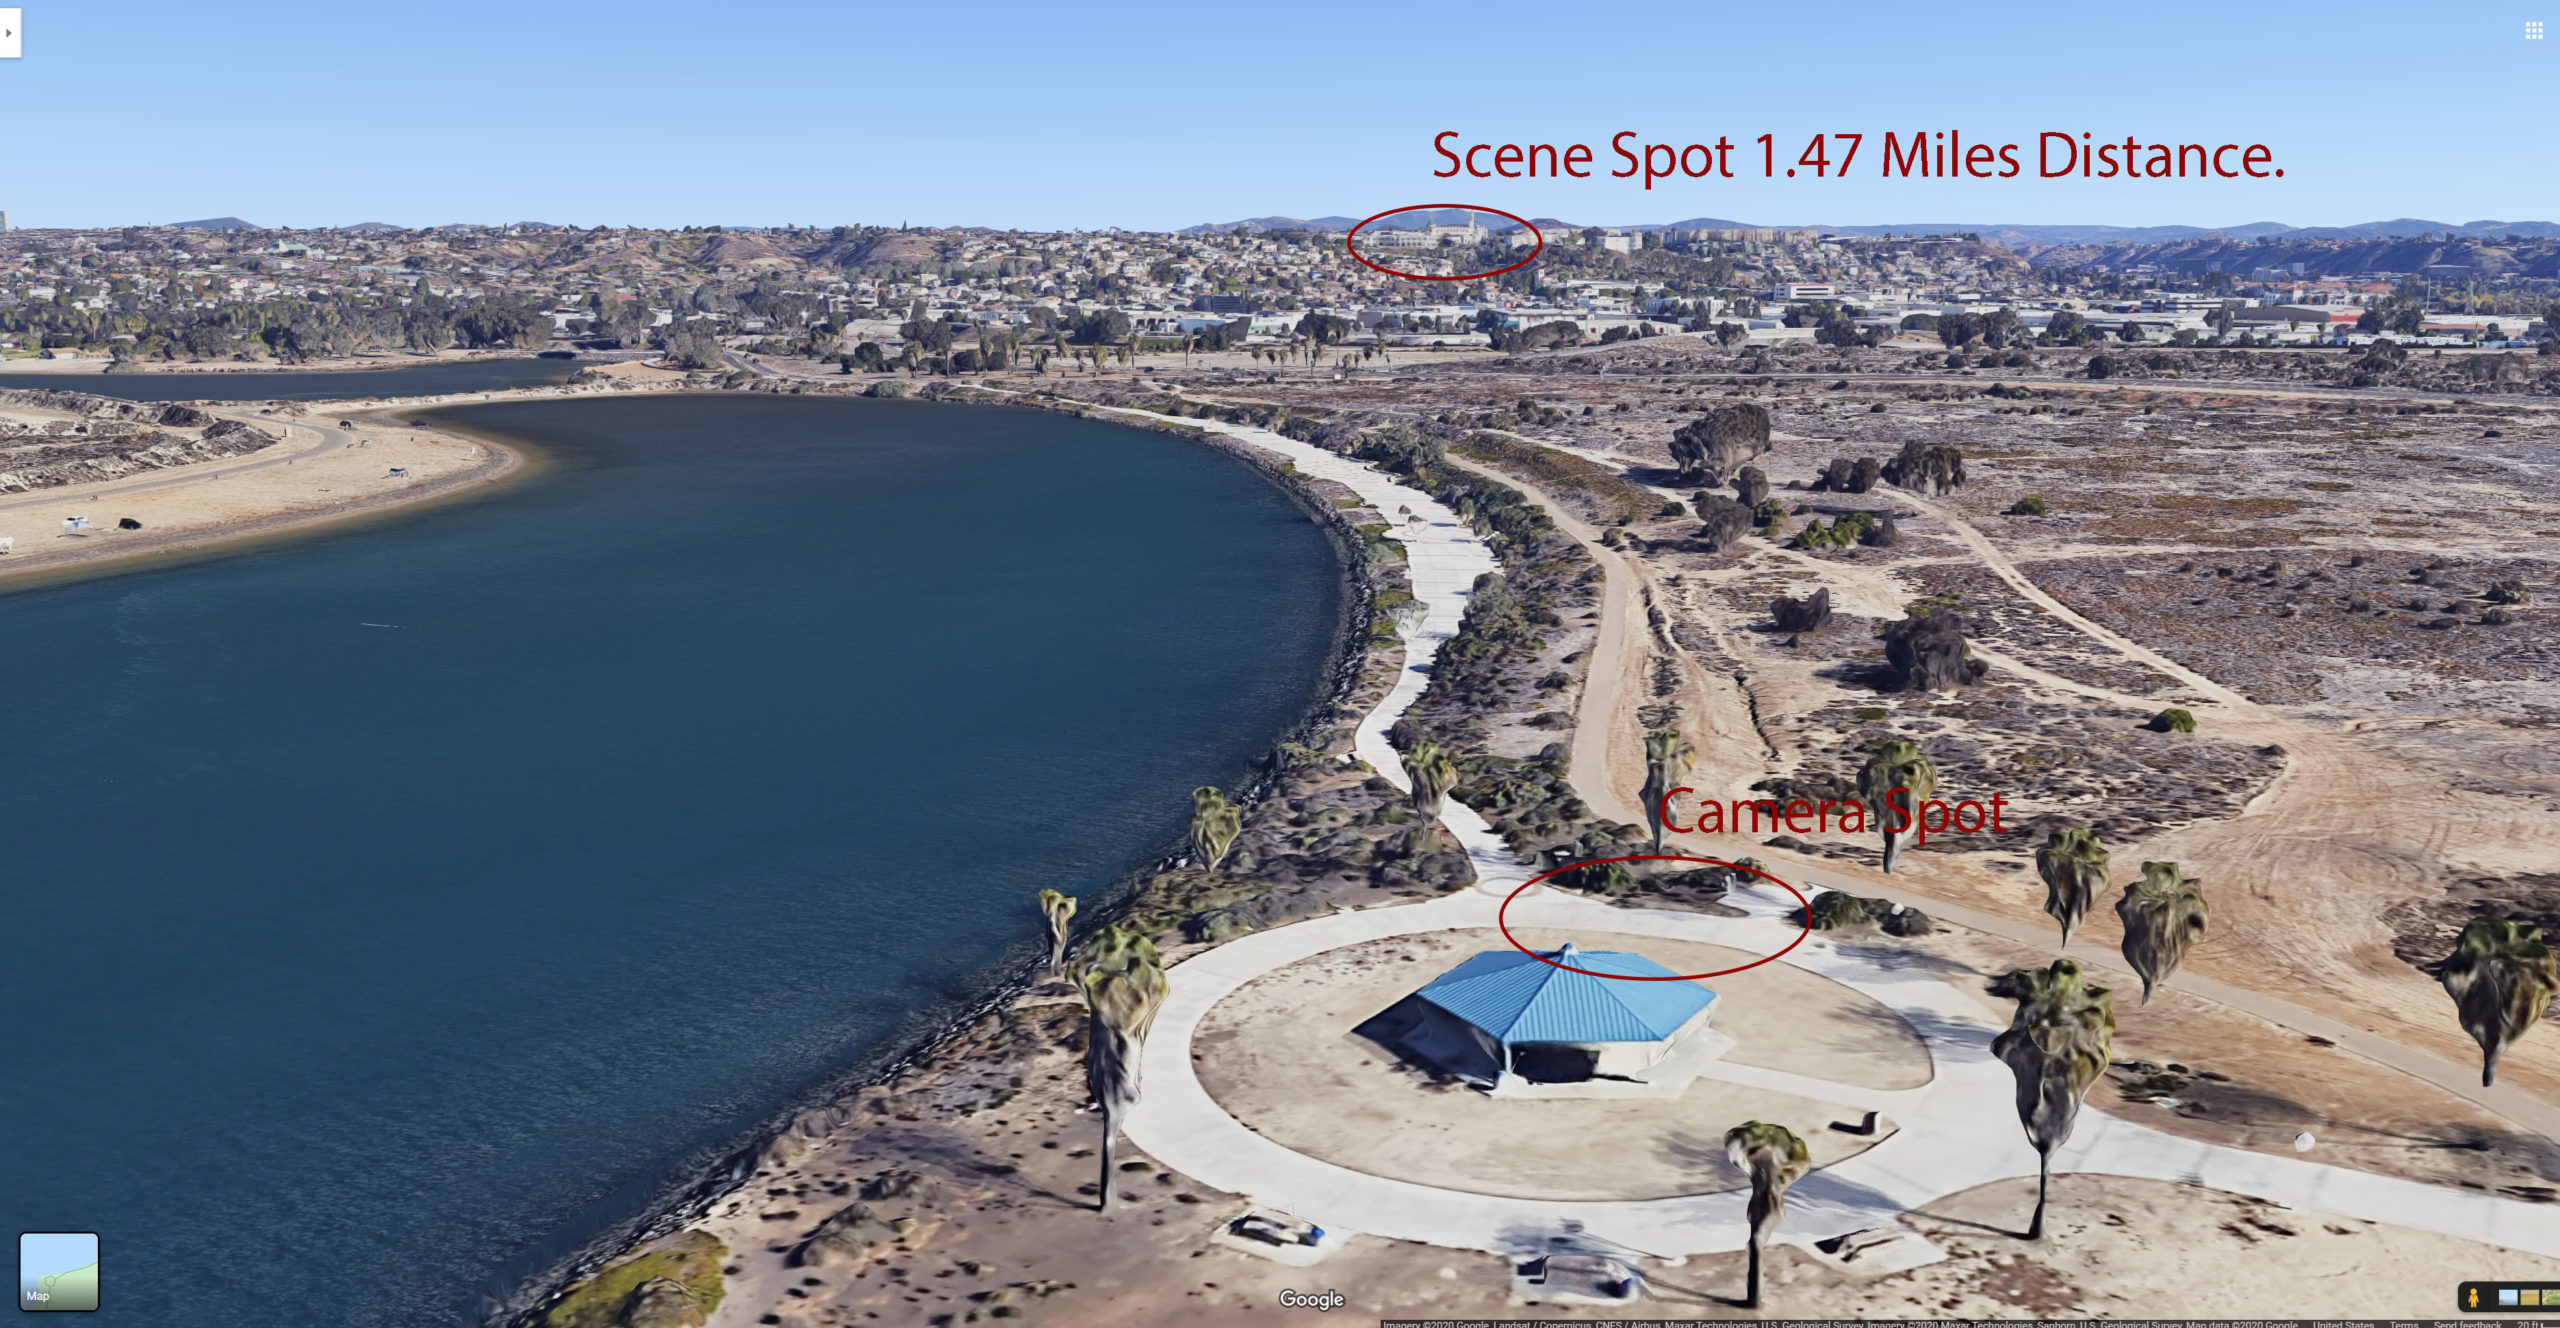
Google Maps 3D View of the area I am shooting for the Moon.
The Full Moon rising over the USD church of the Immaculata using my Sony 200-600 mm and 2X Teleconverter at 1200 mm.
How I plan my Milky Way Photography.
Planning my Milky Way Photography is not that different from planning my Moon Photography.
Step 1. Determine what cool natural feature or man made feature I want to shoot with the Milky Way in the background. You can find more natural compositions that will have darker skies, most made made objects are going to be closer to civilization and therefore light pollution and weaker skies for your Milky Way compositions. Be that as it may there are plenty of awesome photos of such things as lighthouses, radar dishes, abandoned structures or objects that make great composition because we are familiar with these things and lining these things up with the Milky Way just puts them in a new light, all pun intended.
Step 2. Determine what part of the Milky Way season you want to shoot your subject. The Milky Way season ( the time of year when the core of the Milky Way is more visible) stretches from March to October, with the Milky Way appearing more horizontal in the sky when it becomes visible in the sky vs later in the season when the Milky Way becomes more vertical by the time it becomes visible in the night sky. So Ideally you are going to want to shoot compositions such as Milky Way Arches ( when you see a full arch of the Milky Way stretching from one side of the frame to the other) or more horizontally aligned Milky Way photos in the beginning of the season when its easier to set this sort of composition up. This time of the year the Milky Way tends to start appearing in the night sky during the earliest morning hours as well, meaning you are going to have to be out there all night. By the time you reach October the Milky Way will appear almost vertical as soon as it gets dark enough to see it, this is a perfect time of year to be setting up your vertical shots, the only downside is you have a short window of time when the Milky Way core is visible before it disappears behind the horizon. Knowing this, its advantageous to think of what areas you what to shoot the Milky Way for the year and set up a calendar of what shots work best for each month.
Step 3. Looking at a moon phase calendar, determine the what are the best days to shoot the Milky Way. You will have a much easier time shooting the Milky Way when there is less moon light in the night sky competing for your attention, and blowing out the night sky, so knowing that , its ideal to look for nights to shoot when there is a new moon or a couple days before and after the new moon.
Step 4. Start making your plan. Now that you know what cool natural or man made feature you want to shot with the Milky Way ,and what time of year is going to give you the best composition ,start setting up your plan. Now this may be harder then it sounds. If you are shooting some area out in the middle of nowhere you may want to go into Google Maps and look it up so that you know what to look for in the map area of PlanIt for Photographers. You can use the search bar in PlanIt to look for some well known areas, but not every area is going to pop up in the searches. So I look for some feature that are easier to recognize in Google Maps and then go into the map feature of PlanIt, slowly zooming into the area I want to shoot until I can line them up perfectly and know that I am looking at the same feature in the app that I am looking at on my computer. Place a marker on that spot and input any additional information you may need for man made objects or items such as trees that would not be part of the map data, ie,…height, width, and height above ground if need be.
Step 5. Set up your camera scene pin. Now that you have chosen what natural or made made object you want to shoot with the milky way, determine which direction the Milky Way is rising in relation to your subject and set up your camera pin so that you are looking towards the Milky Way. The Milky Way will rise in the southeast and set in the southwest as it makes its way across the sky. So set up your camera pin so that you are facing towards your composition and the southeast to southwest. Open up up your VR component of the app and see what your composition is going to look like with the Milky Way behind it and then you can adjust the VR scene with the time bar at the bottom of the app until you see the Milky Way line up with your composition the way you would like it to. You may need to play around with the camera pin and the time scrubber until you get it set up the way you like it, when that happens you have a plan, save it so that you don’t loose any information. If you are planning on shooting the Milky Way arch you can go into the menu of the app, go to photography tools and go down 5 spots to the Panorama tool. Using the Panorama tool will allow you to input your lens length, if you are shooting landscape or portrait and then tell you towards the far right of the information bar how many shots you will need and what the degree increments should be, for example a portrait setting using 6 shots at 30 degree increments to achieve the panorama you may want. Again just like the normal Milky Way shot try using the VR component of the app and look to see what the Arch will look like using the time scrubber to get it to look just the way you want it to look. This will tell you exactly where you need to set up your camera, where you need to point it, and at what time you need to be there to get the exact composition you are looking for.
Below are some examples of a vertical shot of delicate arch in Arches National Park with the Milky Way I took in August of 2019.
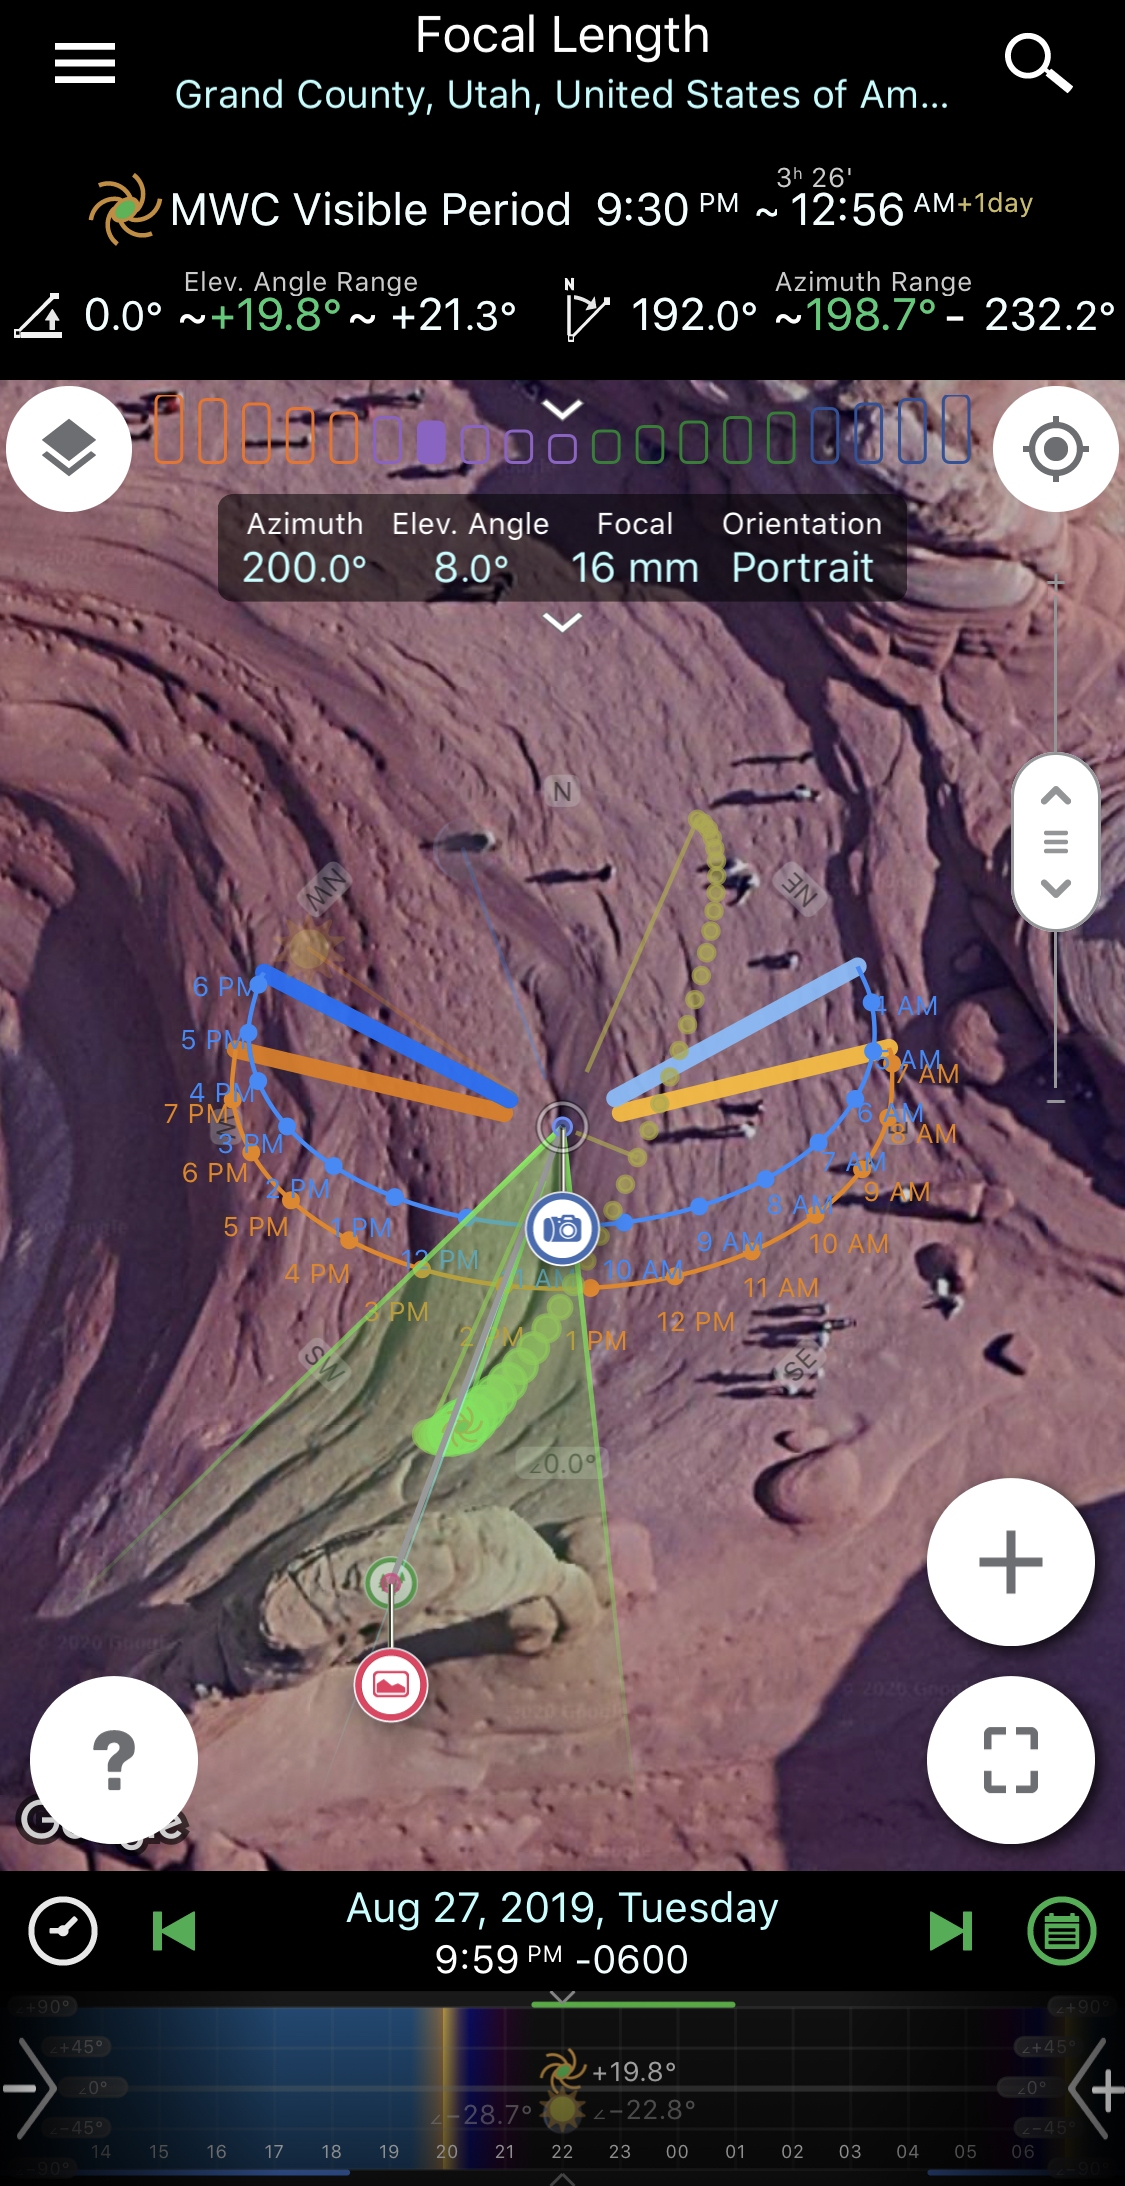
PlanIt app view of the Milky Way plan for my Delicate Arch Milky Way
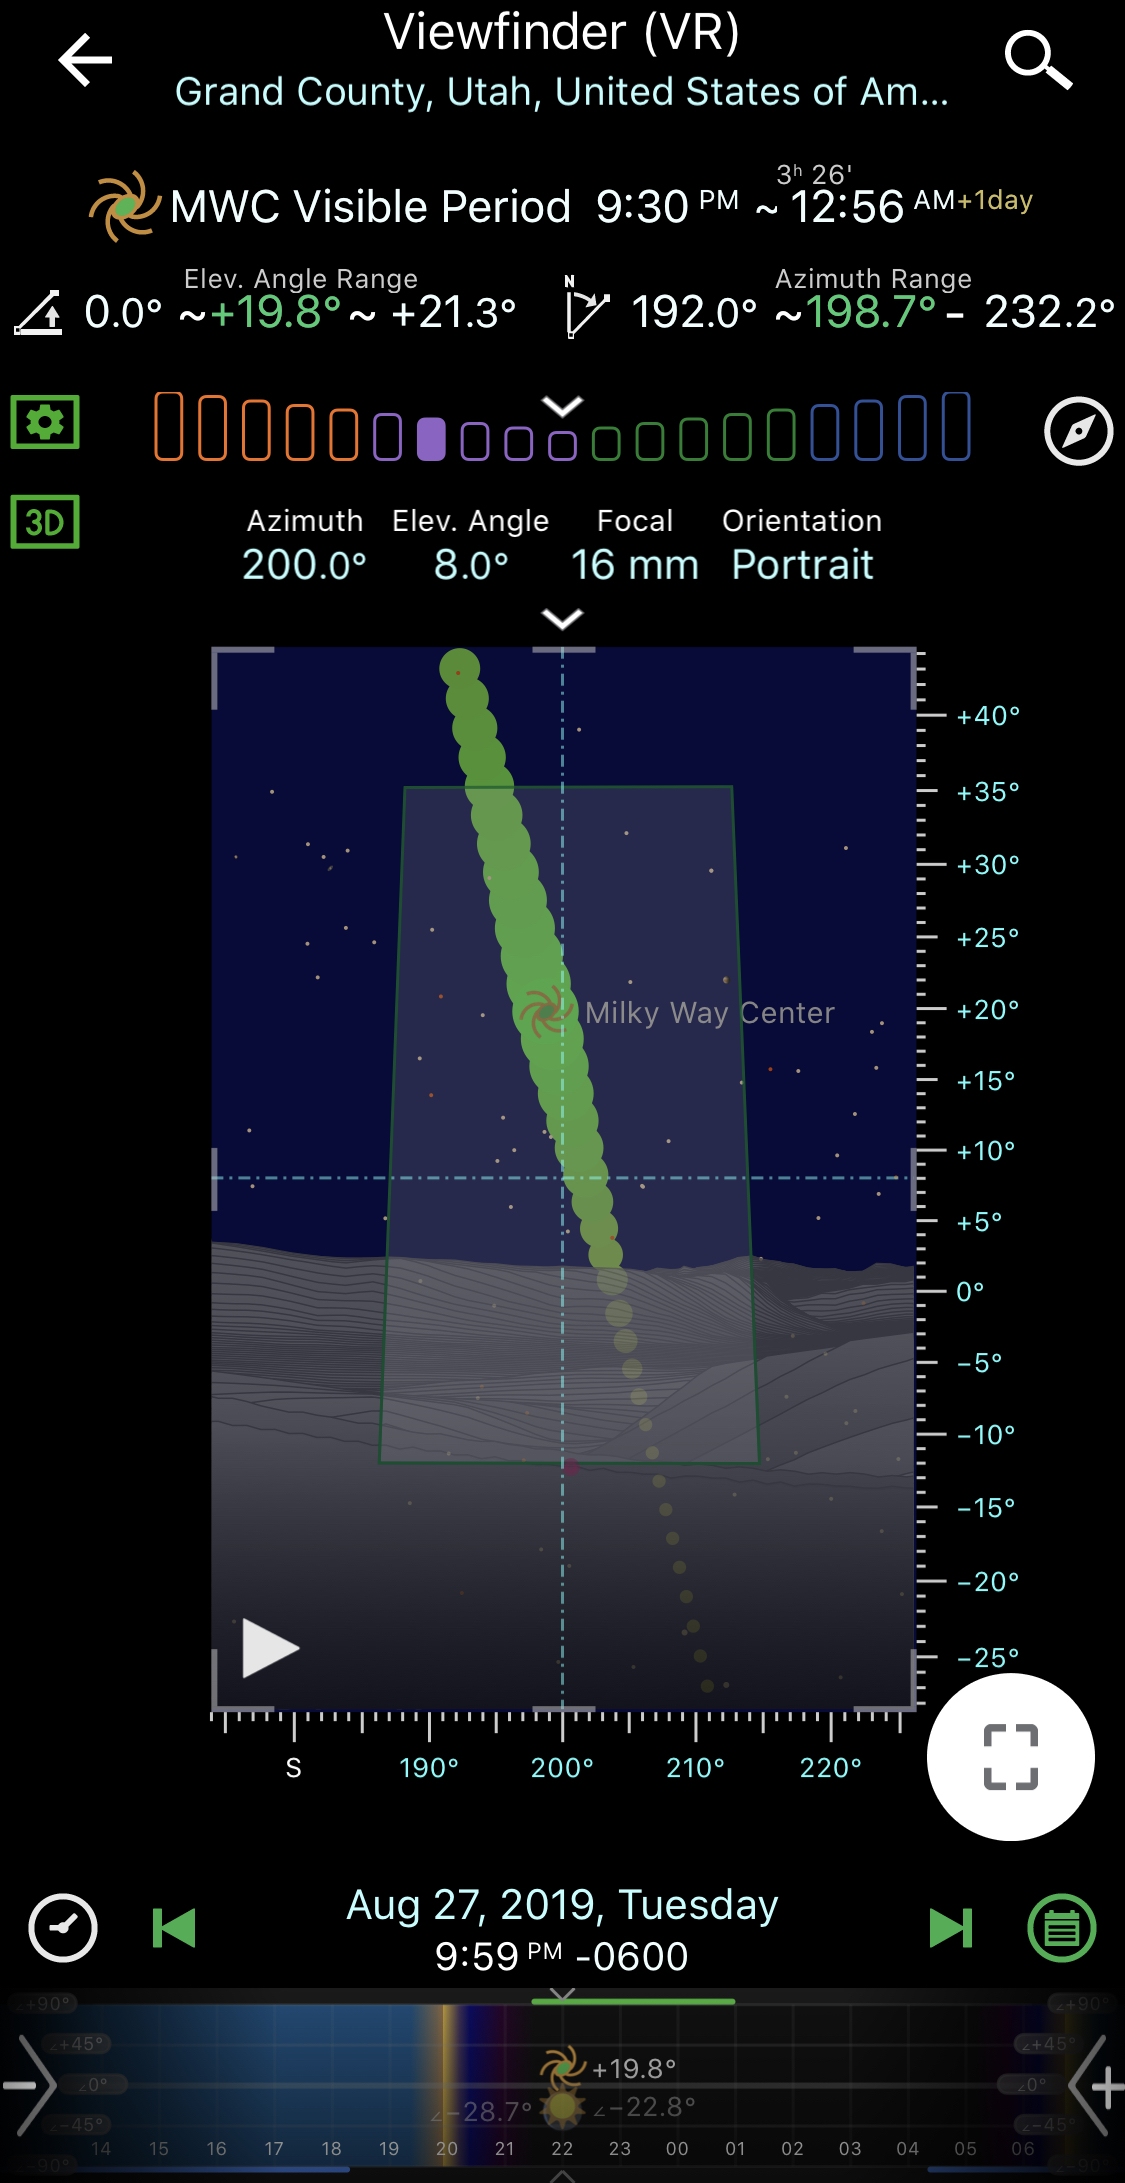
PlanIt app VR view of my Delicate Arch Milky Way
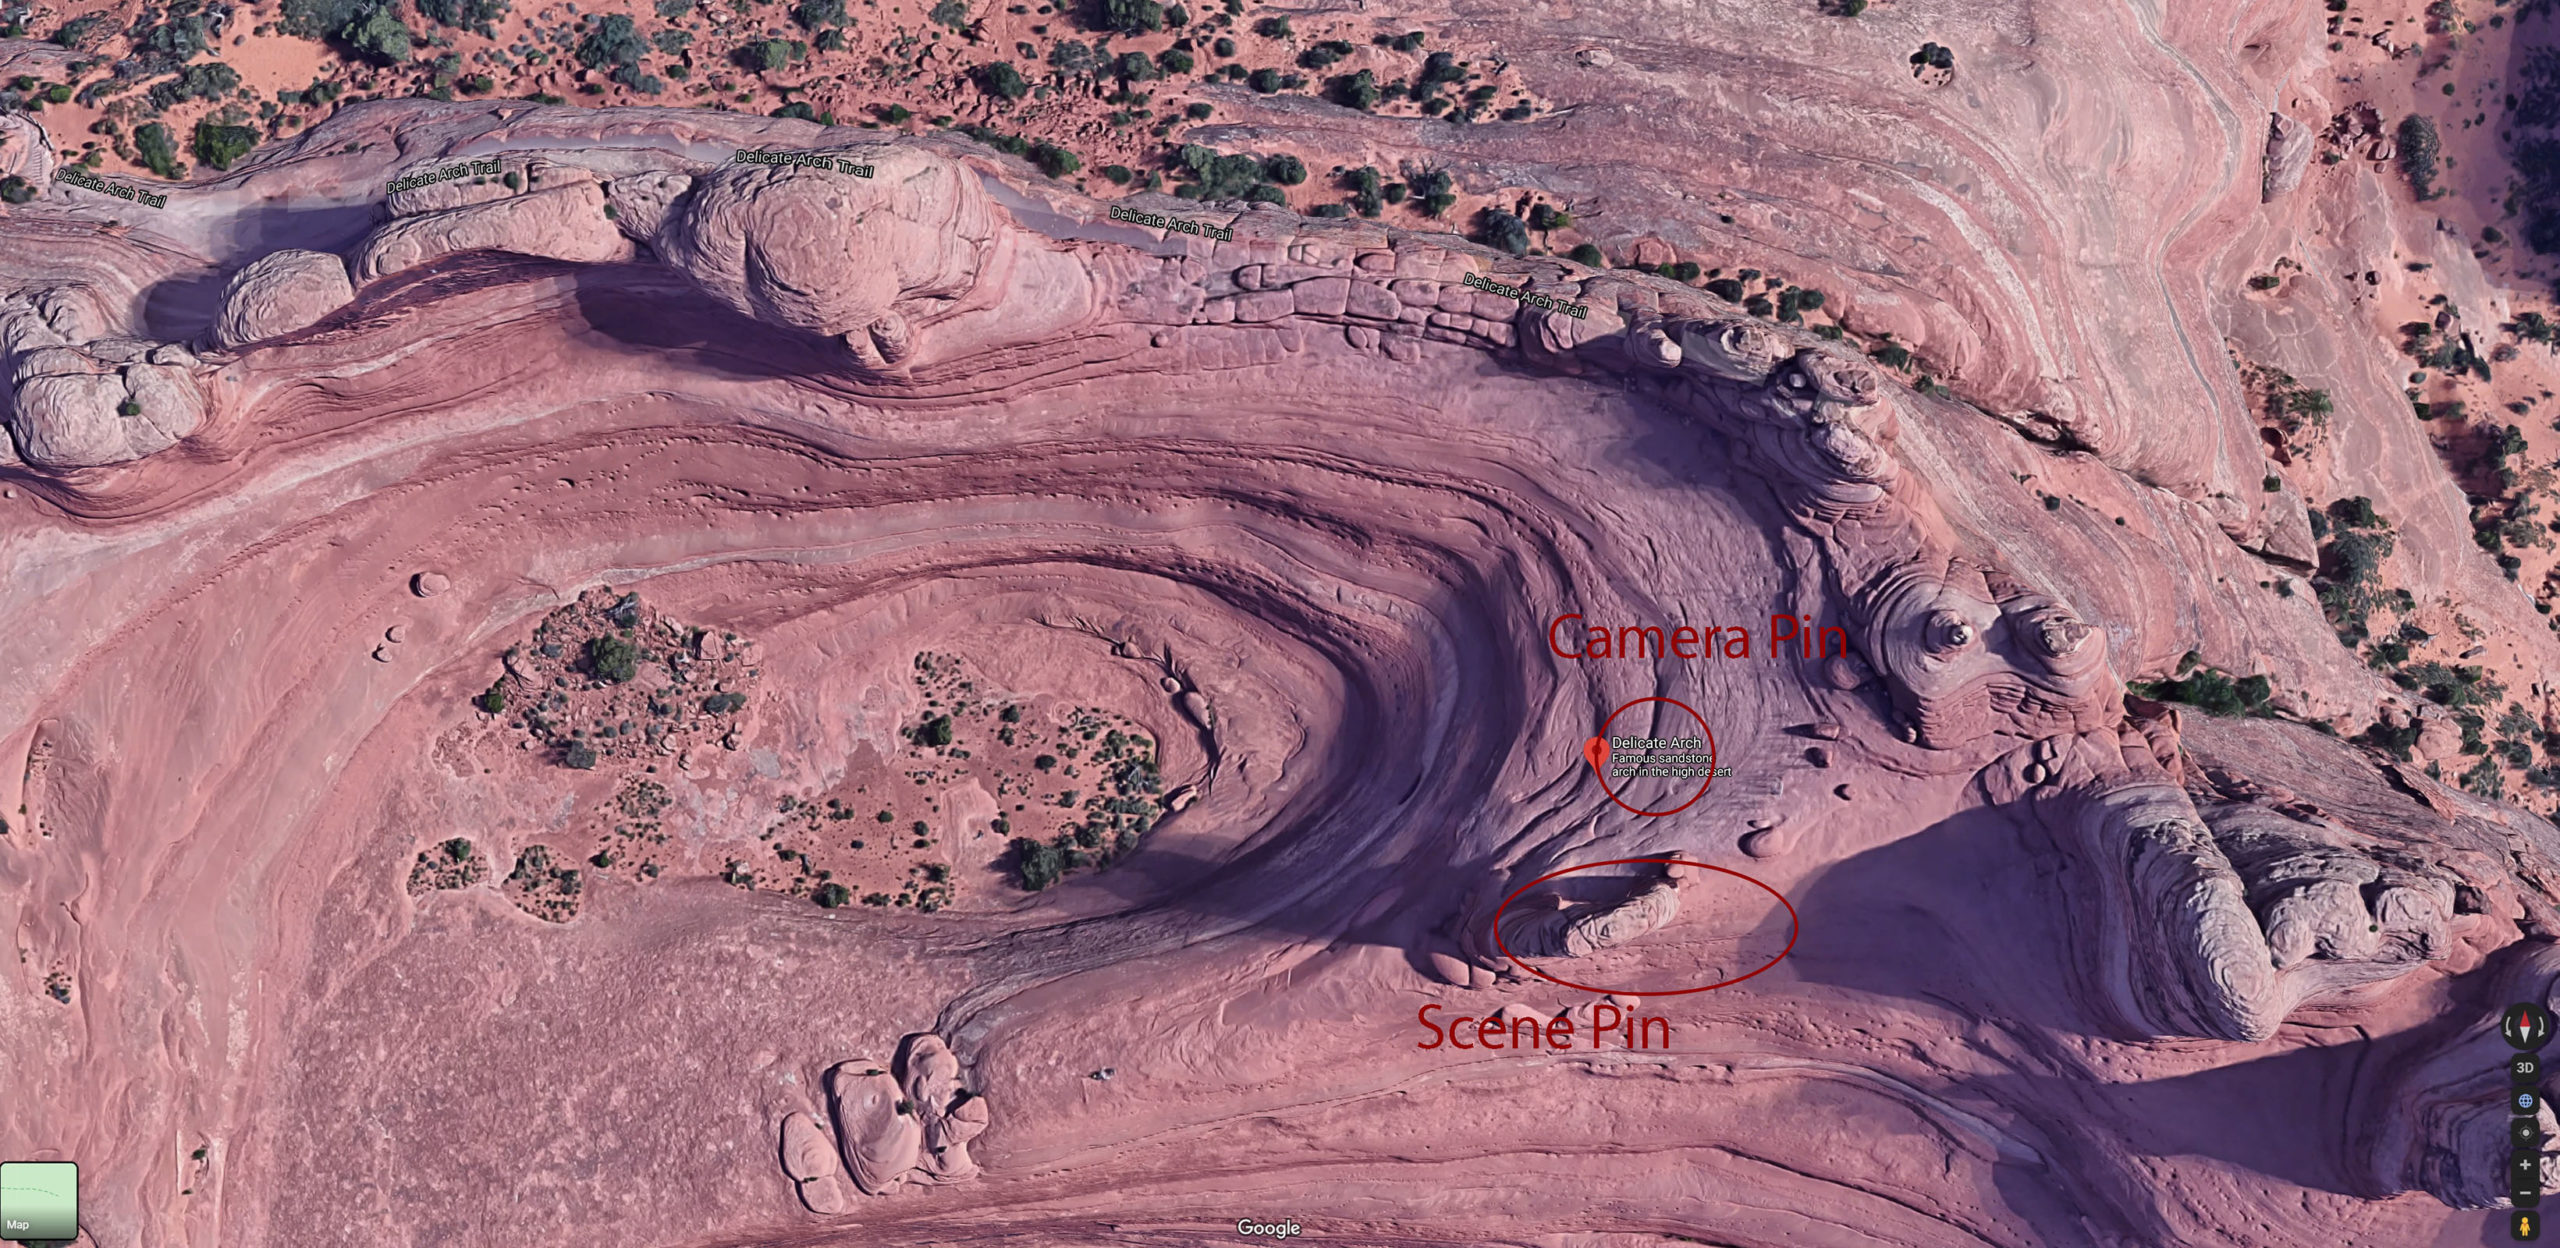
Top down Google maps view of Delicate Arch area
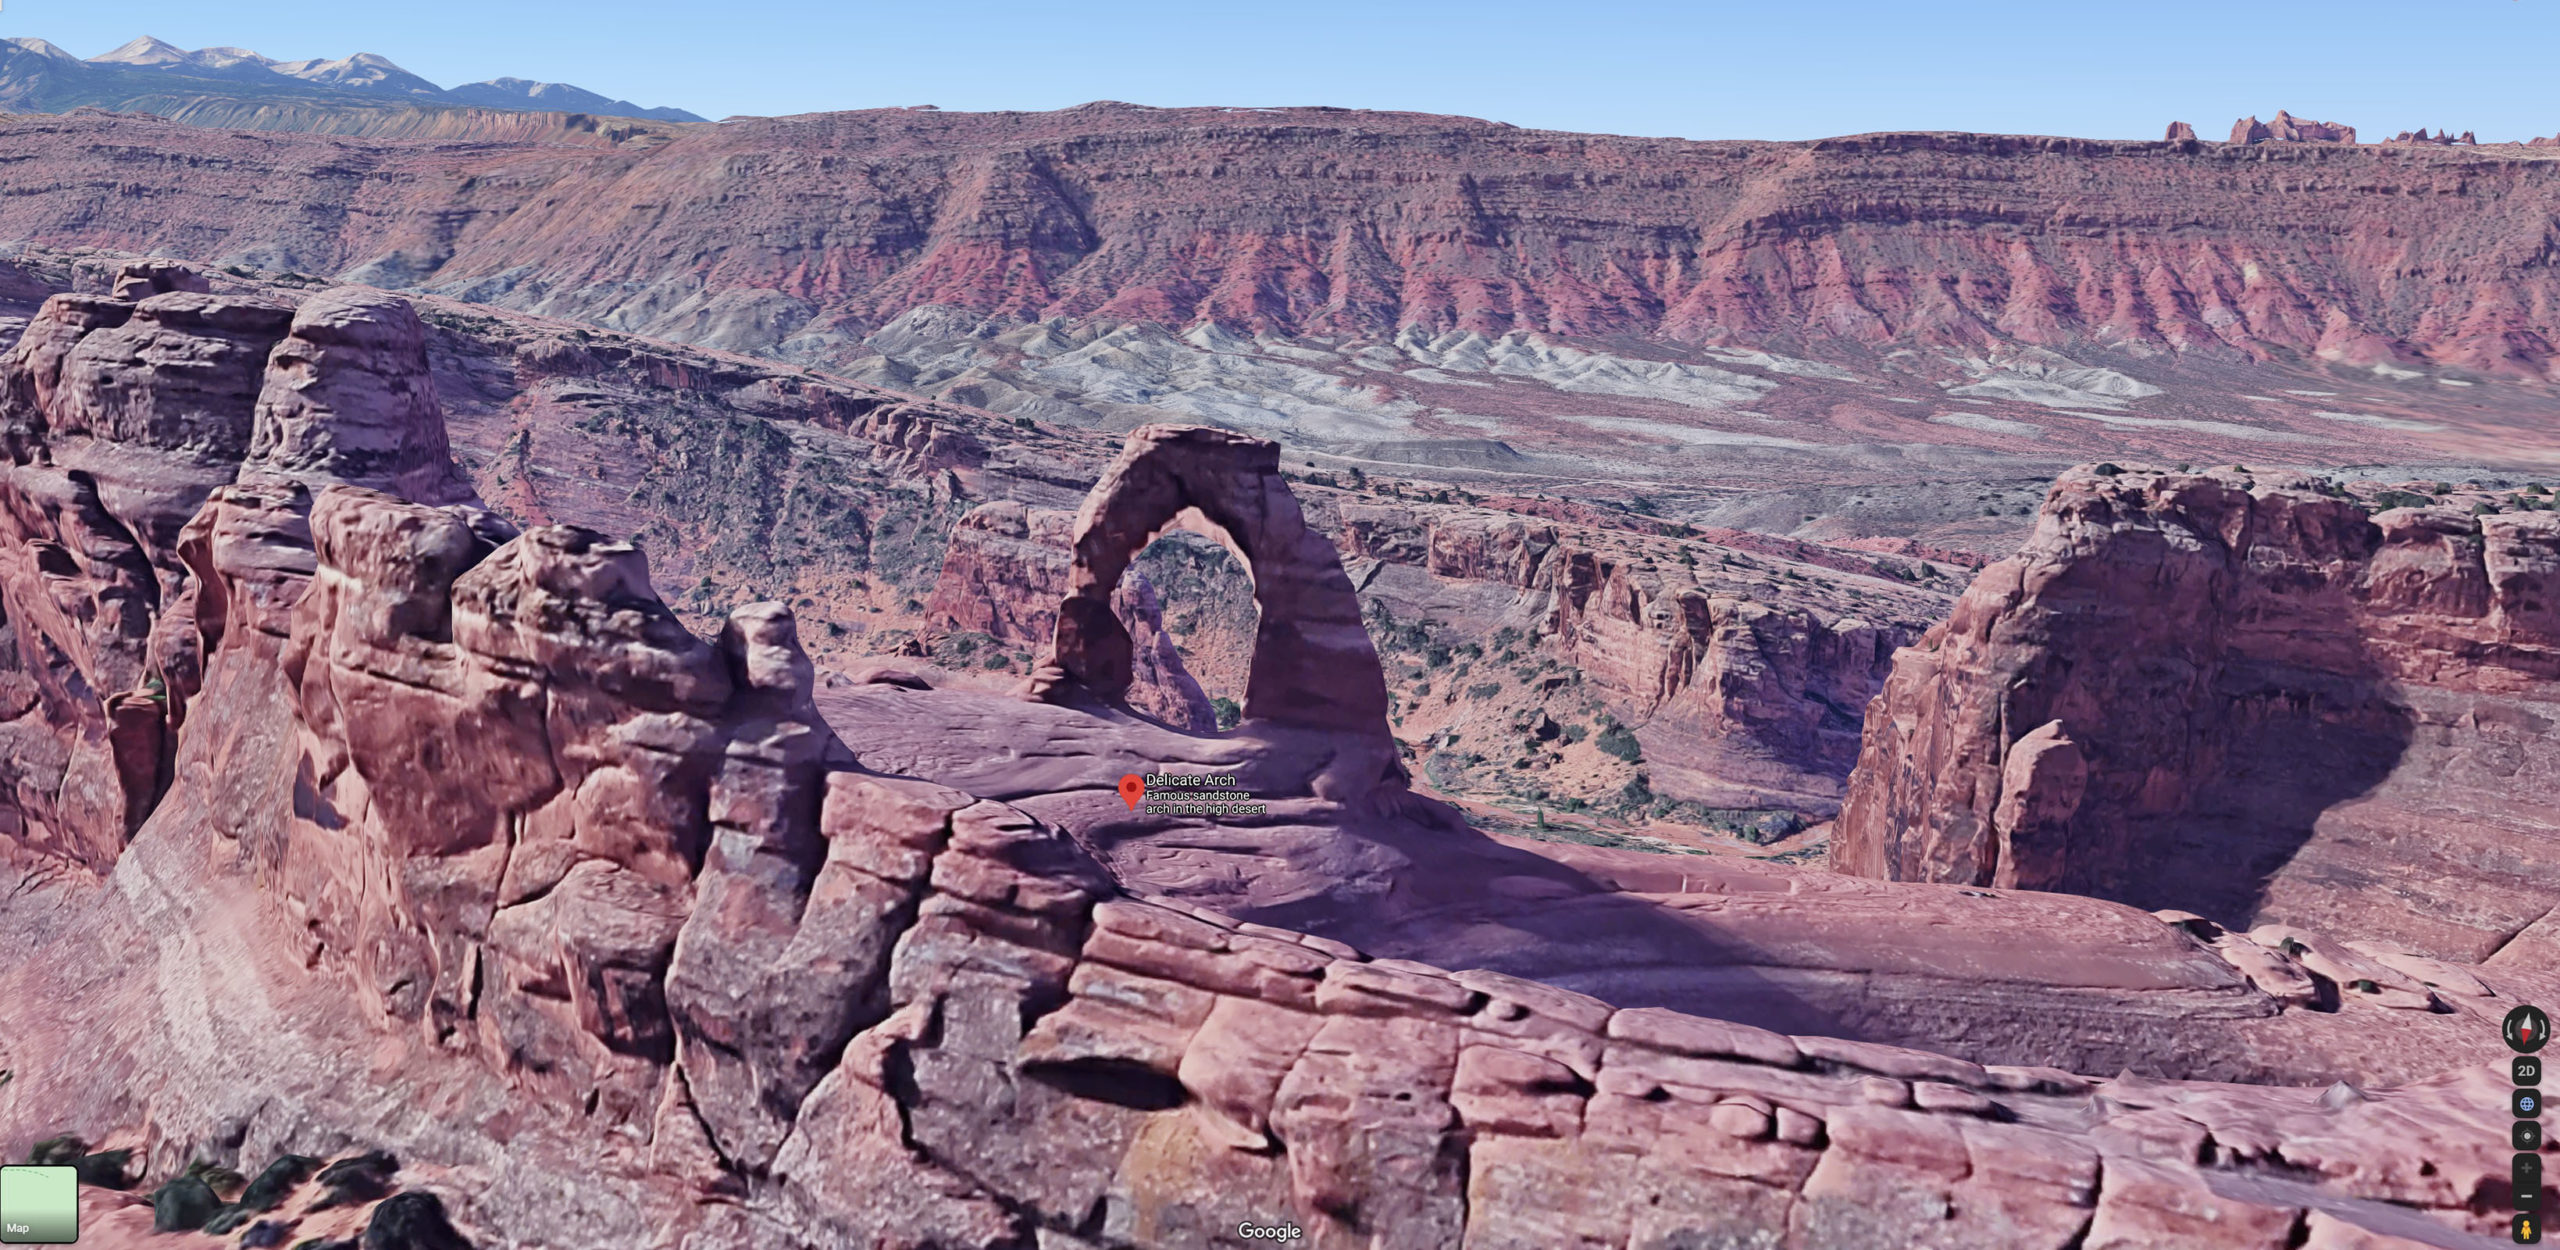
3D Google Maps View of Delicate Arch Area
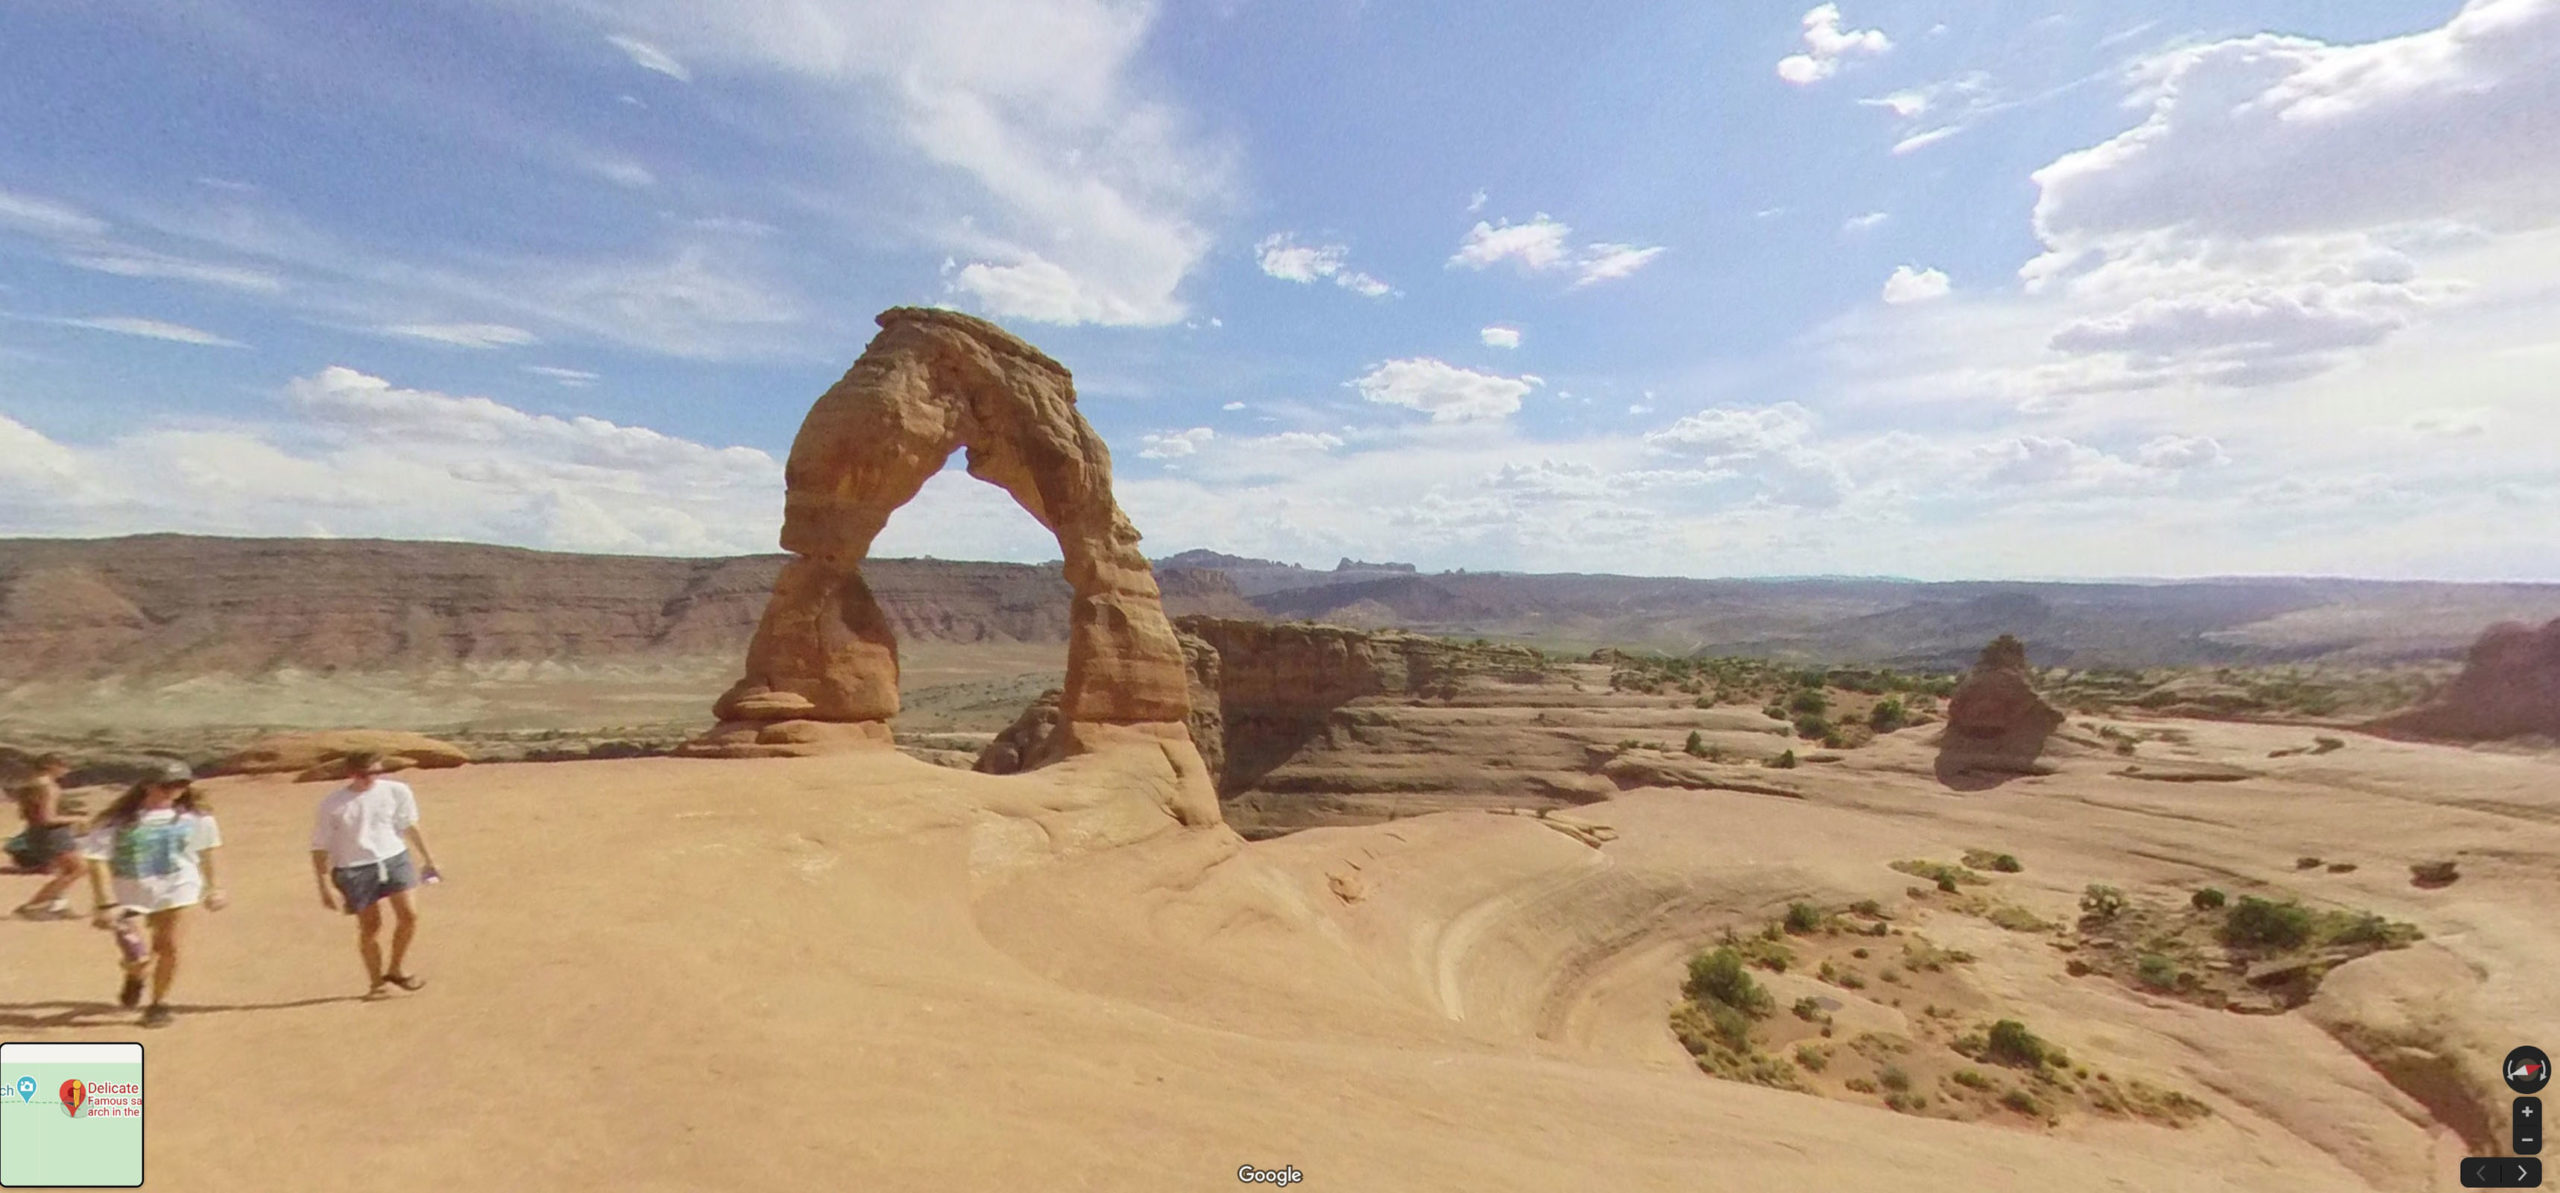
Google Street view of Delicate Arch area.
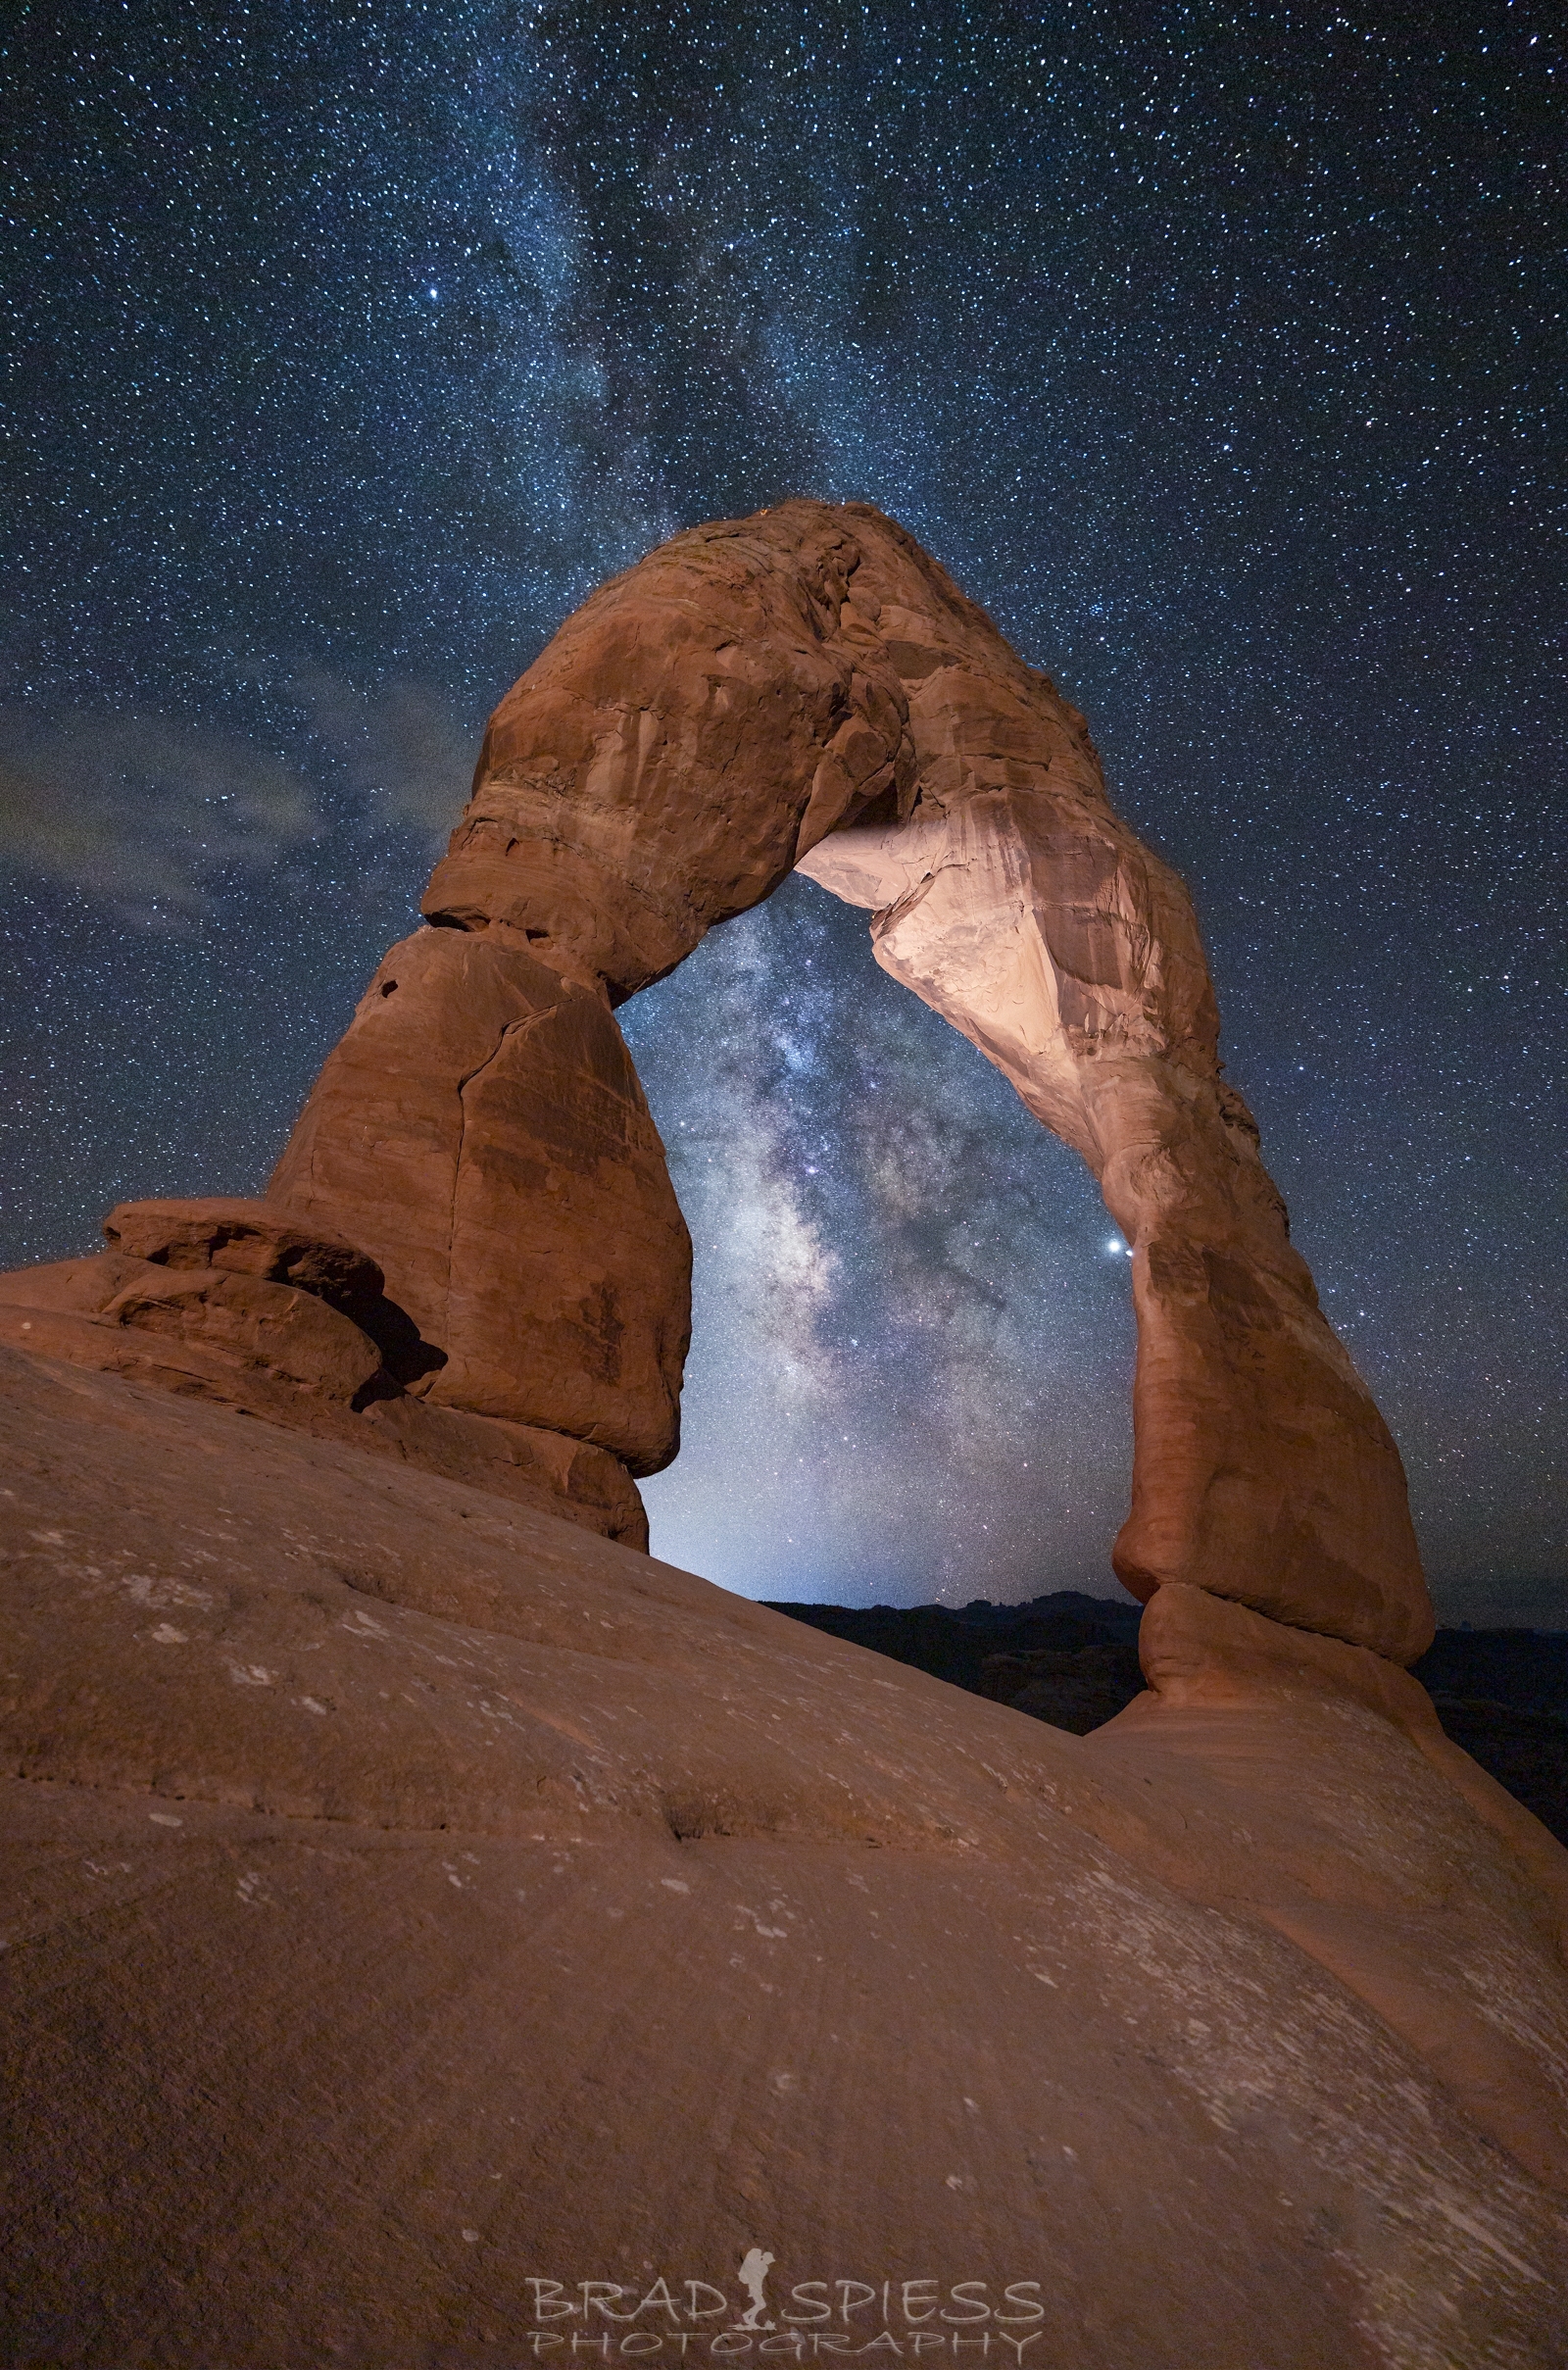
The Milky Way rising up behind Delicate Arch in Arches National Park
I hope this article will help you understand using these planning tools in order to help make your next photographic master piece. Again I am not the “expert” at using these tools, so don’t just take my information as the only way to use these tools. I would suggest looking up instructional videos for whatever tool you decide works best for, there is so much information out there, and I have found that the more you understand what you are using, the more comfortable and confident you will be in using said tool to help you in your photographic endeavors.