My White Pocket Trip
Another Chance to Experience Moab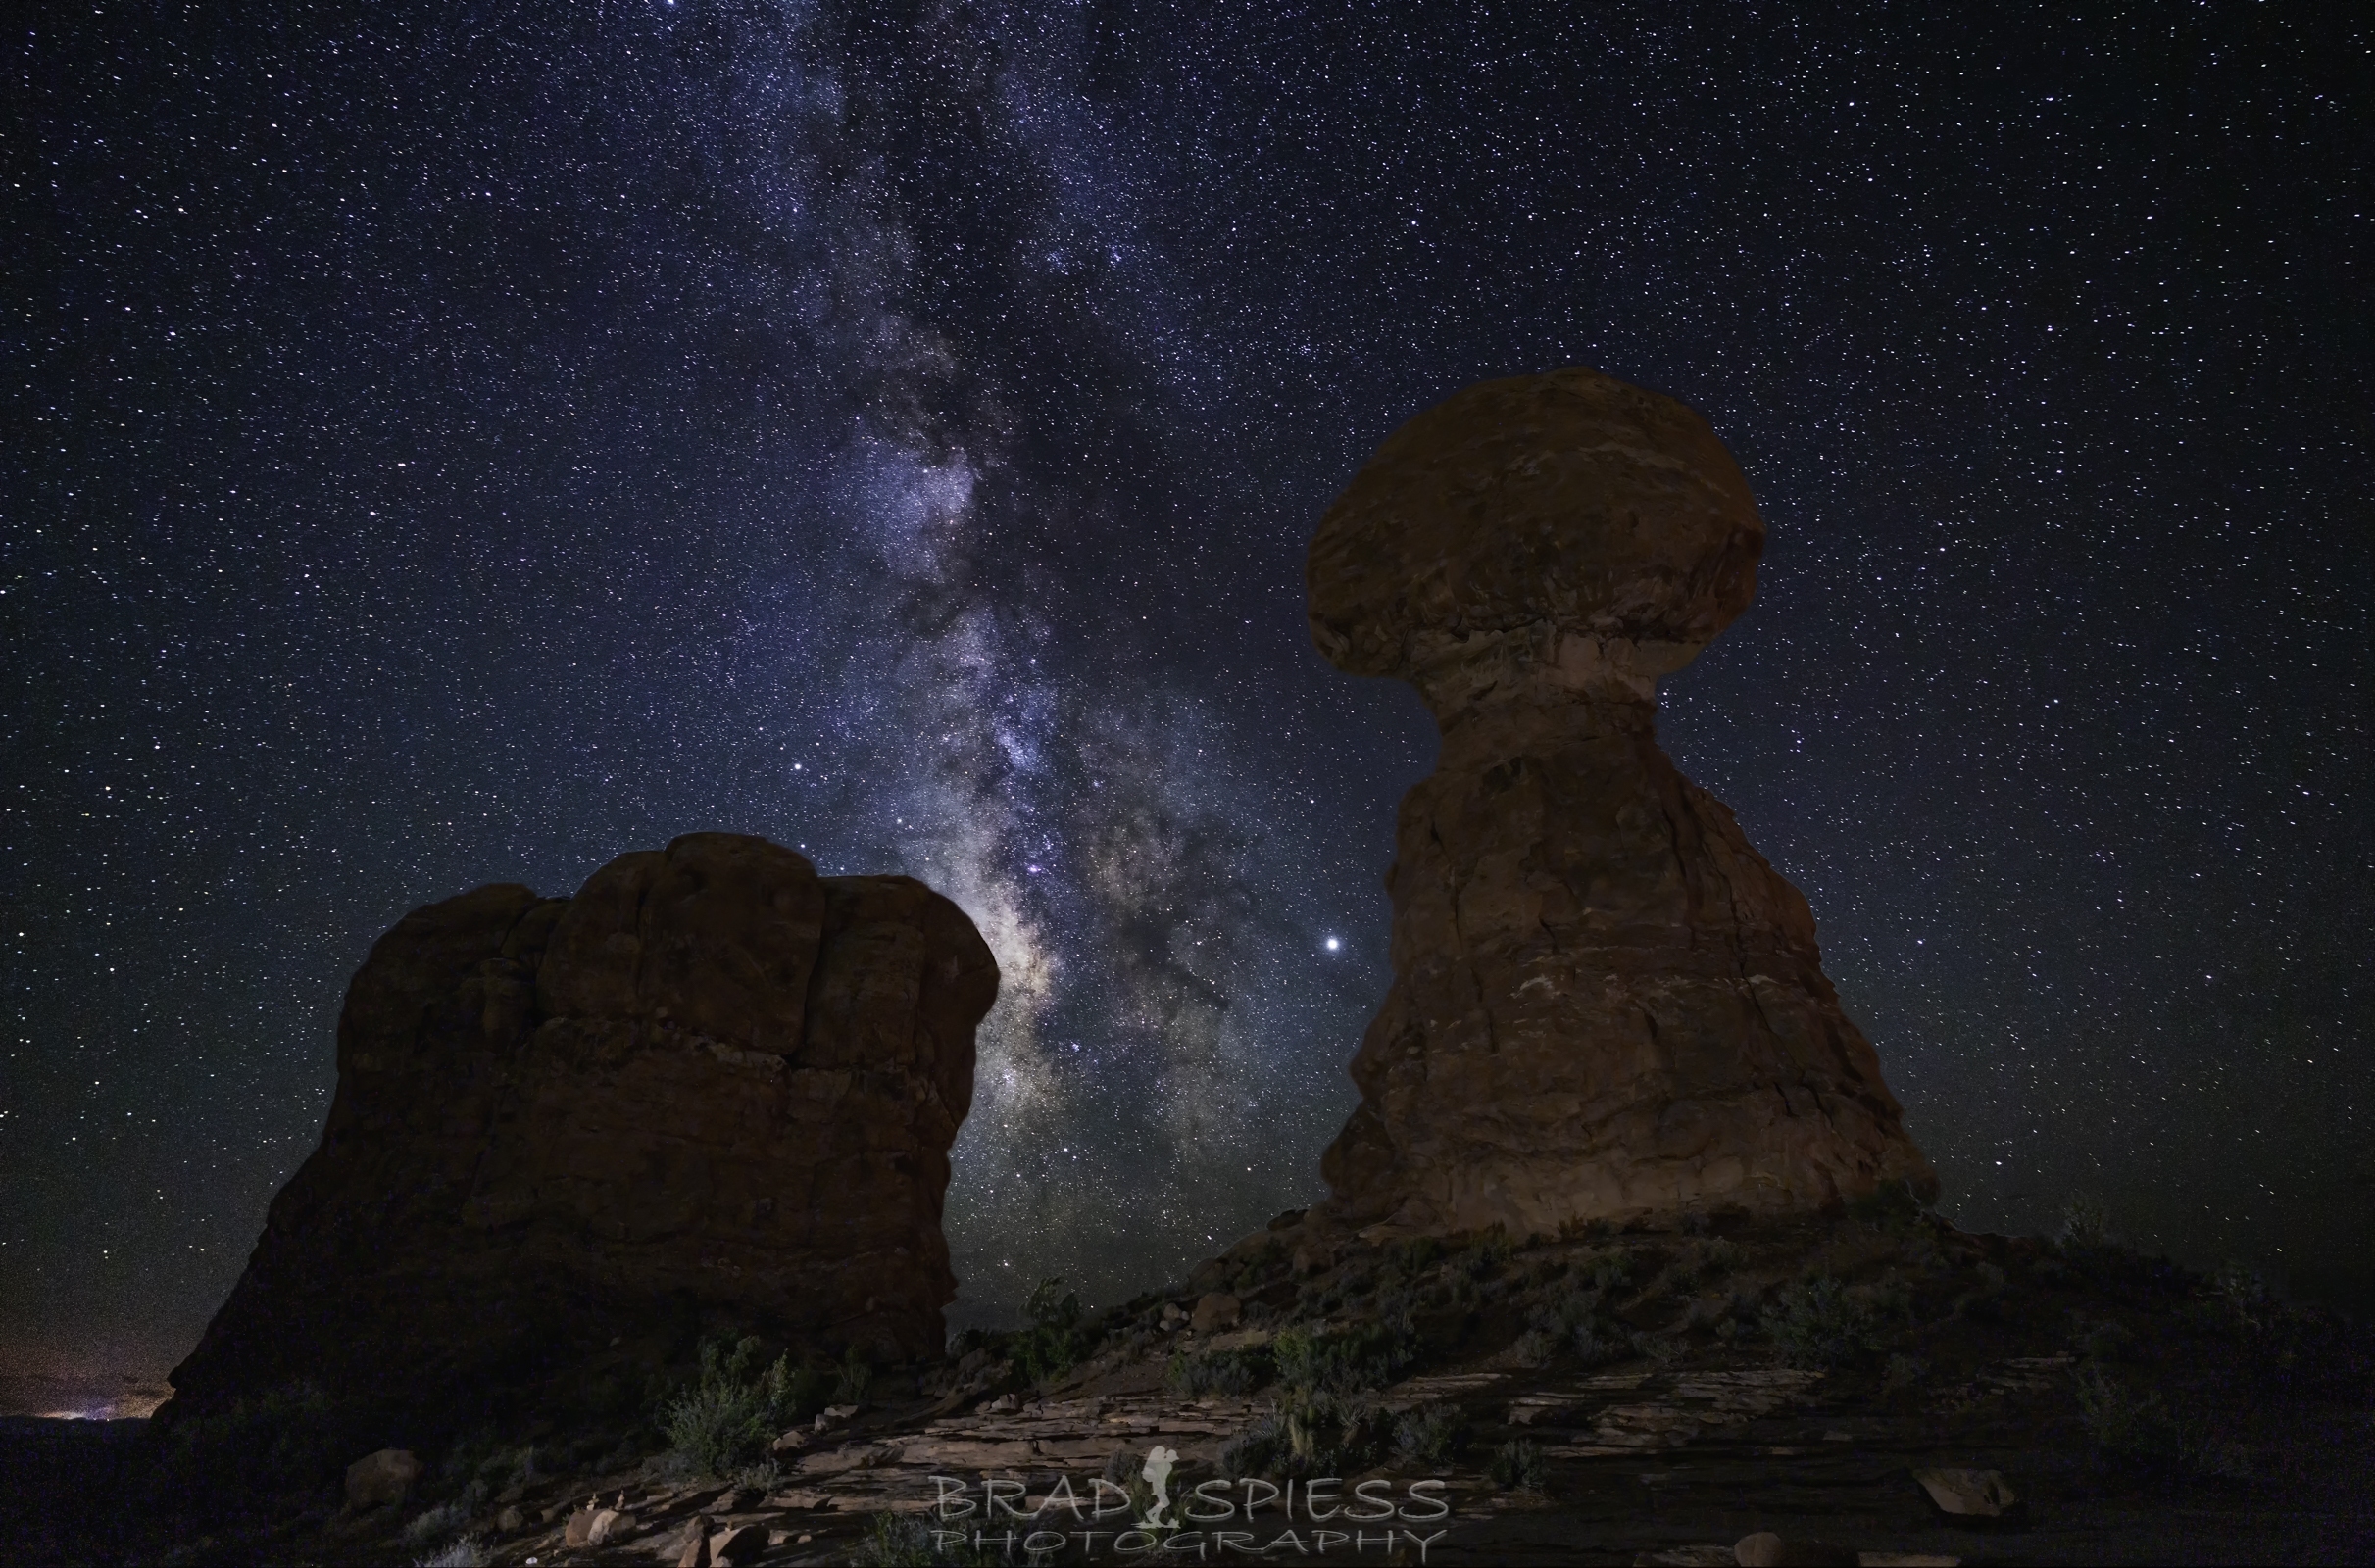
Milky Way rising between the rock columns of Balanced Rock in Moab Utah.
Day 1
It has taken me a while to get to writing this section of my adventure in White Pocket. I was not sure what I could add that already had not been said during my previous trip to this area. The more I thought about this the more I thought about featuring what went well with this trip and what did not , so that it could help you plan your trip if and when you go. With all the craziness of the current Covid 19 crisis ( March 19th, 2020 – as I write this ) I have plenty of time on my hands to catch up with projects, so here goes.
After enjoying the morning shooting in Kanab’s Peekaboo Canyon with the workshop and having lunch at the Best Friends Animal Sanctuary we headed back to Kanab and packed up our car for the 5 hour trip to Moab. The trip was uneventful and we got into town with plenty of time to get checked in to our hotel and get a little dinner before we headed out, since we would be out most of the night shooting the Milky Way with our blessed clear sky’s that night.
While planning out this trip I tried to maximize the opportunities to shoot and this night we planned on shooting the Milky Way as it rose between the rock columns of Balanced Rock and then head over to Double Arch to see what we could do with the Milky Way there. After shooting the Milky Way at Balanced Rock and looking back at the experience my big takeaway would be this. Get there a little early and take advantage of Blue Hour to shoot your foreground shots ( if early in the season when the Milky Way rises early ) or go much latter in the early morning ( earlier in the season when the Milky Way rises late ) when traffic is at a minimum. The night sky was so clear that we got great shots of the Milky Way but while trying to shoot longer exposure shots at lower ISO for our foreground shots the headlights and taillights of passing cars on the near by road just played havoc with the shots. With such a dark sky area it does not take much stray light to start screwing up your shots.
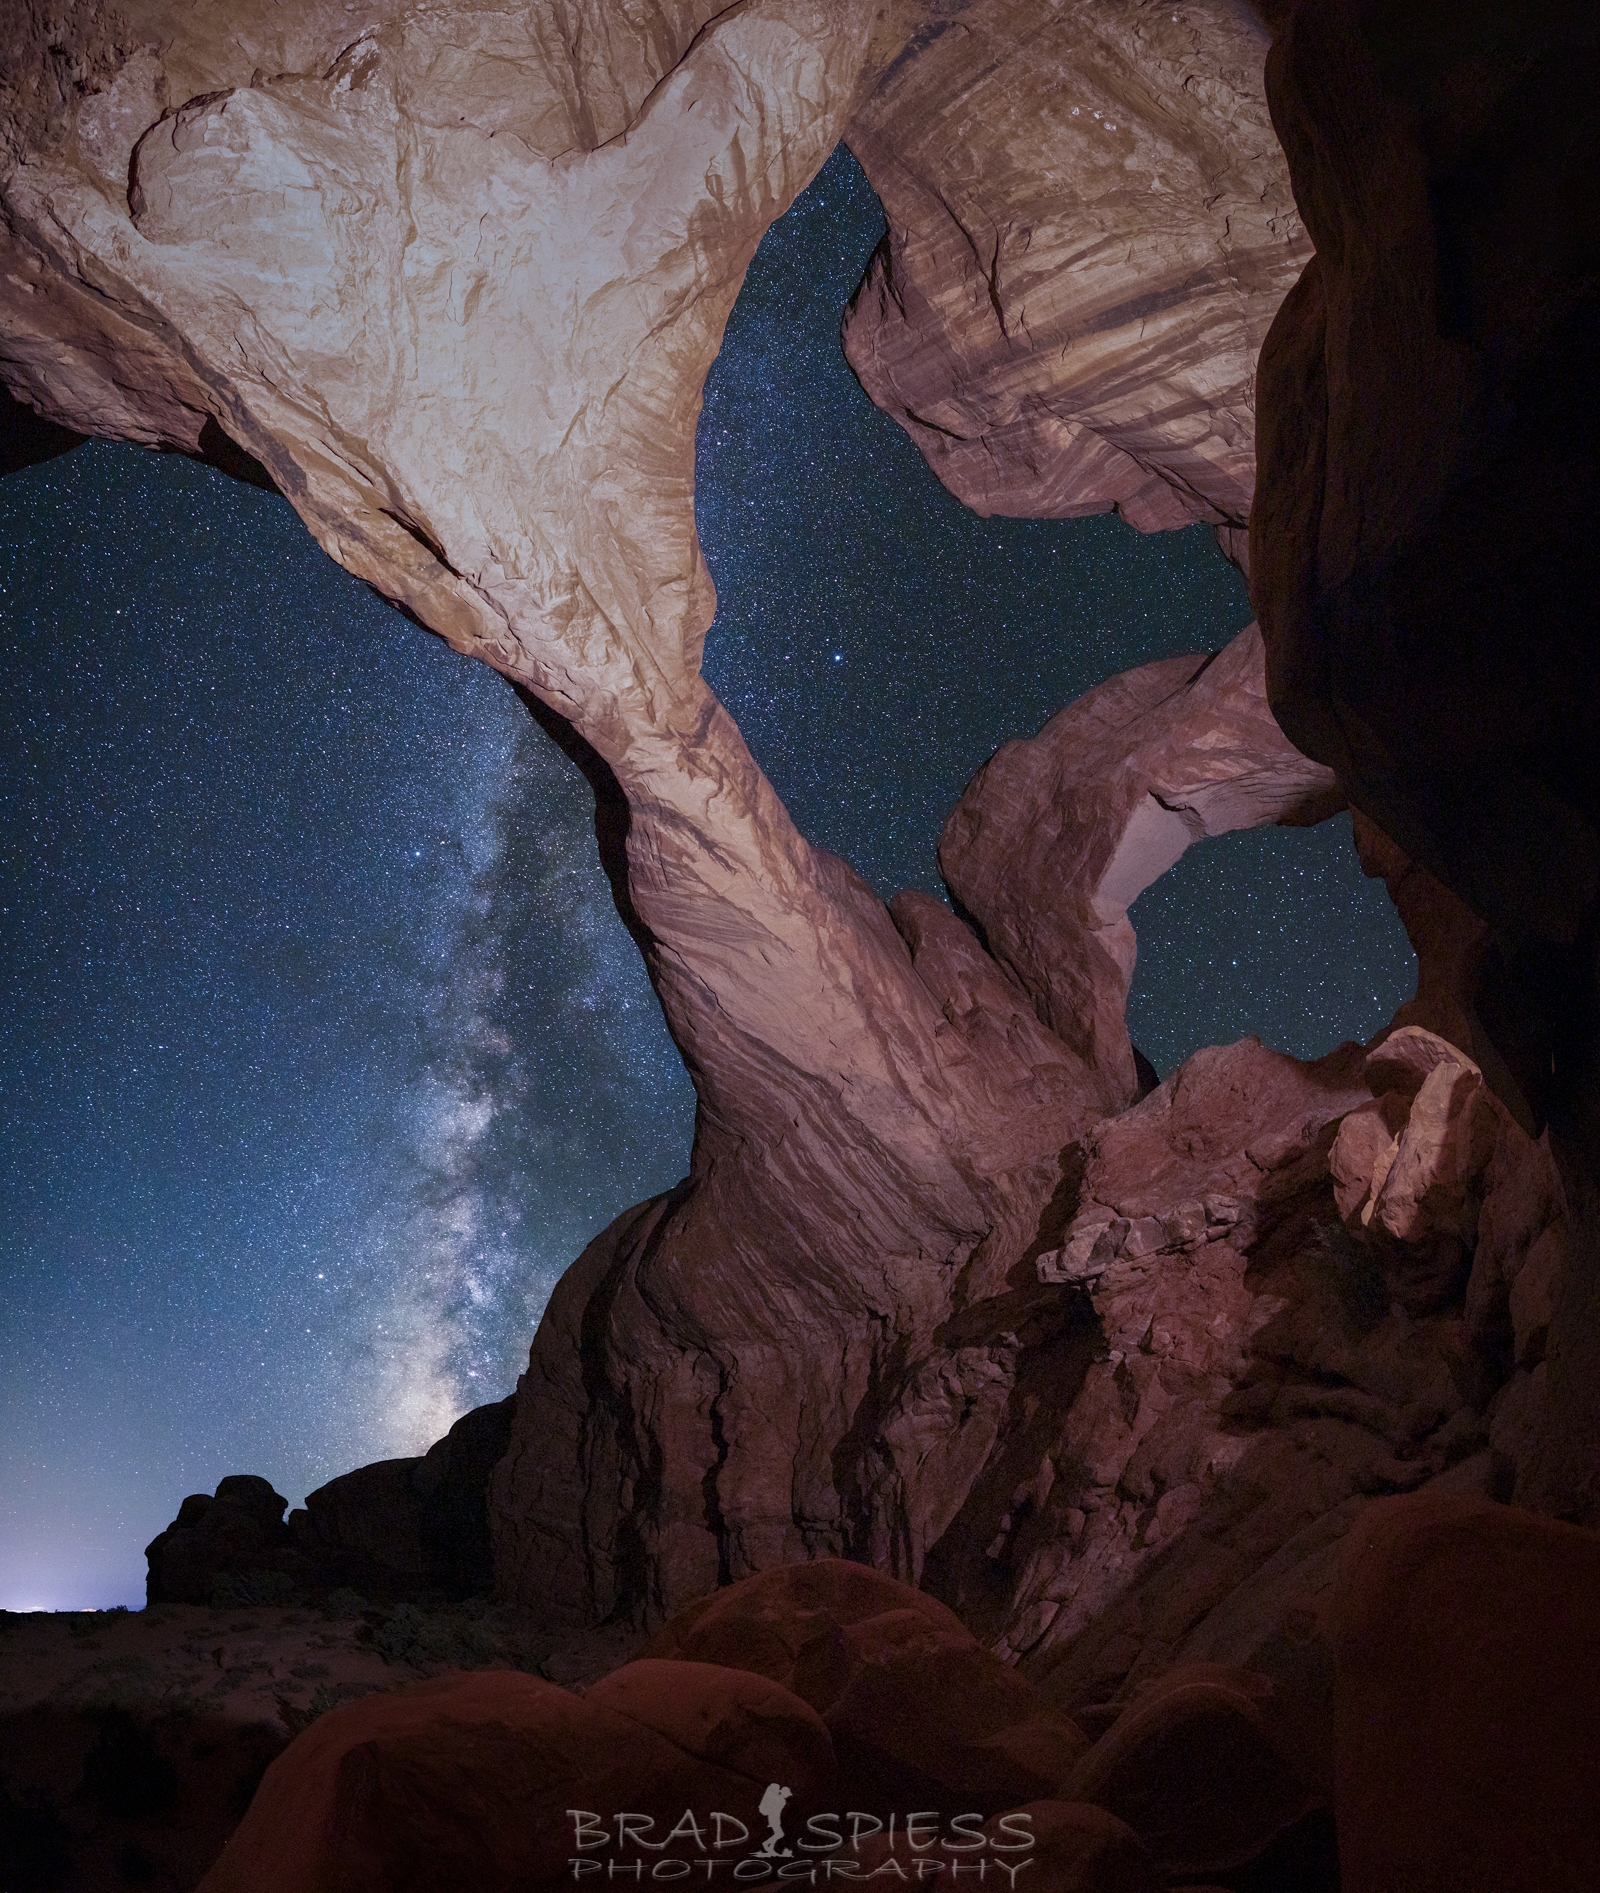
A vertical Panorama of Double Arch and the Milky Way
After shooting at Balanced Rock we headed over towards Double Arch to shoot the Milky Way. When planning out our shots I was using PlanIt for Photographers. The app has a steep learning curve, but as you get used to the app it gives you a lot of useful information, but it is rather hard to plan for shooting a vertical panorama, so it was a little bit of a guessing game as to what we would get. I also only had one light to use for lighting up the foreground, which I would definitely change if I shoot it again in the future. I set up the light behind this large rock formation and pointed it towards the back wall and pointed slightly up and I put a white towel over it to dampen down the harshness of the light. It took several tries scrambling up rocks in the middle of the night trying not to break my neck before we finally got the lighting to look somewhat like what we wanted it to. I had seen other Photographers who had done this type of shot with Double Arch and I liked the look of it so it was high on my list. The above photo is made up of 3 vertical rows of 6 pictures each stitched together. If I had more practice with shooting perfect pano’s I would suggest shooting your panos with the stars first and then going back and shooting longer exposures at lower ISO’s for cleaner a foreground, but I’m not sure if you could do that and get it all to line up correctly.
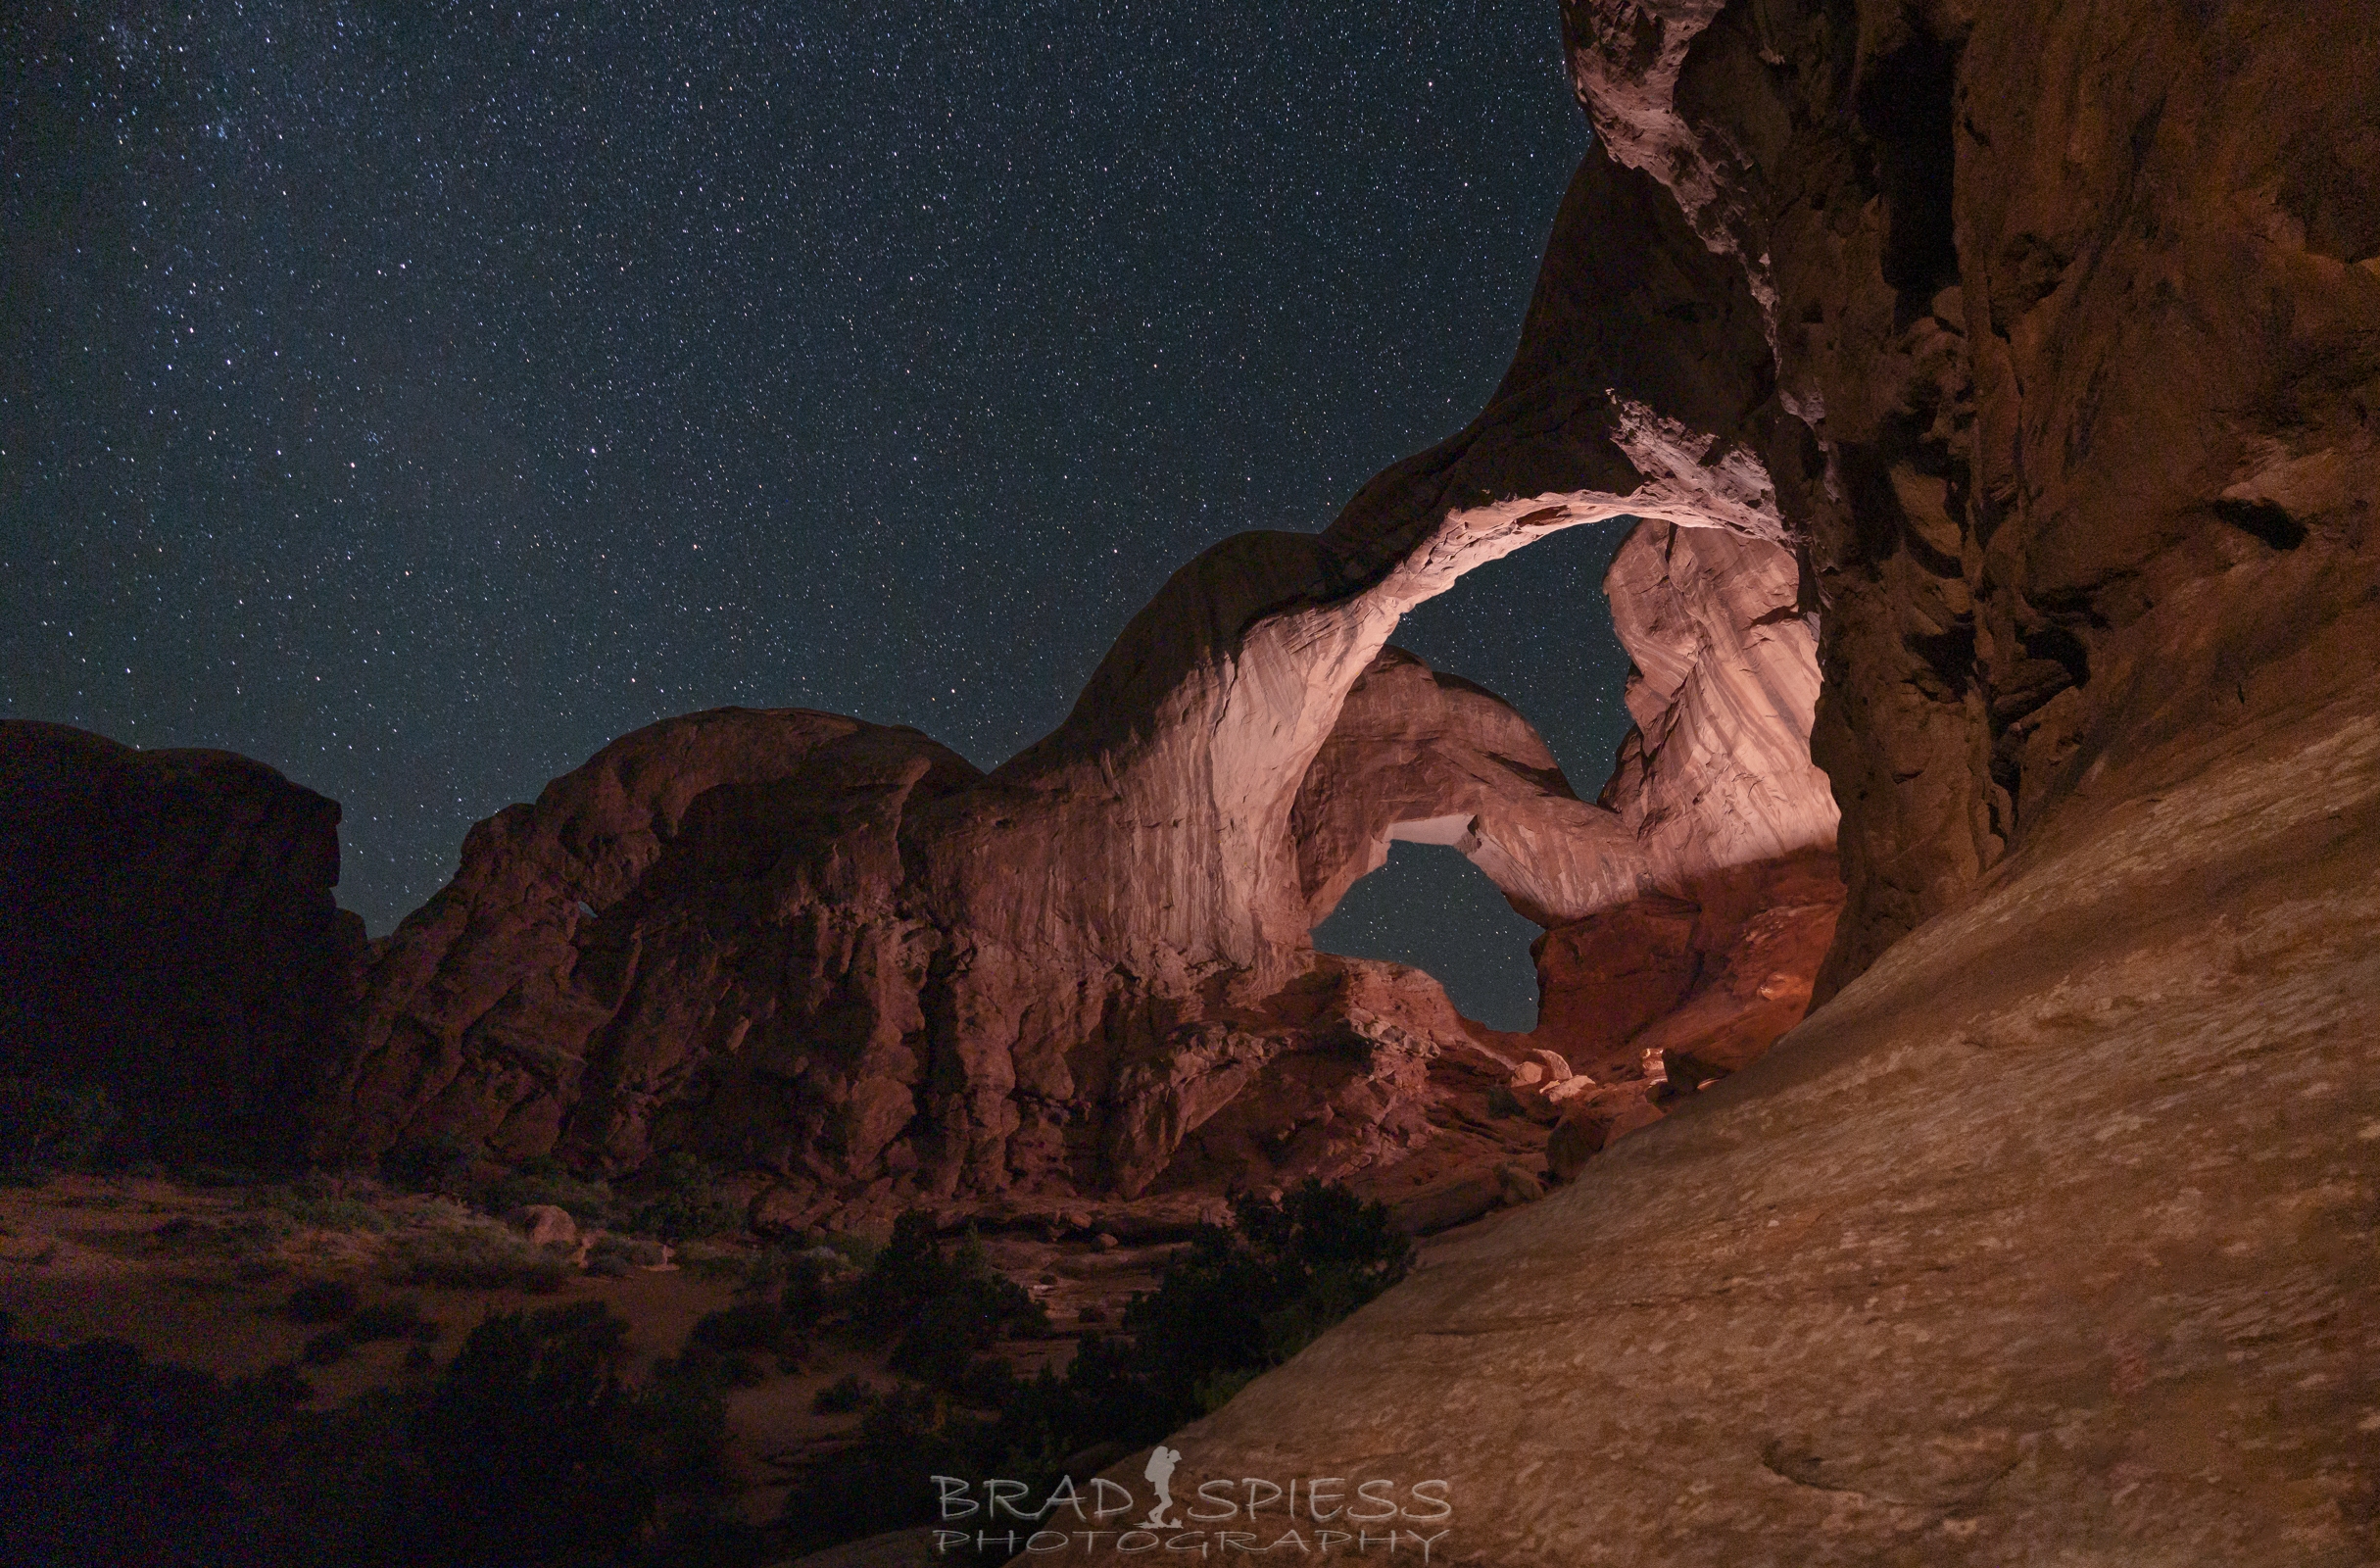
Double Arch at night
After shooting all the pano’s I decided to also shoot Double Arch from a spot that I liked from my previous trip. The above photo is a blend of 3 different images. One taken at a short duration and high ISO for the night sky, one taken at a longer exposure but much lower ISO that makes up more of the mid ground and Arches and then the last one taken at same settings as the first one taken for the sky but with a little light painting from my headlamp or cell phone. My big takeaway from shooting the Double Arch at night is have a lot of patience and take more then one light. It would be much more helpful to have at least one light inside the arch, maybe even two and at least one on the outside lighting up the foreground, but I am no lighting expert so take what I say as just my opinion, likely to change in the future. If you are looking for a great guide to lighting up your scenes with Astrophotography I would check out the ebook from Royce Bair : Milky Way Nightscapes, he does a pretty good job breaking down the different types of lighting and techniques for using them. Have some patience with this landmark because it is going to be difficult to get the whole scene to come out exactly as you would like, I assume it takes many tries with this landmark before you start to figure out the best angles and lighting for night shots.
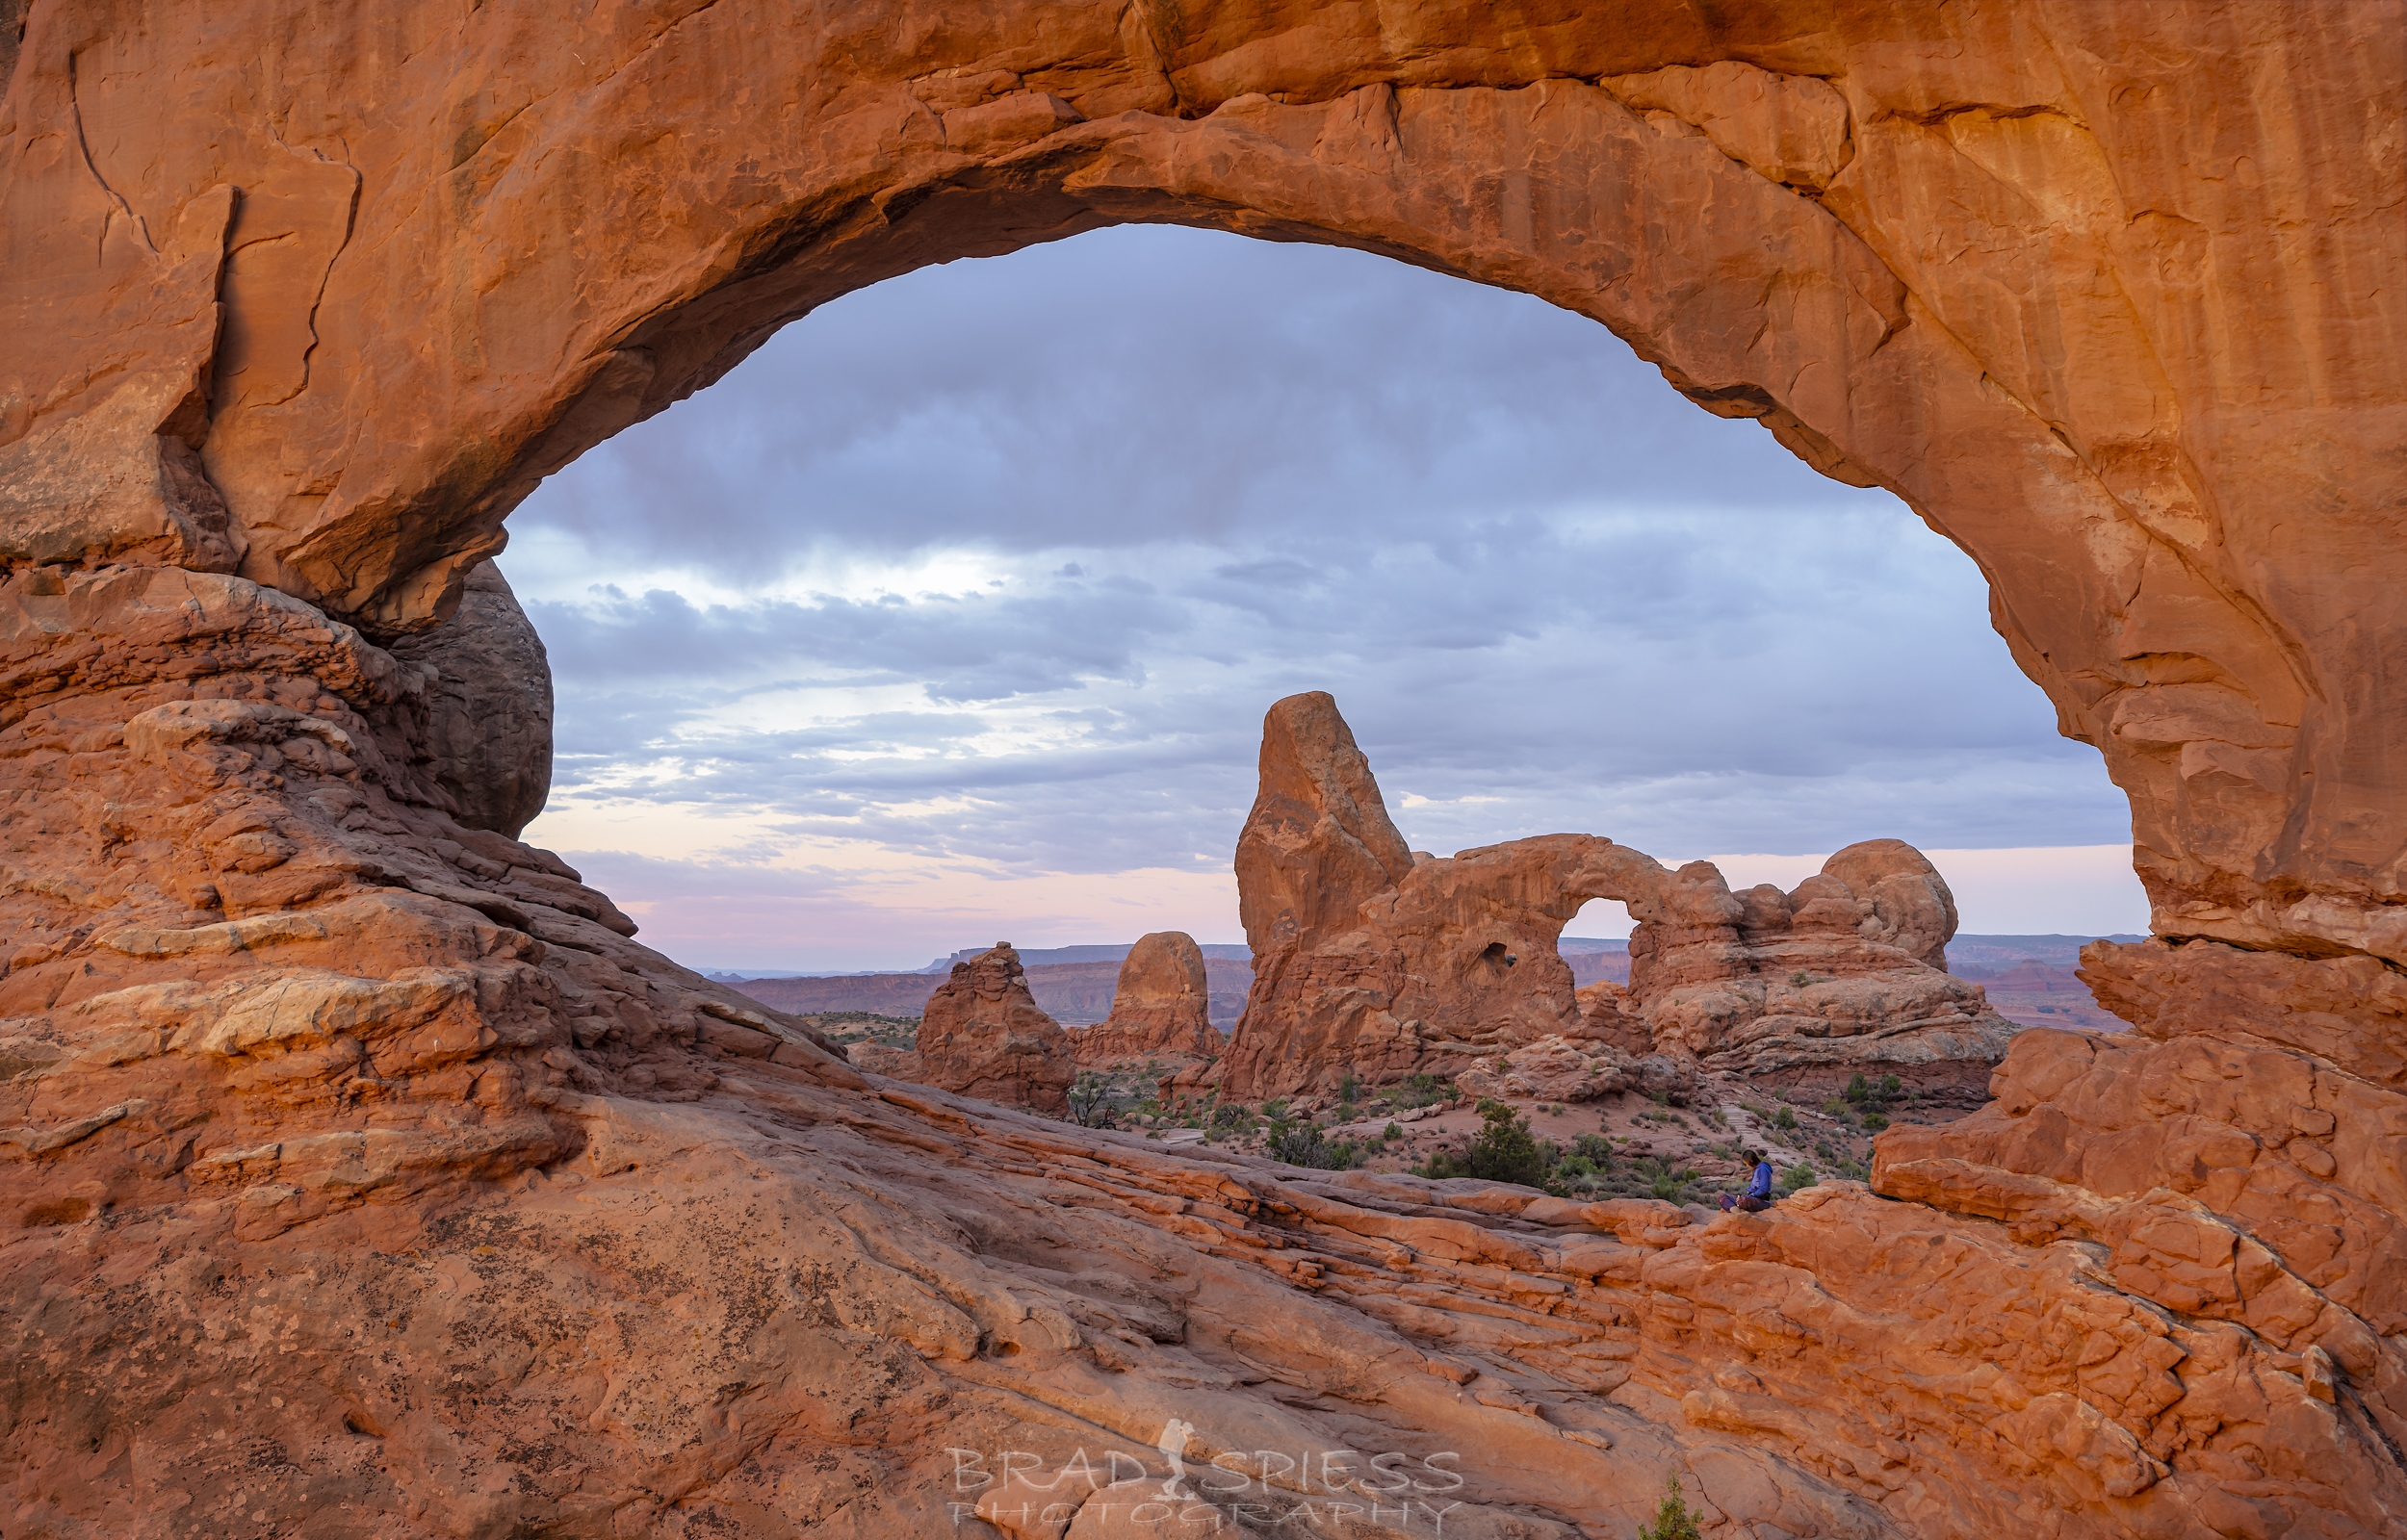
Sunrise at the North Window
Day 2
After shooting at Balanced Rock and Double Arch we caught a few winks of sleep before getting up and hightailing it up to shoot sunrise at the North Window Arch. There is nothing really difficult about shooting at this location, but I would suggest that you get there as early as possible. The spot where you will be shooting the window is a very small area with only enough space for about 5 – 6 people to set up and get the best shots. I thought we got there super early but someone had already beat us to the best spot. I will also tell you that you will probably have to blend several shots together to get the best lighting and do some Photoshop work to get all the people who come up and hang out in the window out of your frame. I shot the above image at 35 mm, leaving the 1 women in the frame to give it some scale and I liked the pose she was in, this would be a good spot for someone in your shot doing yoga or something like it. Another shot was blended in to give a little more color to the walls, I found that getting the full sunlight on this wall is almost to much, turning these walls a bright orange red, hard to control and not make look fake with the full light on the rocks. Its also going to be difficult to get your back ground looking through the arch without harsh shadows if you wait to long.
After shooting sunrise we headed back to town to get some breakfast, do some post processing, and take a nap before we headed out for our sunset and Milky Way shoot at Delicate Arch.
I don’t find Delicate Arch to be a terribly hard hike, but you are going to have to hike up to the spot. You are probably going to want to shoot sunset, blue hour, and Milky Way, so bring an appropriate amount of water and food. Depending on when you are visiting for Milky Way season you may be there for a while as you wait for the Milky Way to line up. At this time ( August ) the Milky Way started to line up with our shot around 8:40 pm, and we finished shooting around 10 pm, so it was nice not having to be there all night.
Delicate Arch is a very popular landmark in the Arches National Park so expect to be sharing the area with a lot of other people. We got there with plenty of time to spare and I found it interesting that the crowd behavior dictated where everyone sat to watch the sunset. The year previous a lot of people were sat close to the arch to watch the sunset and that is where we set up as well. This year everyone seemed to be hanging back towards the beginning of the bowl when you come off of trail. If anyone ventured out to get a selfie under the arch they seemed to get a little harassment from the crowd, these people didn’t really bother me, the light was to harsh at this point anyways. Eventually most everyone decided to start leaving in order to make it back to their cars before the last of the light and at this point I moved over towards the arch for a different shot but still behind some rocks so as not to be in anyone else’s shot if they were still shooting.
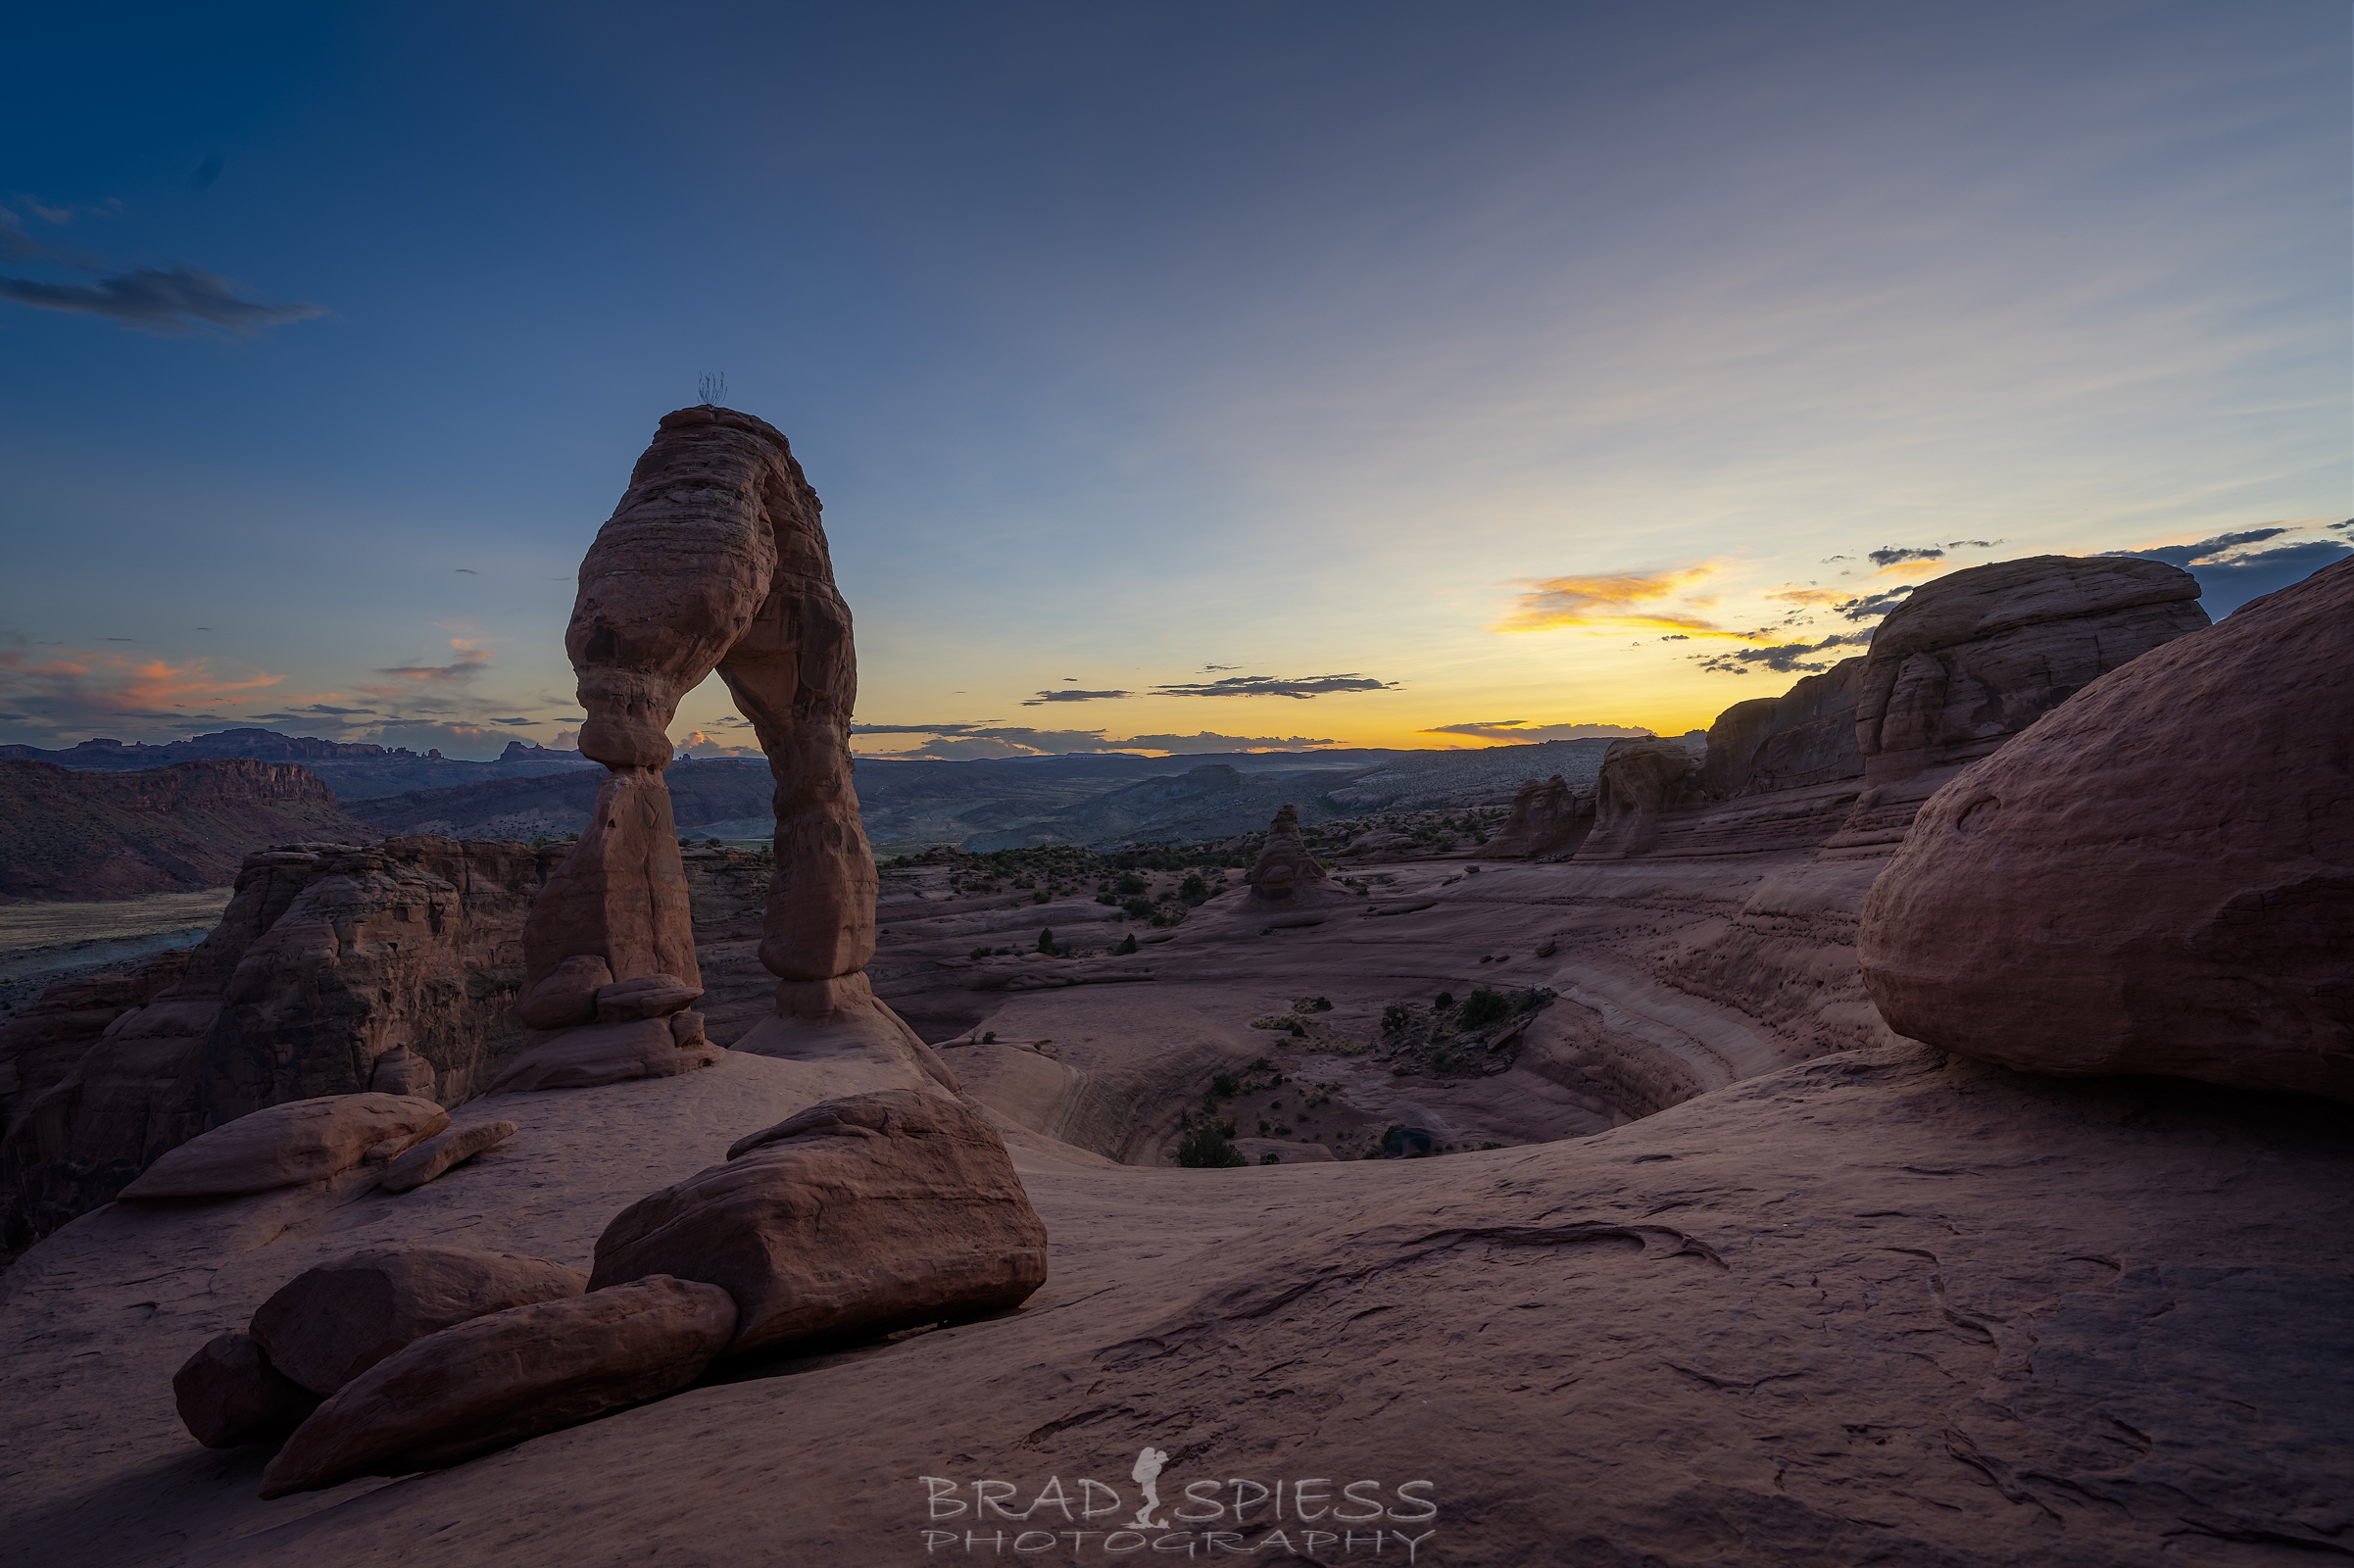
Sunset at the Delicate Arch in Arches National Park
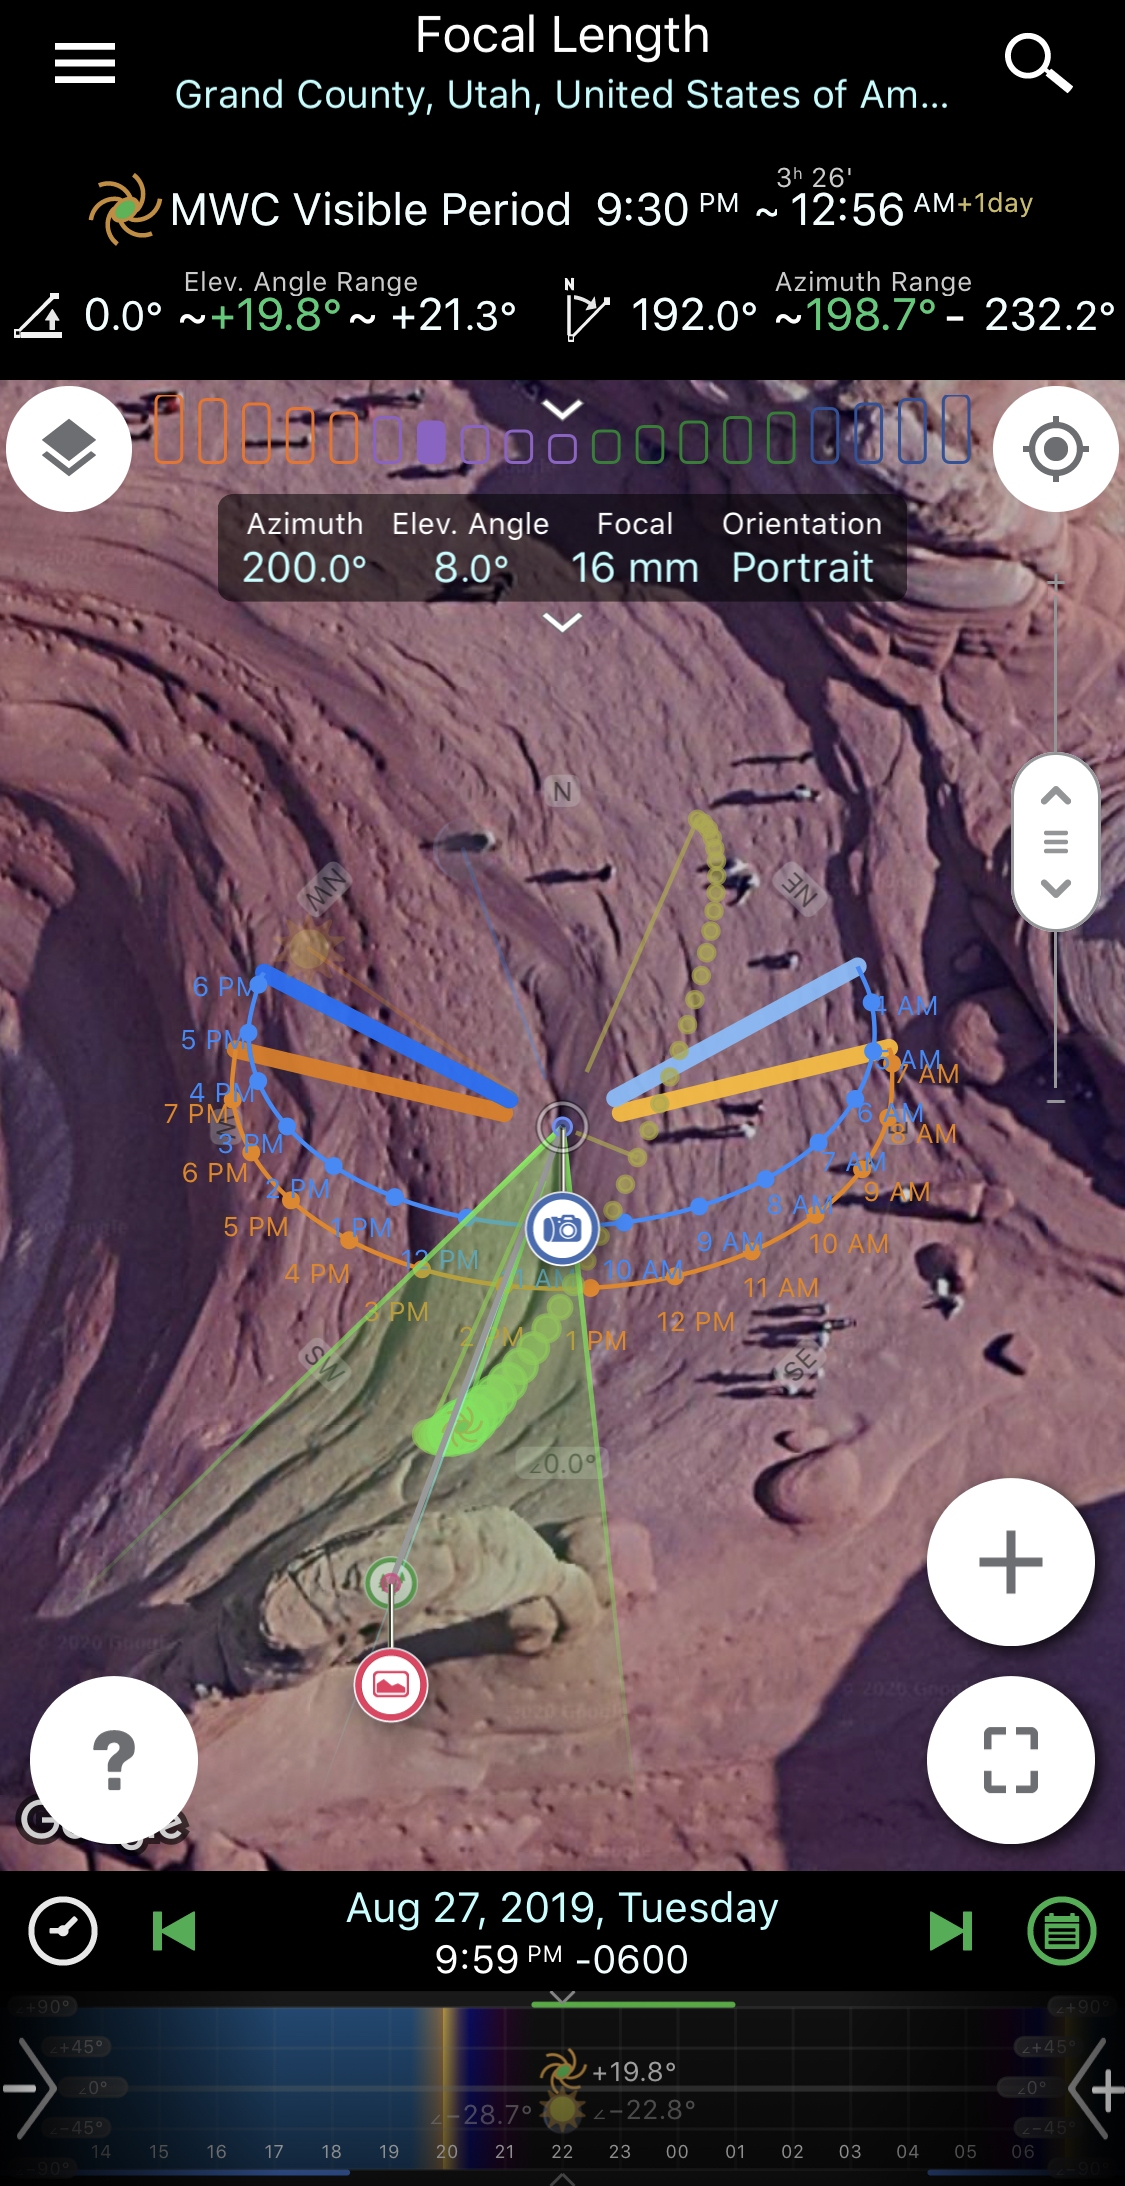
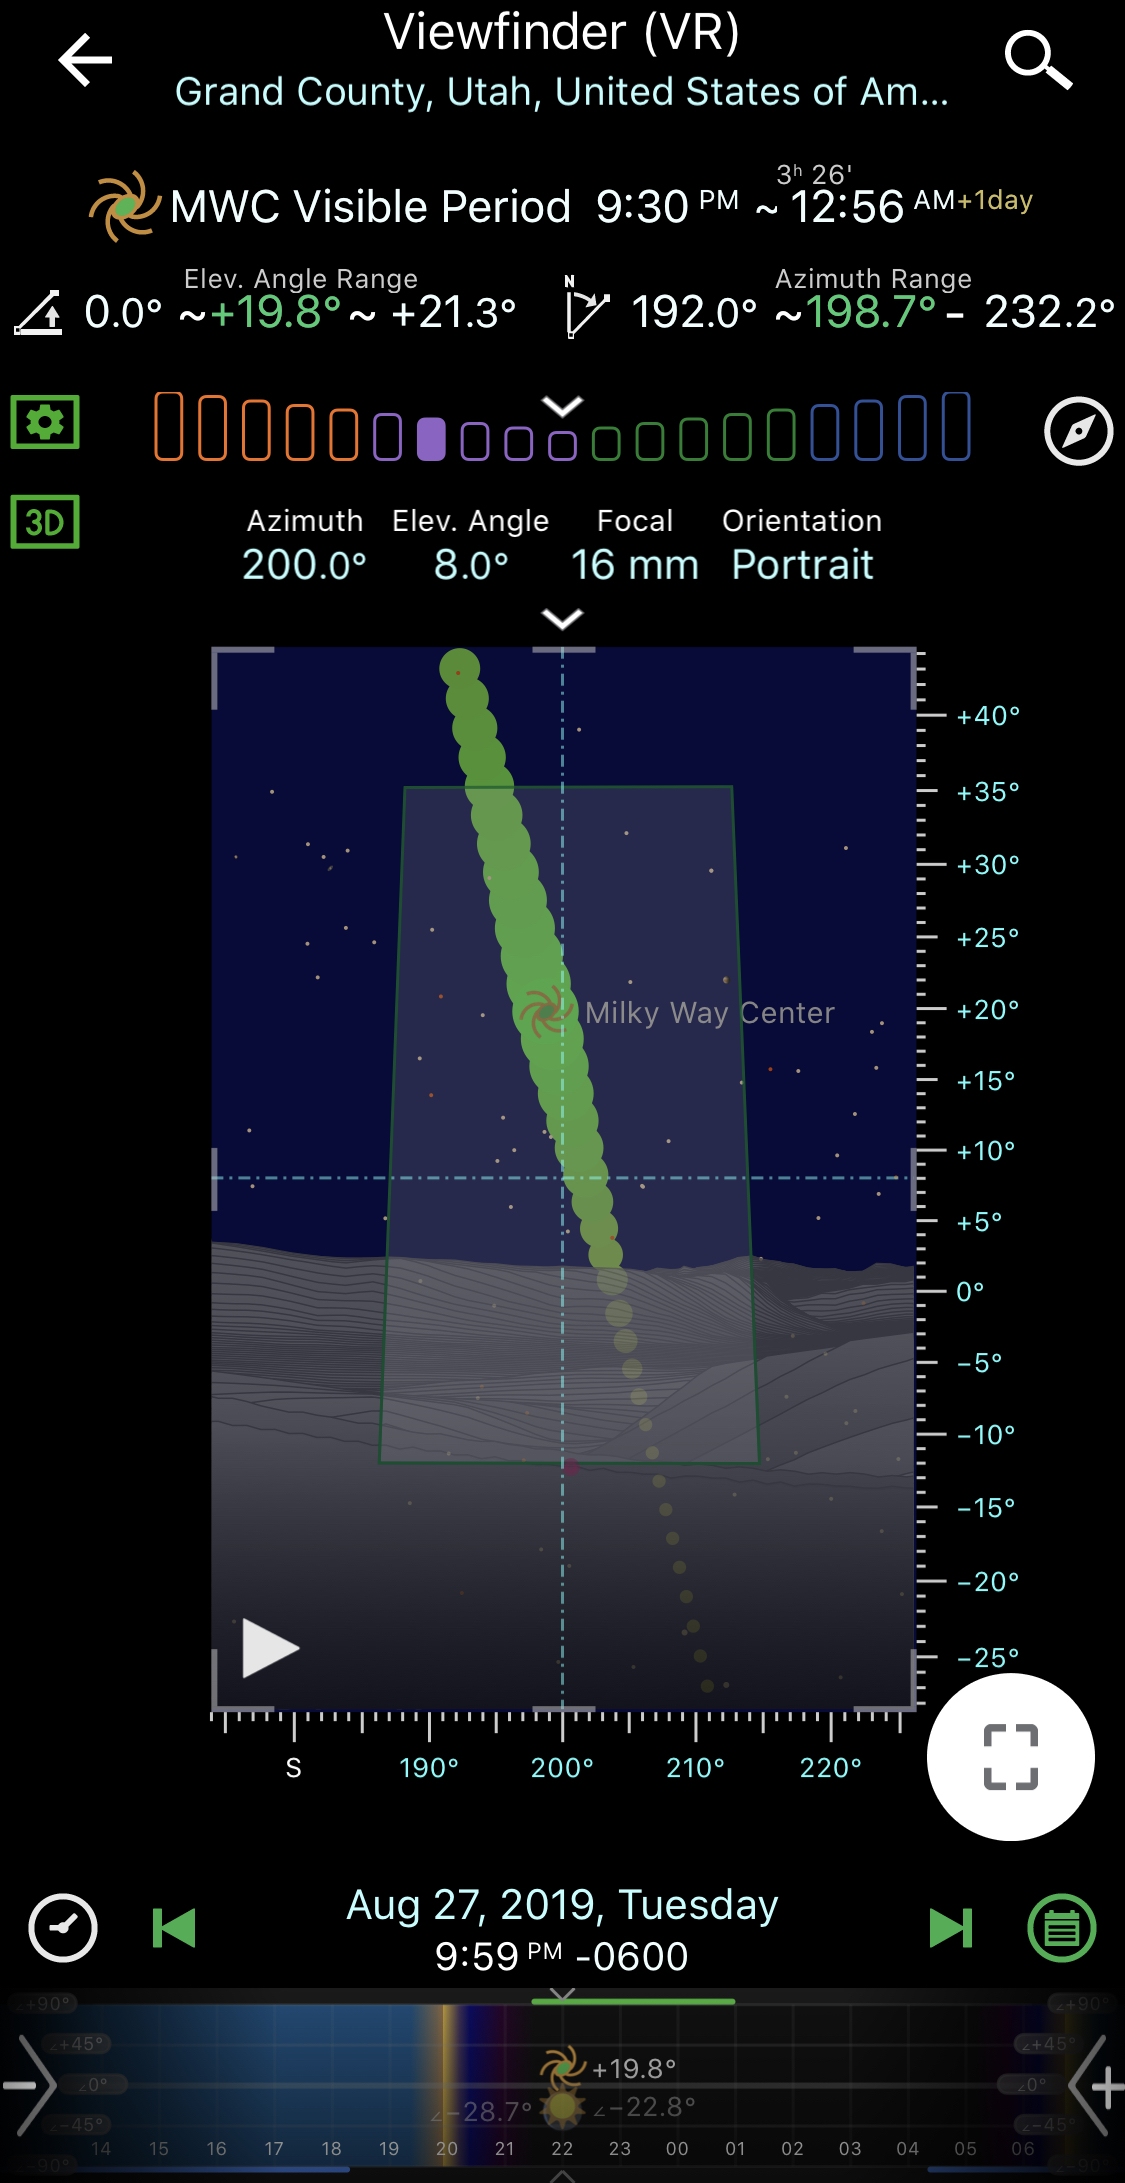
I used the PlanIt for Photographers app to plan out this shot. It gives you a pretty good idea of where and when you will want to be in order to line up your shot with the Milky Way. You may still need to play around with your composition after you get set up in order to get the best shot but the nice thing is you can always update the camera location in the app to give you a better idea of where it will line up after getting it all squared away. Below are two shots of the app, the screen where you set up your points and then the 3D modeling screen where you can get an idea of how its going to look. I have no affiliation with this app, I just find it immensely useful when setting up my Milky Way and Moon shots.
The app view where you set up your scene and points
The VR view or ( Virtual Reality ) view of the same scene.
The end result
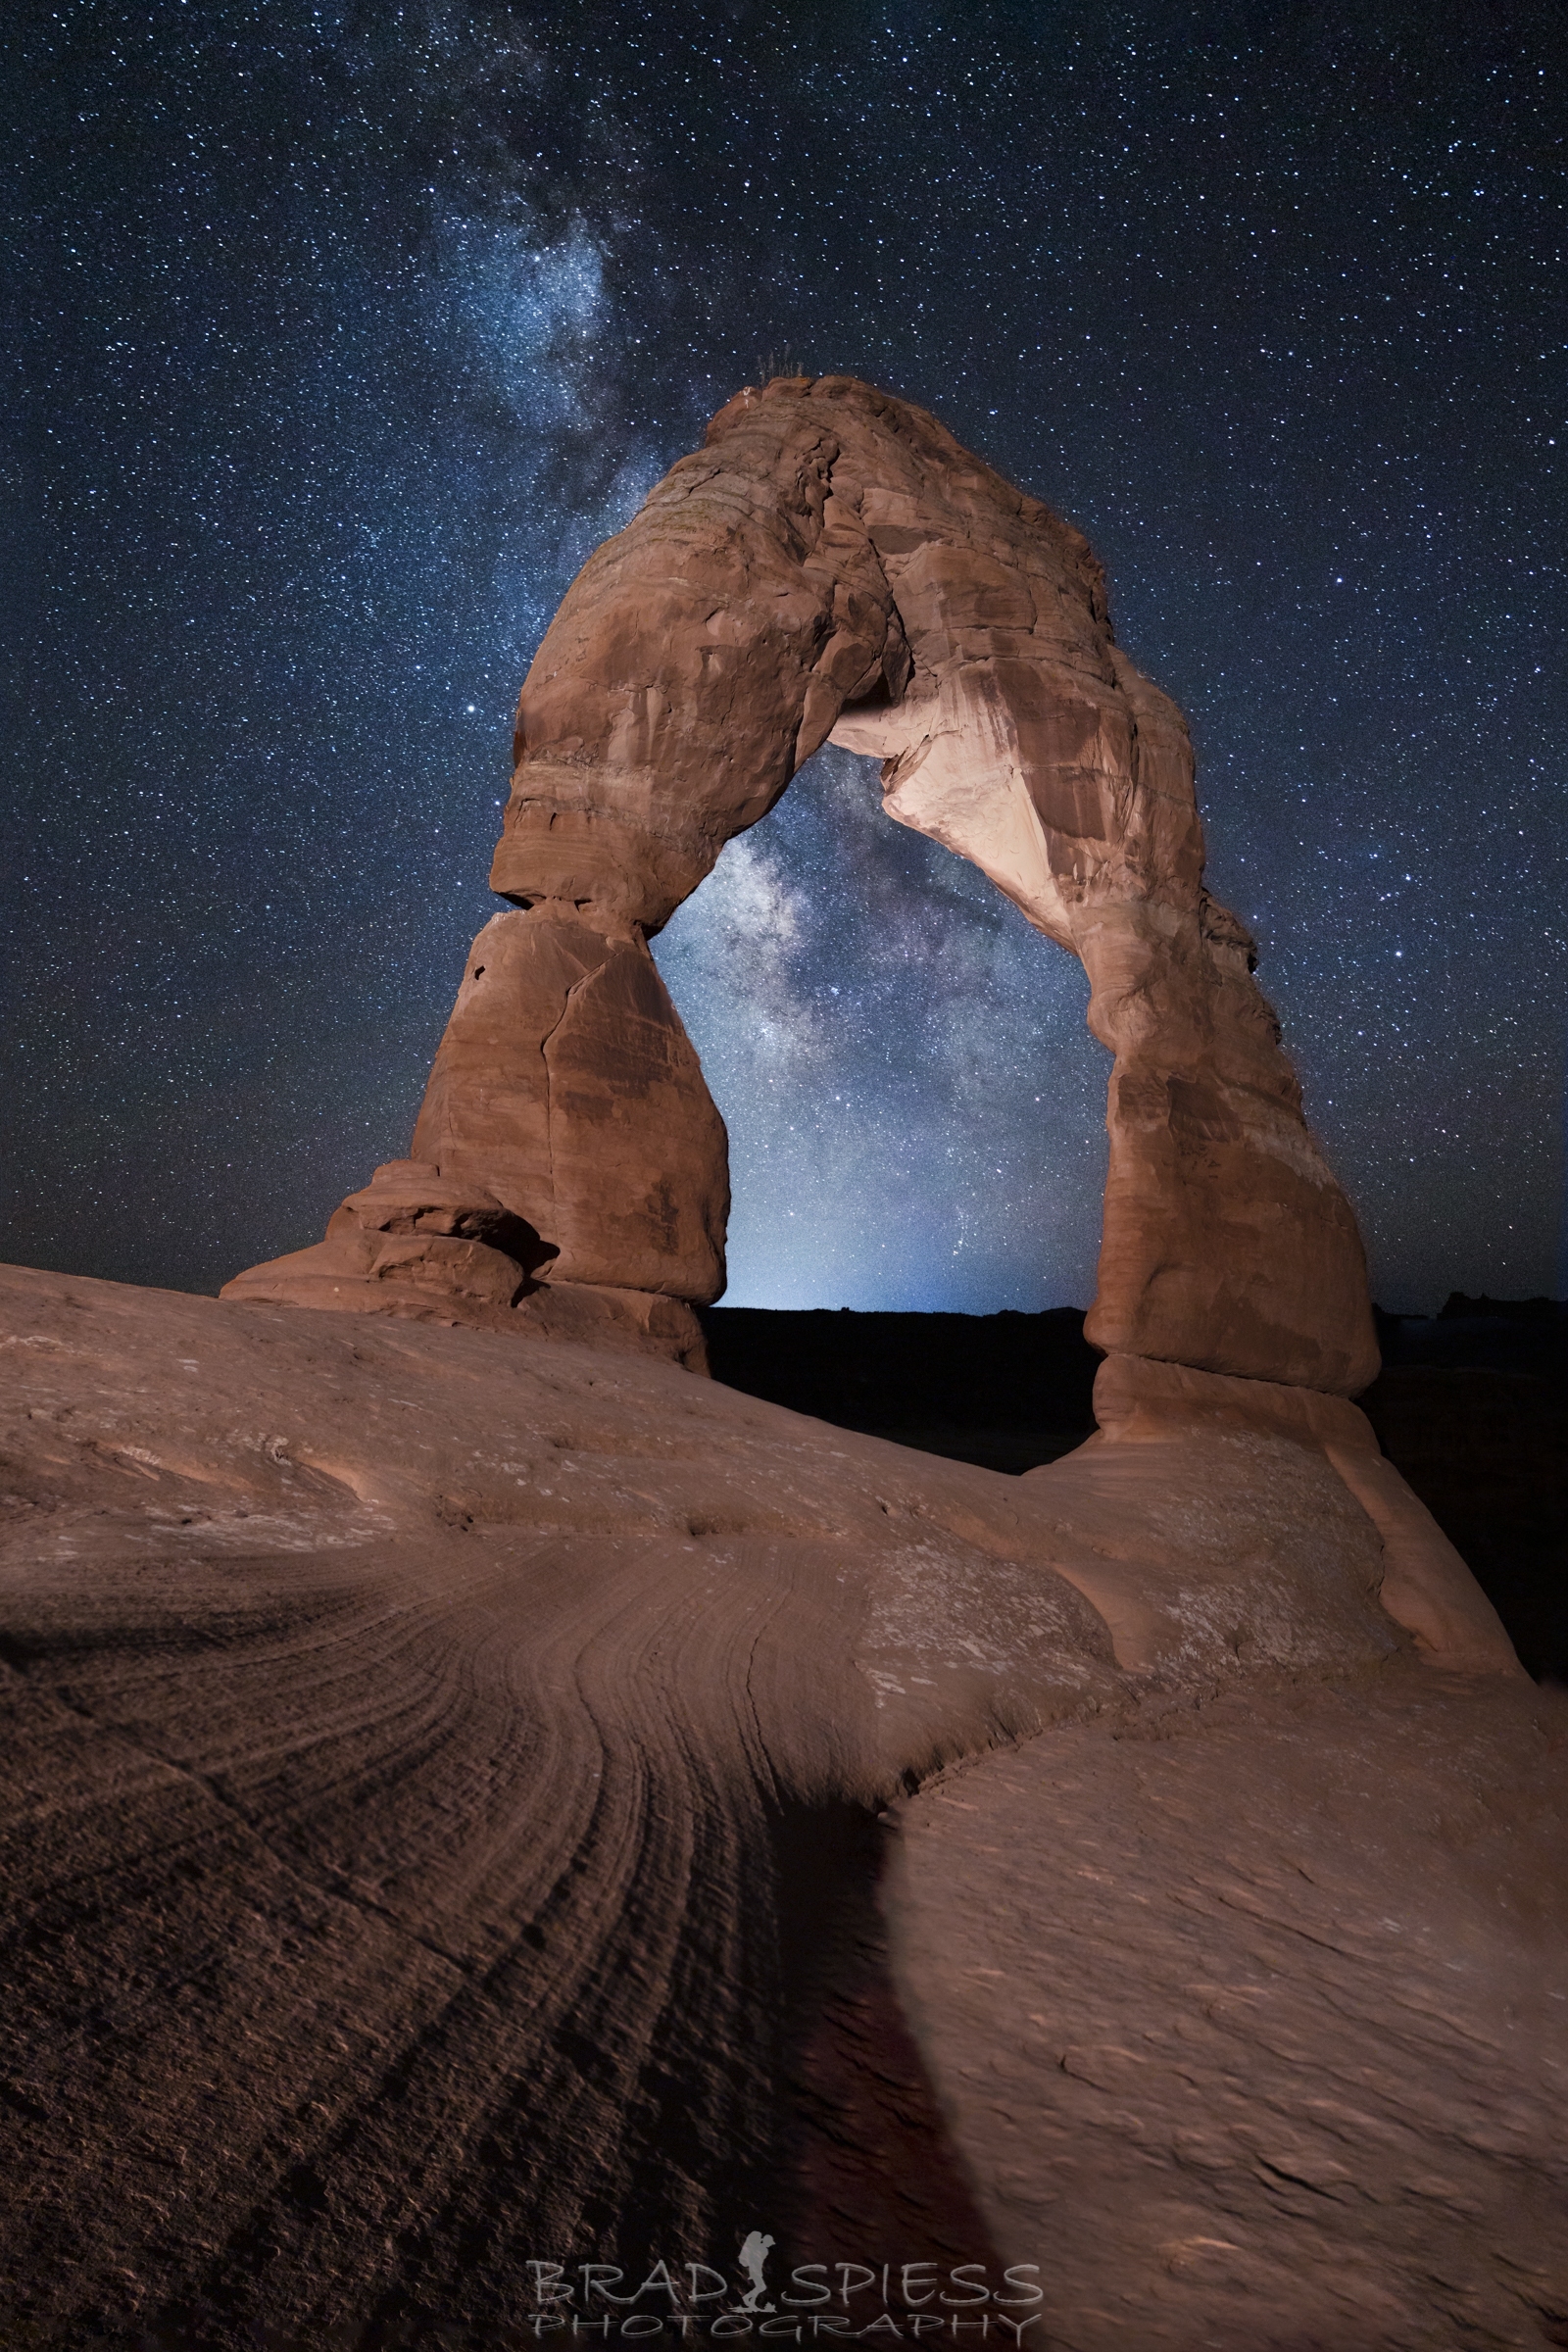
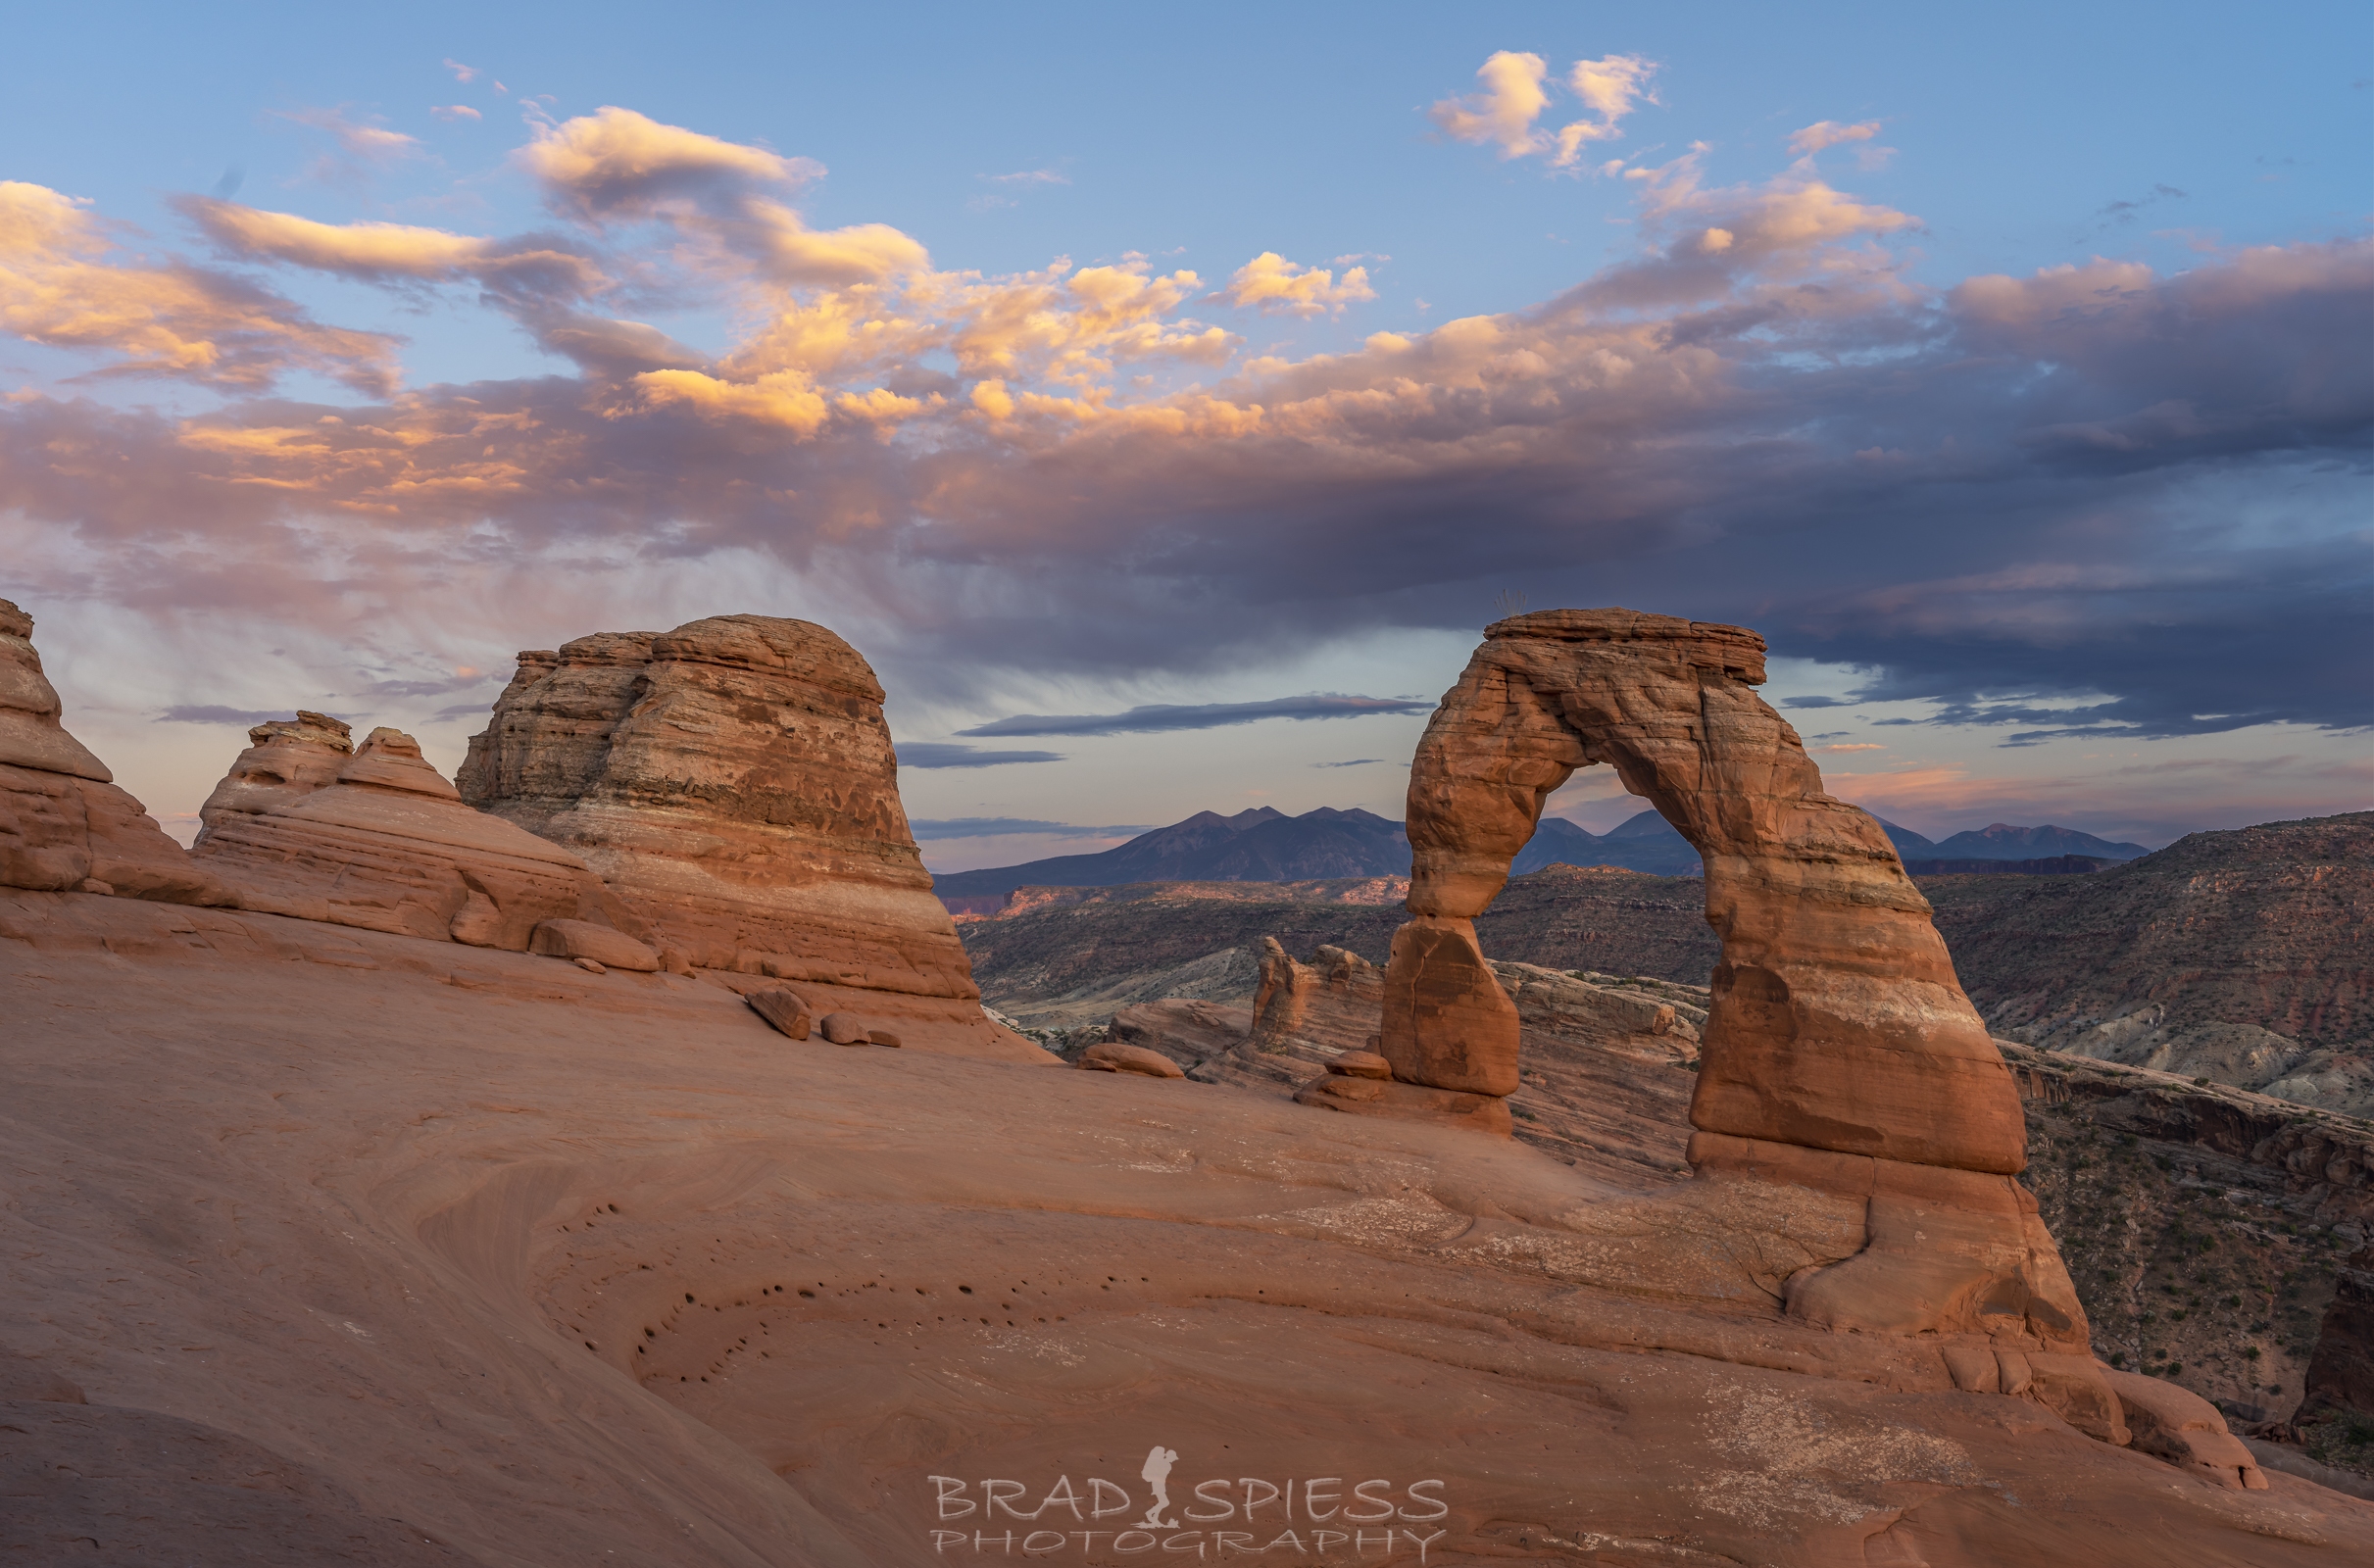
The Milky Way rising up behind the Delicate Arch
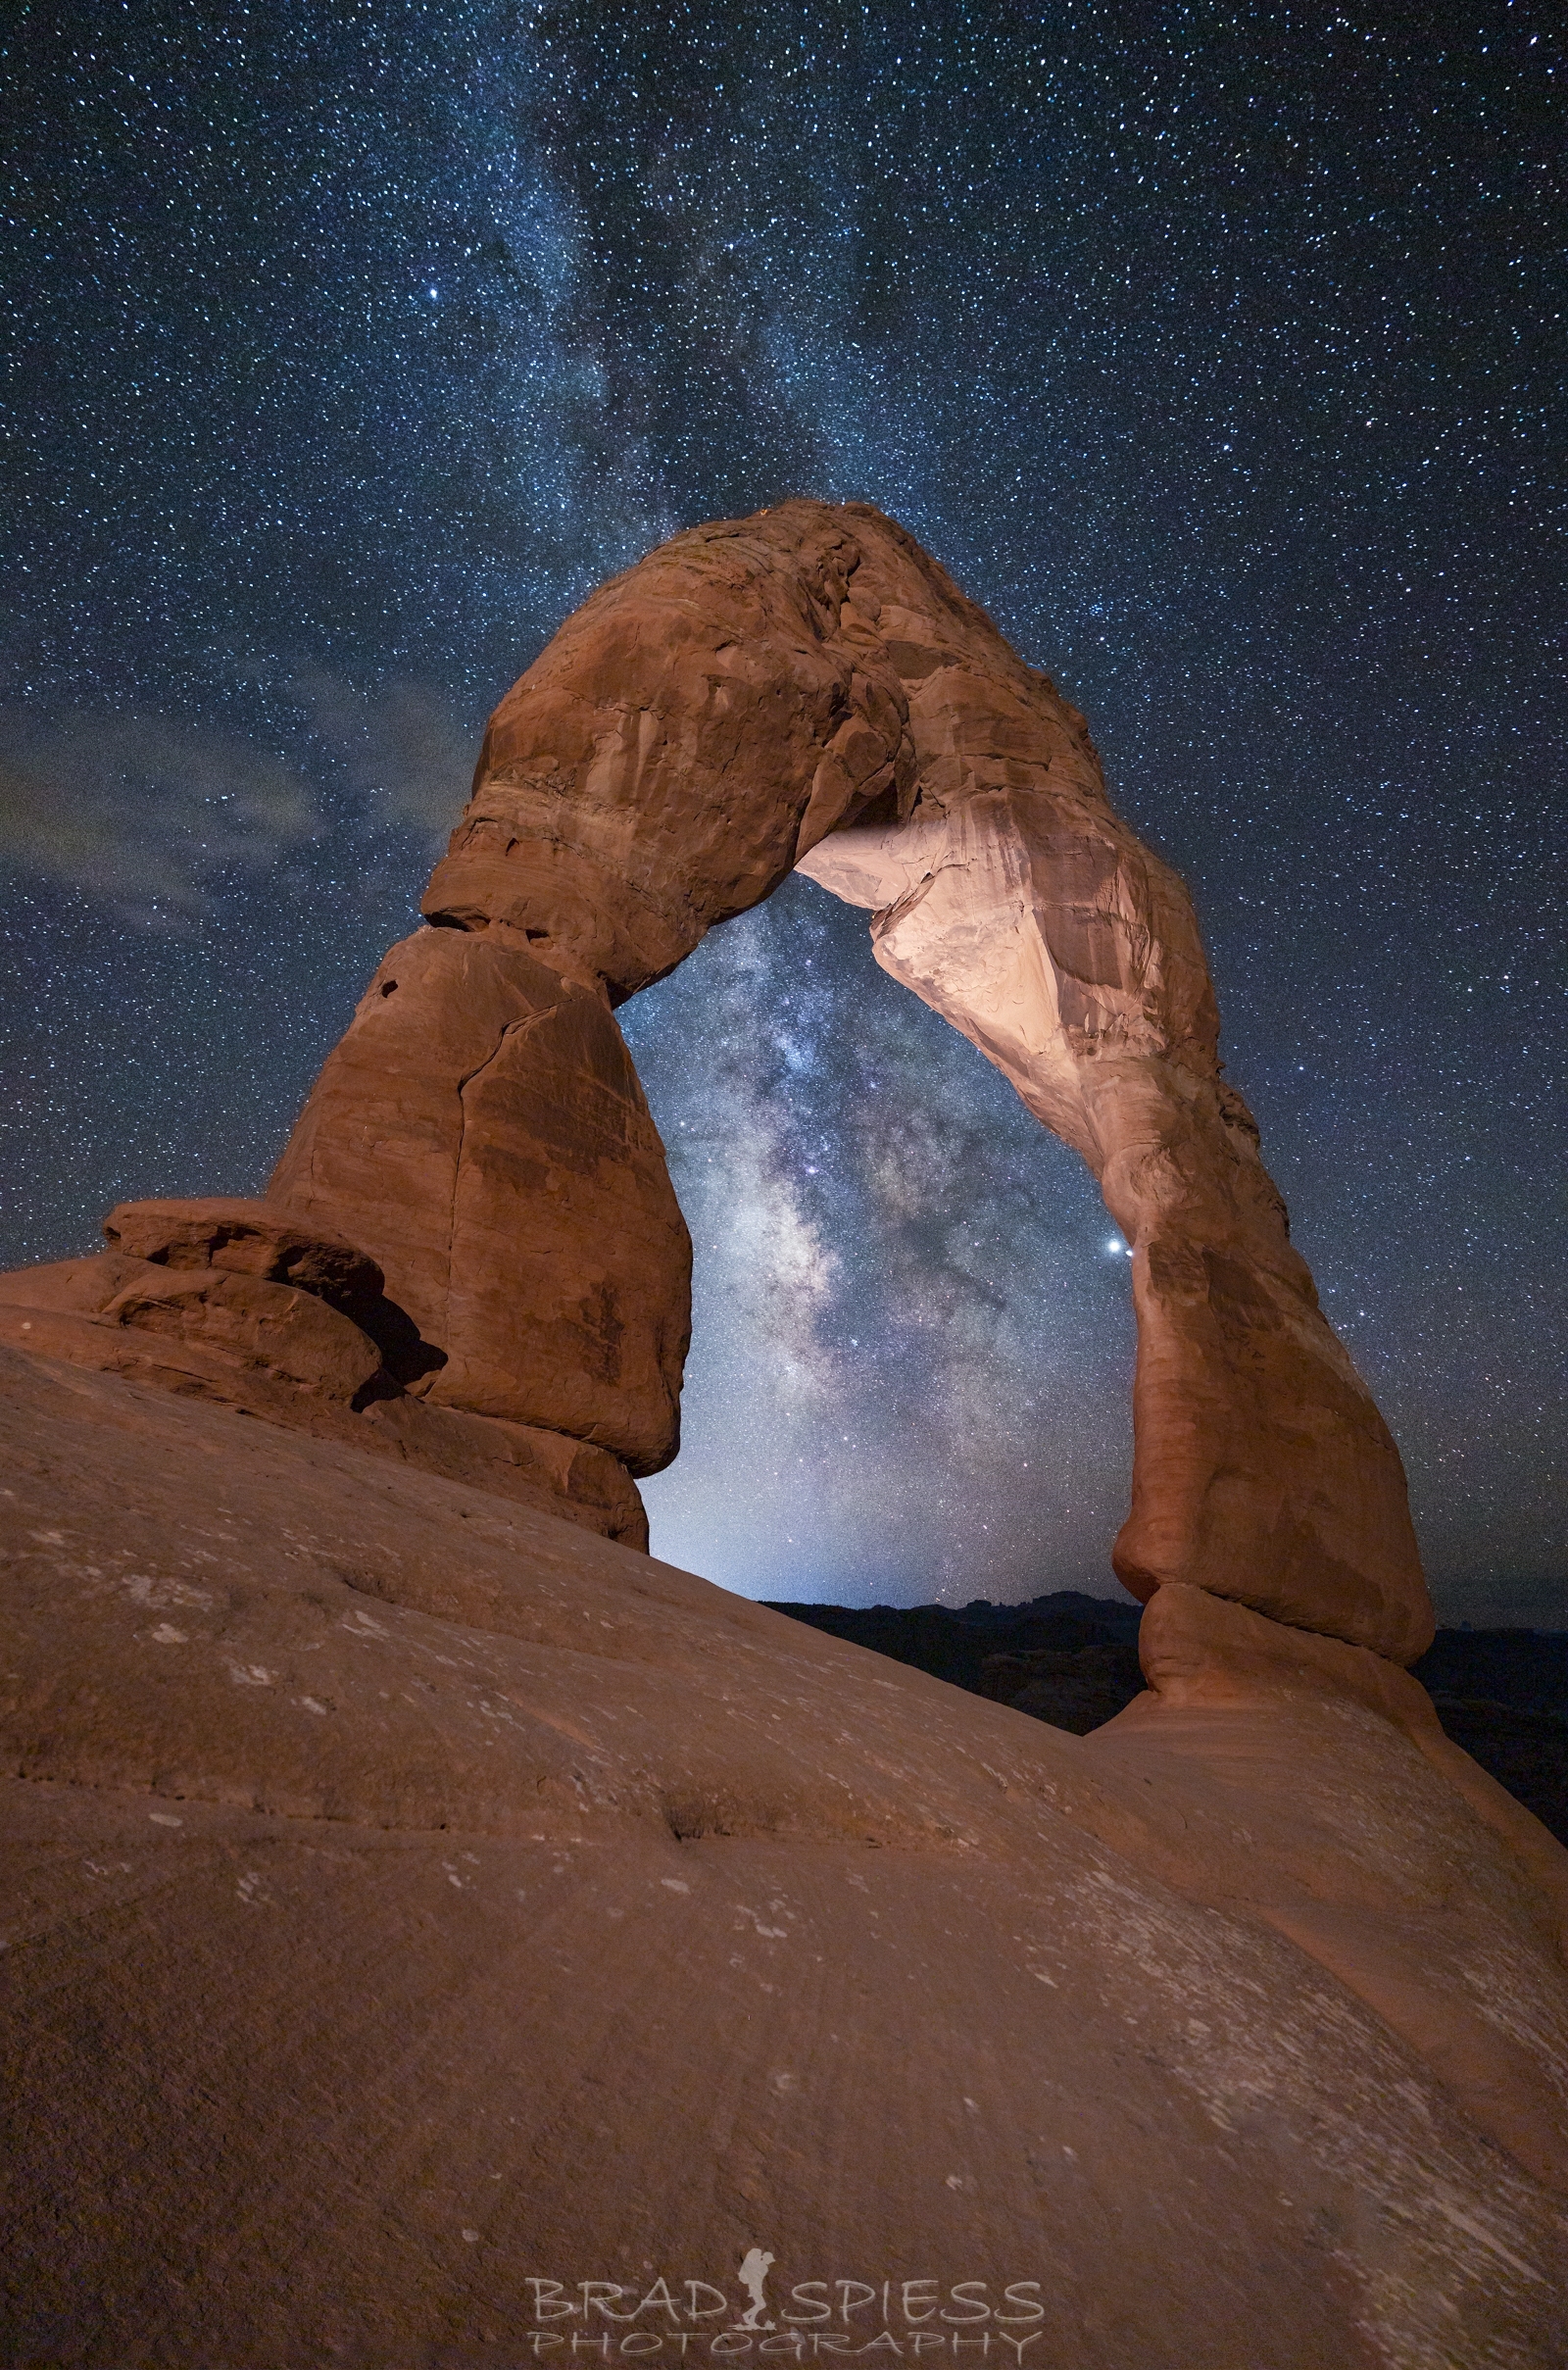
The Milky Way rising up behind Delicate Arch in Arches National Park
Day 3
After shooting Delicate Arch we headed back to the hotel to get some sleep. The forecast did not look favorable for any clouds in the morning so we decided to for go any sunrise shots that morning and sleep in. Work on the computer for a little bit, hit the town and get some lunch etc,..
We had decided to shoot the Canyonlands for our last sunset and milky way while in Moab. I had planned on shooting sunset at the Grand View Overlook and milky way at Deadhorse Point and made up my usual Planit for Photographers plan for Dead Horse Point. I forgot how much distance was between the two areas and I really did not do my due diligence with planing for the sunset at the Grand View area. As soon as we got to the Grand View area I knew I was not going to like the harsh shadows that were creeping across the scene. I went to the spot I wanted to shoot anyways just to check it out, but I was not happy with it. Looking back if I were going to stay there and shoot anyways I probably would use a zoom lens and play to the deep shadows in the canyon.
Harsh shadows creep across Grand View Point
After deciding that I did not like the harsh shadows at the Grand View Overlook my buddy and I hightailed it over to Dead Horse Point. Now you have to remember that I had only been to this location once before, last year in fact and the weather conditions were terrible at the time with most of the photo workshop group ( almost the only people there at that point ) trying to wait out the rain under the over hangs as dawn slowly approached. The rain did eventually let up that morning slightly and I got some shots in but because of that experience I greatly overestimated the ease of doing so. When we arrived at Dead Horse point this time the parking lot was almost full. My buddy and I made our way over to the cliff edge to look for some compositions and I discovered part of the reason the parking lot was so full and made myself feel like an idiot in the process for not getting to this point sooner to scout out locations when I ran into Joshua Snow leading 2 large photo groups. I had taken a class or two the year before with Joshua Snow ( a really nice guy ) during the Out of Moab workshop and he recognized me right away and we talked for a little bit and then my buddy and I looked for a spot where we could find a good composition. I did not want to step on Joshua’s toes and barge my way into an area where his students had already set up so my friend and I worked our way towards the far end of the cliff and found a composition next to one of his students but not interfering with his composition at all. We set up and shot sunset for a little while and then blue hour before the Milky Way made its way up. I was initially shooting with my 16-35 mm f/2.8 during sunset and Milky Way but I also brought out my 24 mm f/1.4 to shoot because I’ve really liked the results so far. Joshua and his group did not stay around to long, clouds had started to flow into the horizon from the right side and I think he wanted to get to the next location to shoot before they obscured the scene entirely. My buddy and I stayed around a little longer shooting before heading home for the night. I thought I would have an easy time combining the results from my 24 mm f/1.4 Milky Way with my 16 mm f/2.8 blue hour shot of the same area but maybe my skills aren’t quite up to that level yet, part of the problem was I panned up from the original comp to get more of the Milky Way in and it did not lend itself to easy blending but here is the result. I would love to try this location again some time, the night sky is so dark its awesome for Milky Way shots. I would suggest that if you decide to try shooting this scene that you get there early to find the right composition, shoot a lot of blue hour, maybe incorporating some low level lighting for the foreground if your not doing blue hour and realizing your going to have a hard time getting detail out of the canyon below at night without doing some long exposures to blend in later.
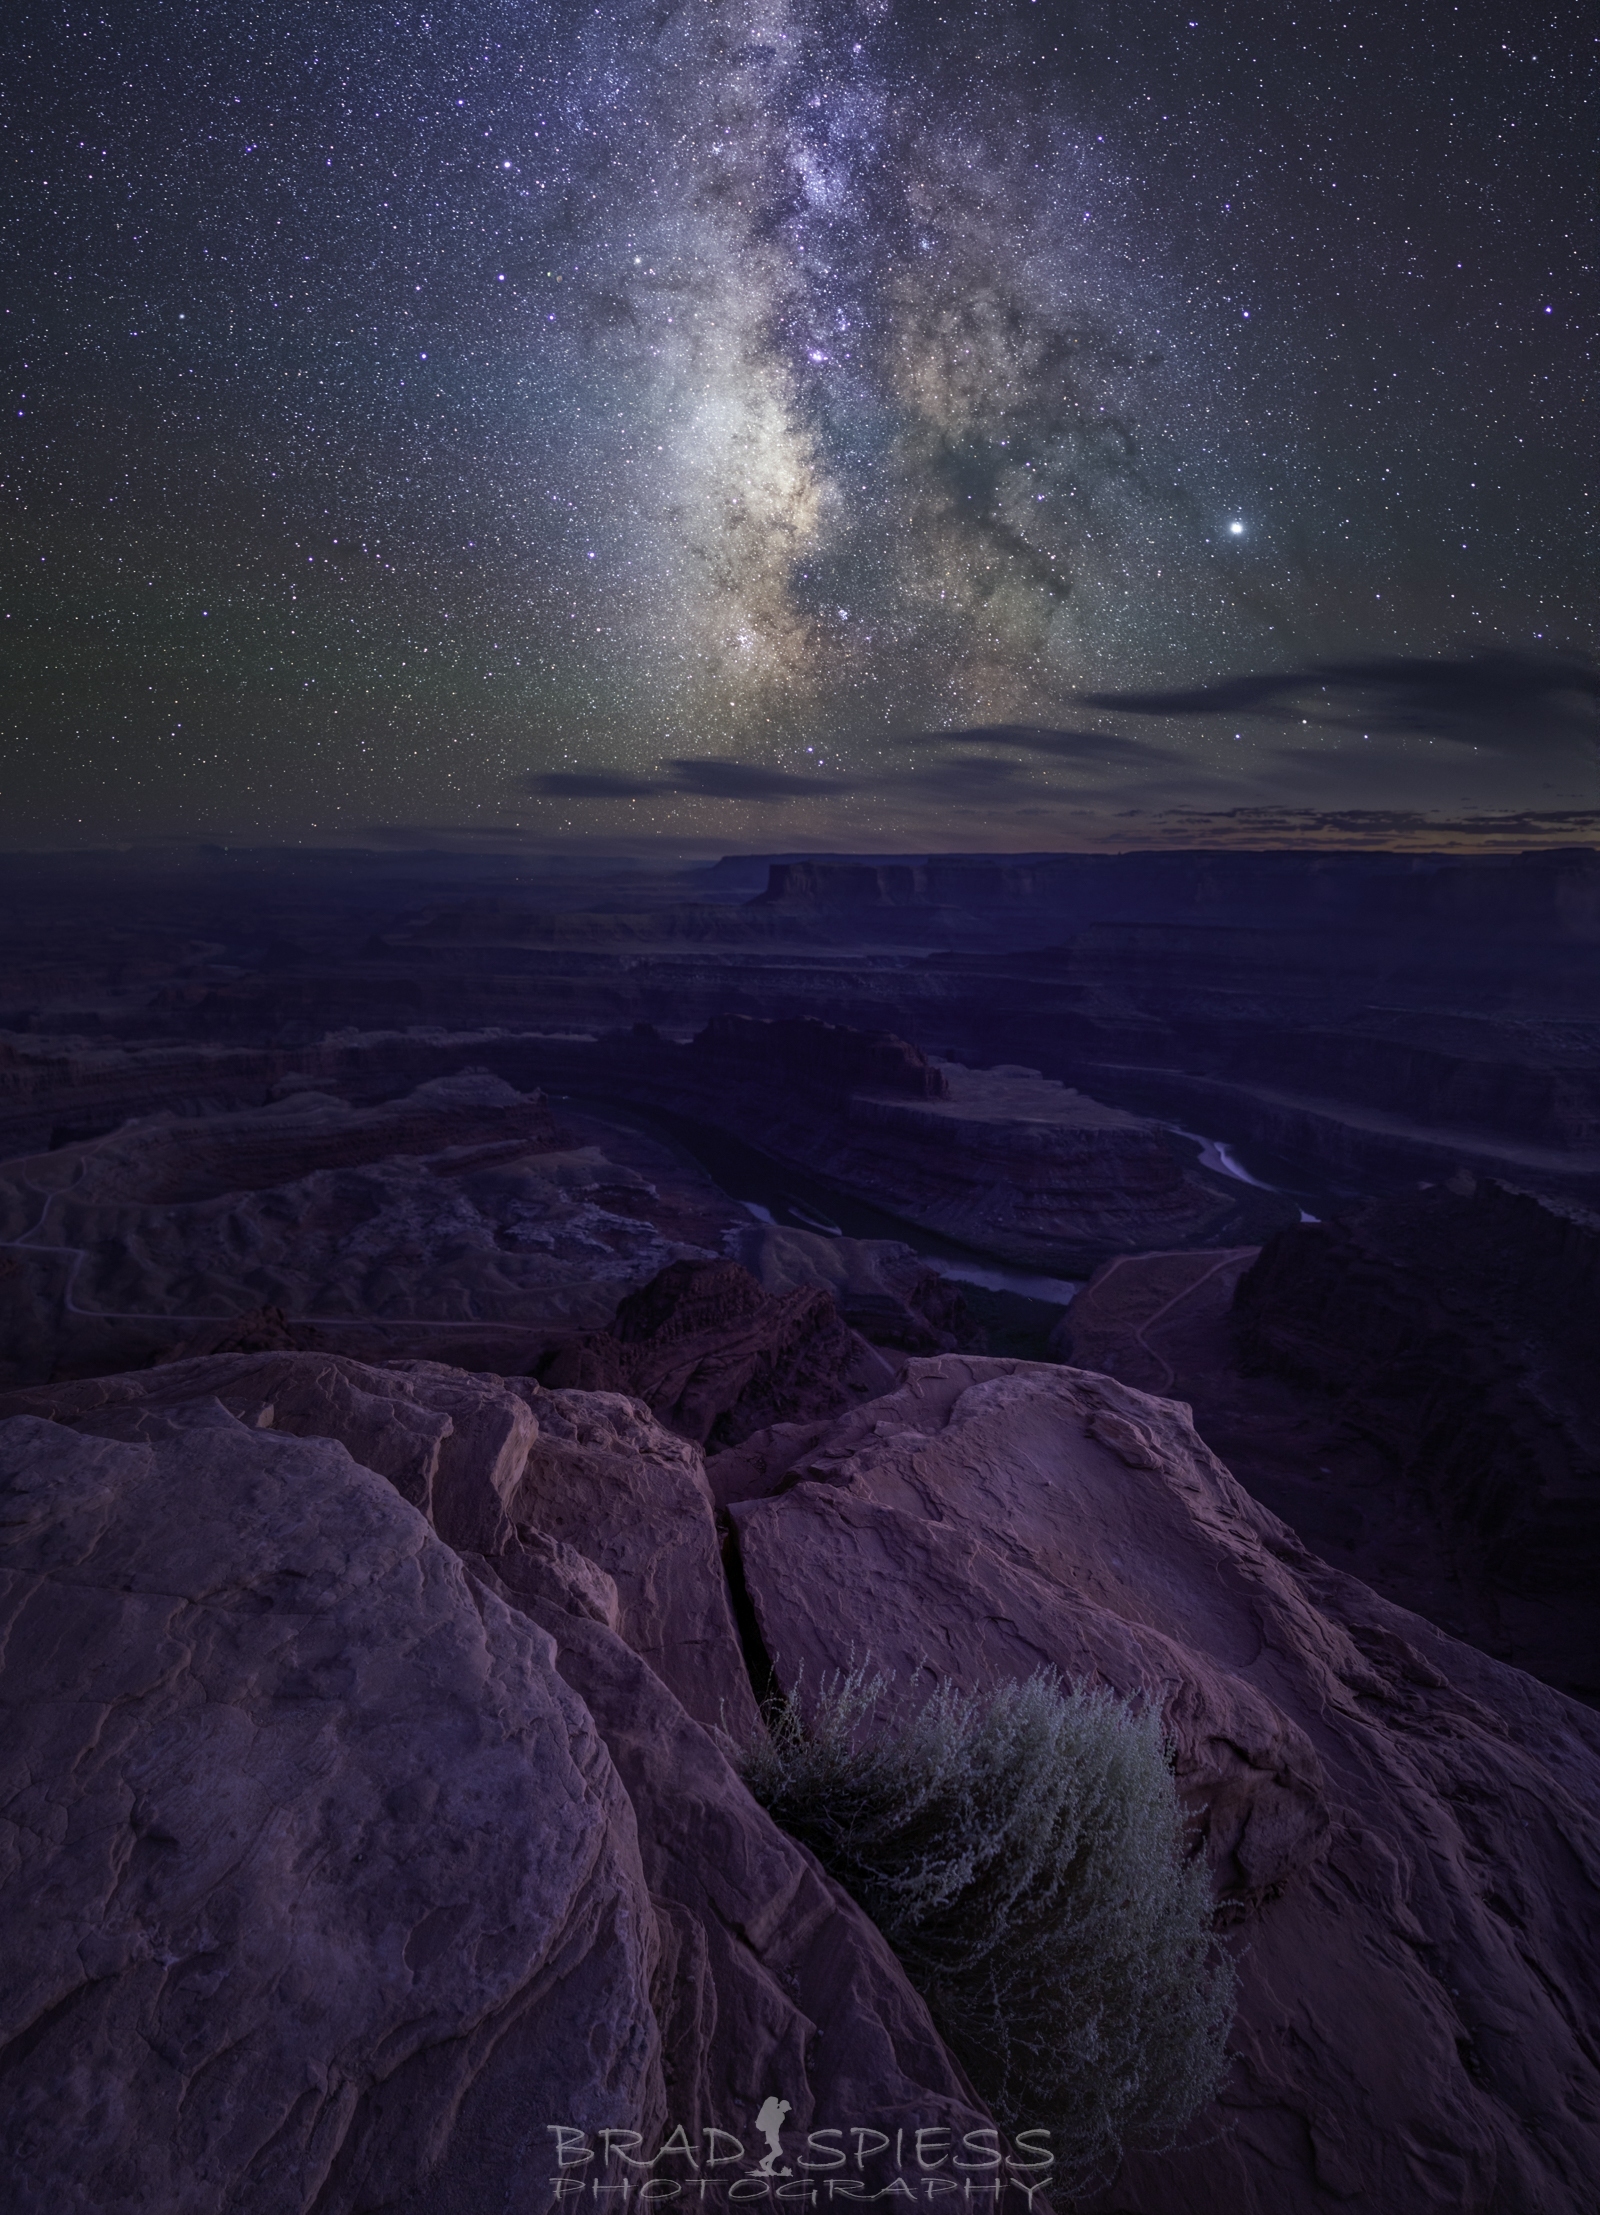
The Milky Way rising in the night sky behind Dead Horse Point.
Day 4
We decided to forgo looking for sunrise again the next morning and sleep in and get a good breakfast before we made our way to our last destination, Kanarra Falls, a small waterfall in a slot canyon located in Kanarraville, not to far from Zion National Park were we started this whole trip and conveniently located along the 15 freeway ( about a 4.5 to 5 hour drive from Moab ) on our way back home to San Diego. I had seen pictures of this waterfall for some time and always wanted to try my hand at shooting this location and my buddy was just as excited to check out this location. So after having some breakfast and packing my car we headed out for Kanarraville. I had planned the trip so we had plenty of time to check into our hotel, get some lunch, and then head out to the trail head. If you are thinking about doing Kanarra Falls you will need a permit, they only sell so many permits a day to help keep the place from getting over run so I would pick one up well ahead of your scheduled trip if I were you.

Heading up the slot canyon towards Kanarra Falls.
The hike up to Kanarra Falls is not to long, only a little over 3 miles round trip so its not a hard hike, but make sure you bring some water for yourself and realize there is no place for you to “use the bathroom”, this is the towns water supply. It seems pretty warm at first until you actually get down into the slot canyon and then it will cool off a little. I’m sure it depends on what time of the year you go but I found hiking along the creek bed pretty easy. I started off with my hiking boots and then when I got to the point where we had to start walking up the creek I found a place to hide my boots to pick back up on the way back, doing this will make the hike much easier. People talk a lot about the crowds in hike and I went expecting to deal with hordes of people but I was pleasantly surprised to not have a lot of people hiking through the canyon at the time we went. Even with a small amount of people hiking through the canyon, the falls will become a chocking point for traffic and when you are set up in front of the falls to shoot you need to bring some patience as groups of people negotiate the steep, wet log to get up to the next level of the creek above the waterfall. I had a lot of fun shooting around this area and I would say that I prefer the vertical composition to the horizontal composition at the waterfall.

A horizontal ( landscape orientation ) composition of Kanrra Falls
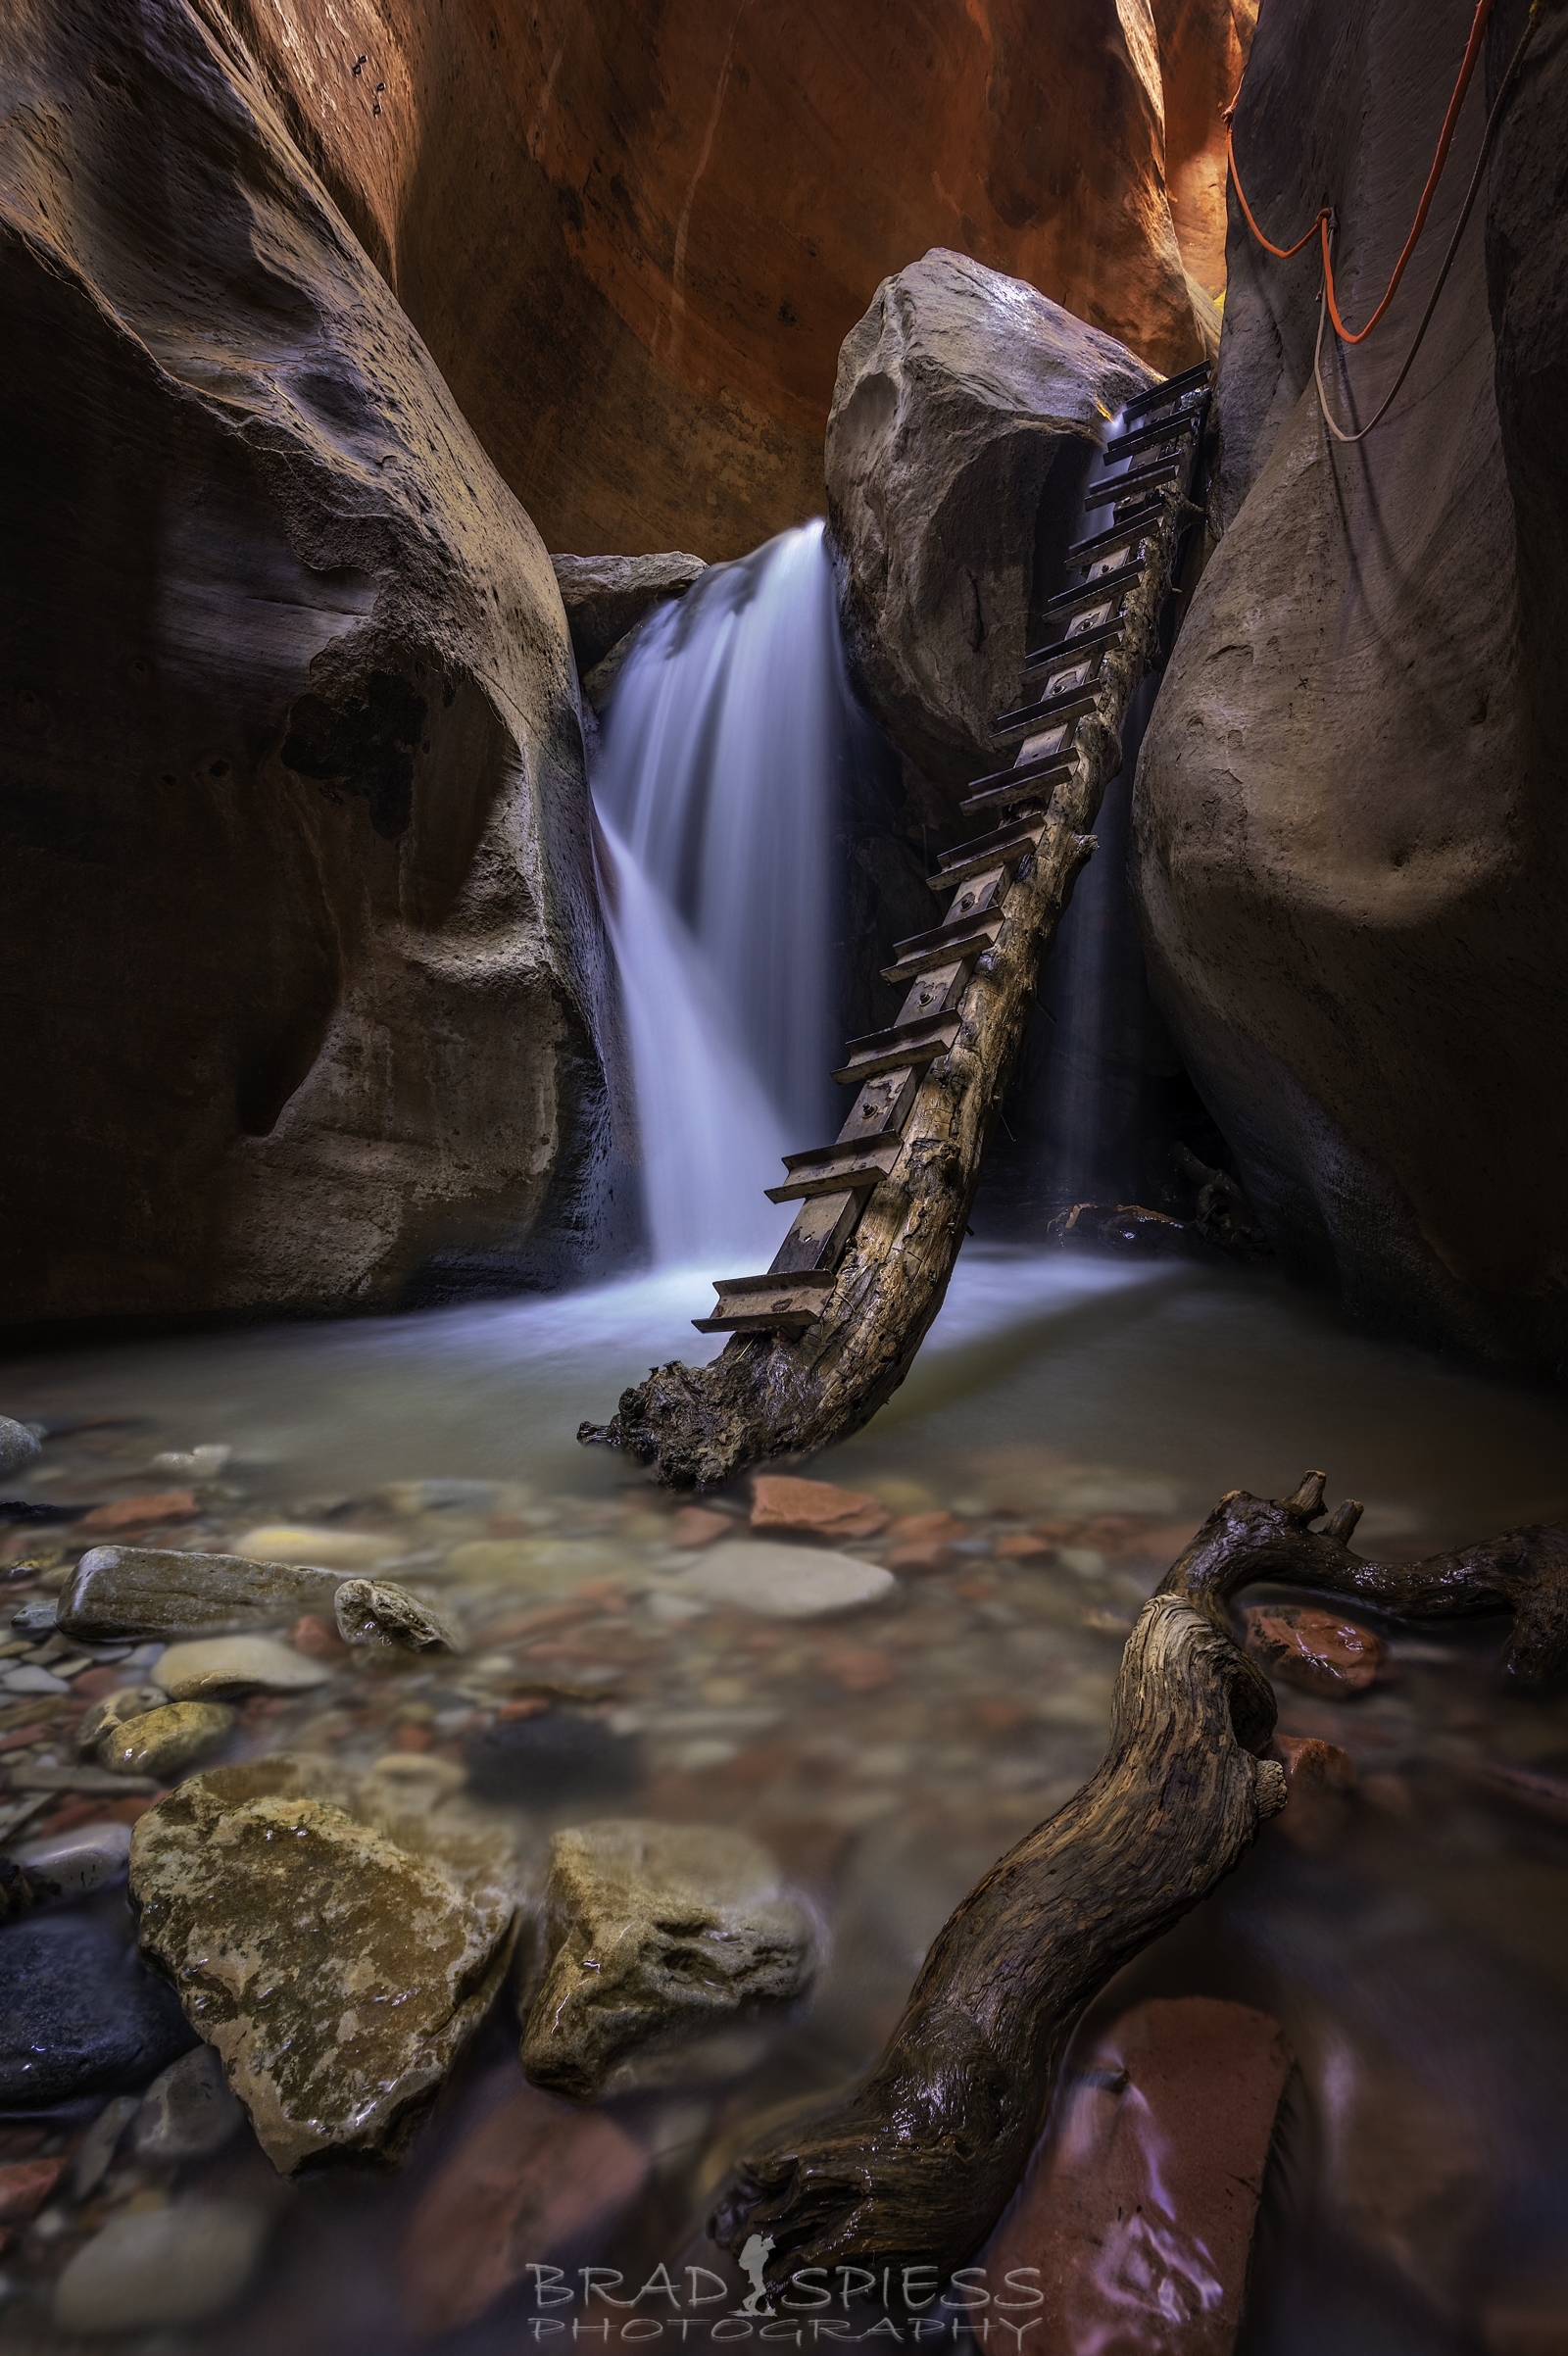
A vertical ( portrait ) composition of Kanarra Falls.
After shooting the front of the waterfall for a while I clambered up to the next level and made my way along to the next series of waterfalls which are smaller and not as impressive, but its still worth making your way up and seeing what catches your eye. I shot a lot up at this level but after getting back was not quite as impressed with it. I found that I shot to wide and had to crop down quite a bit to get the final composition that I liked.
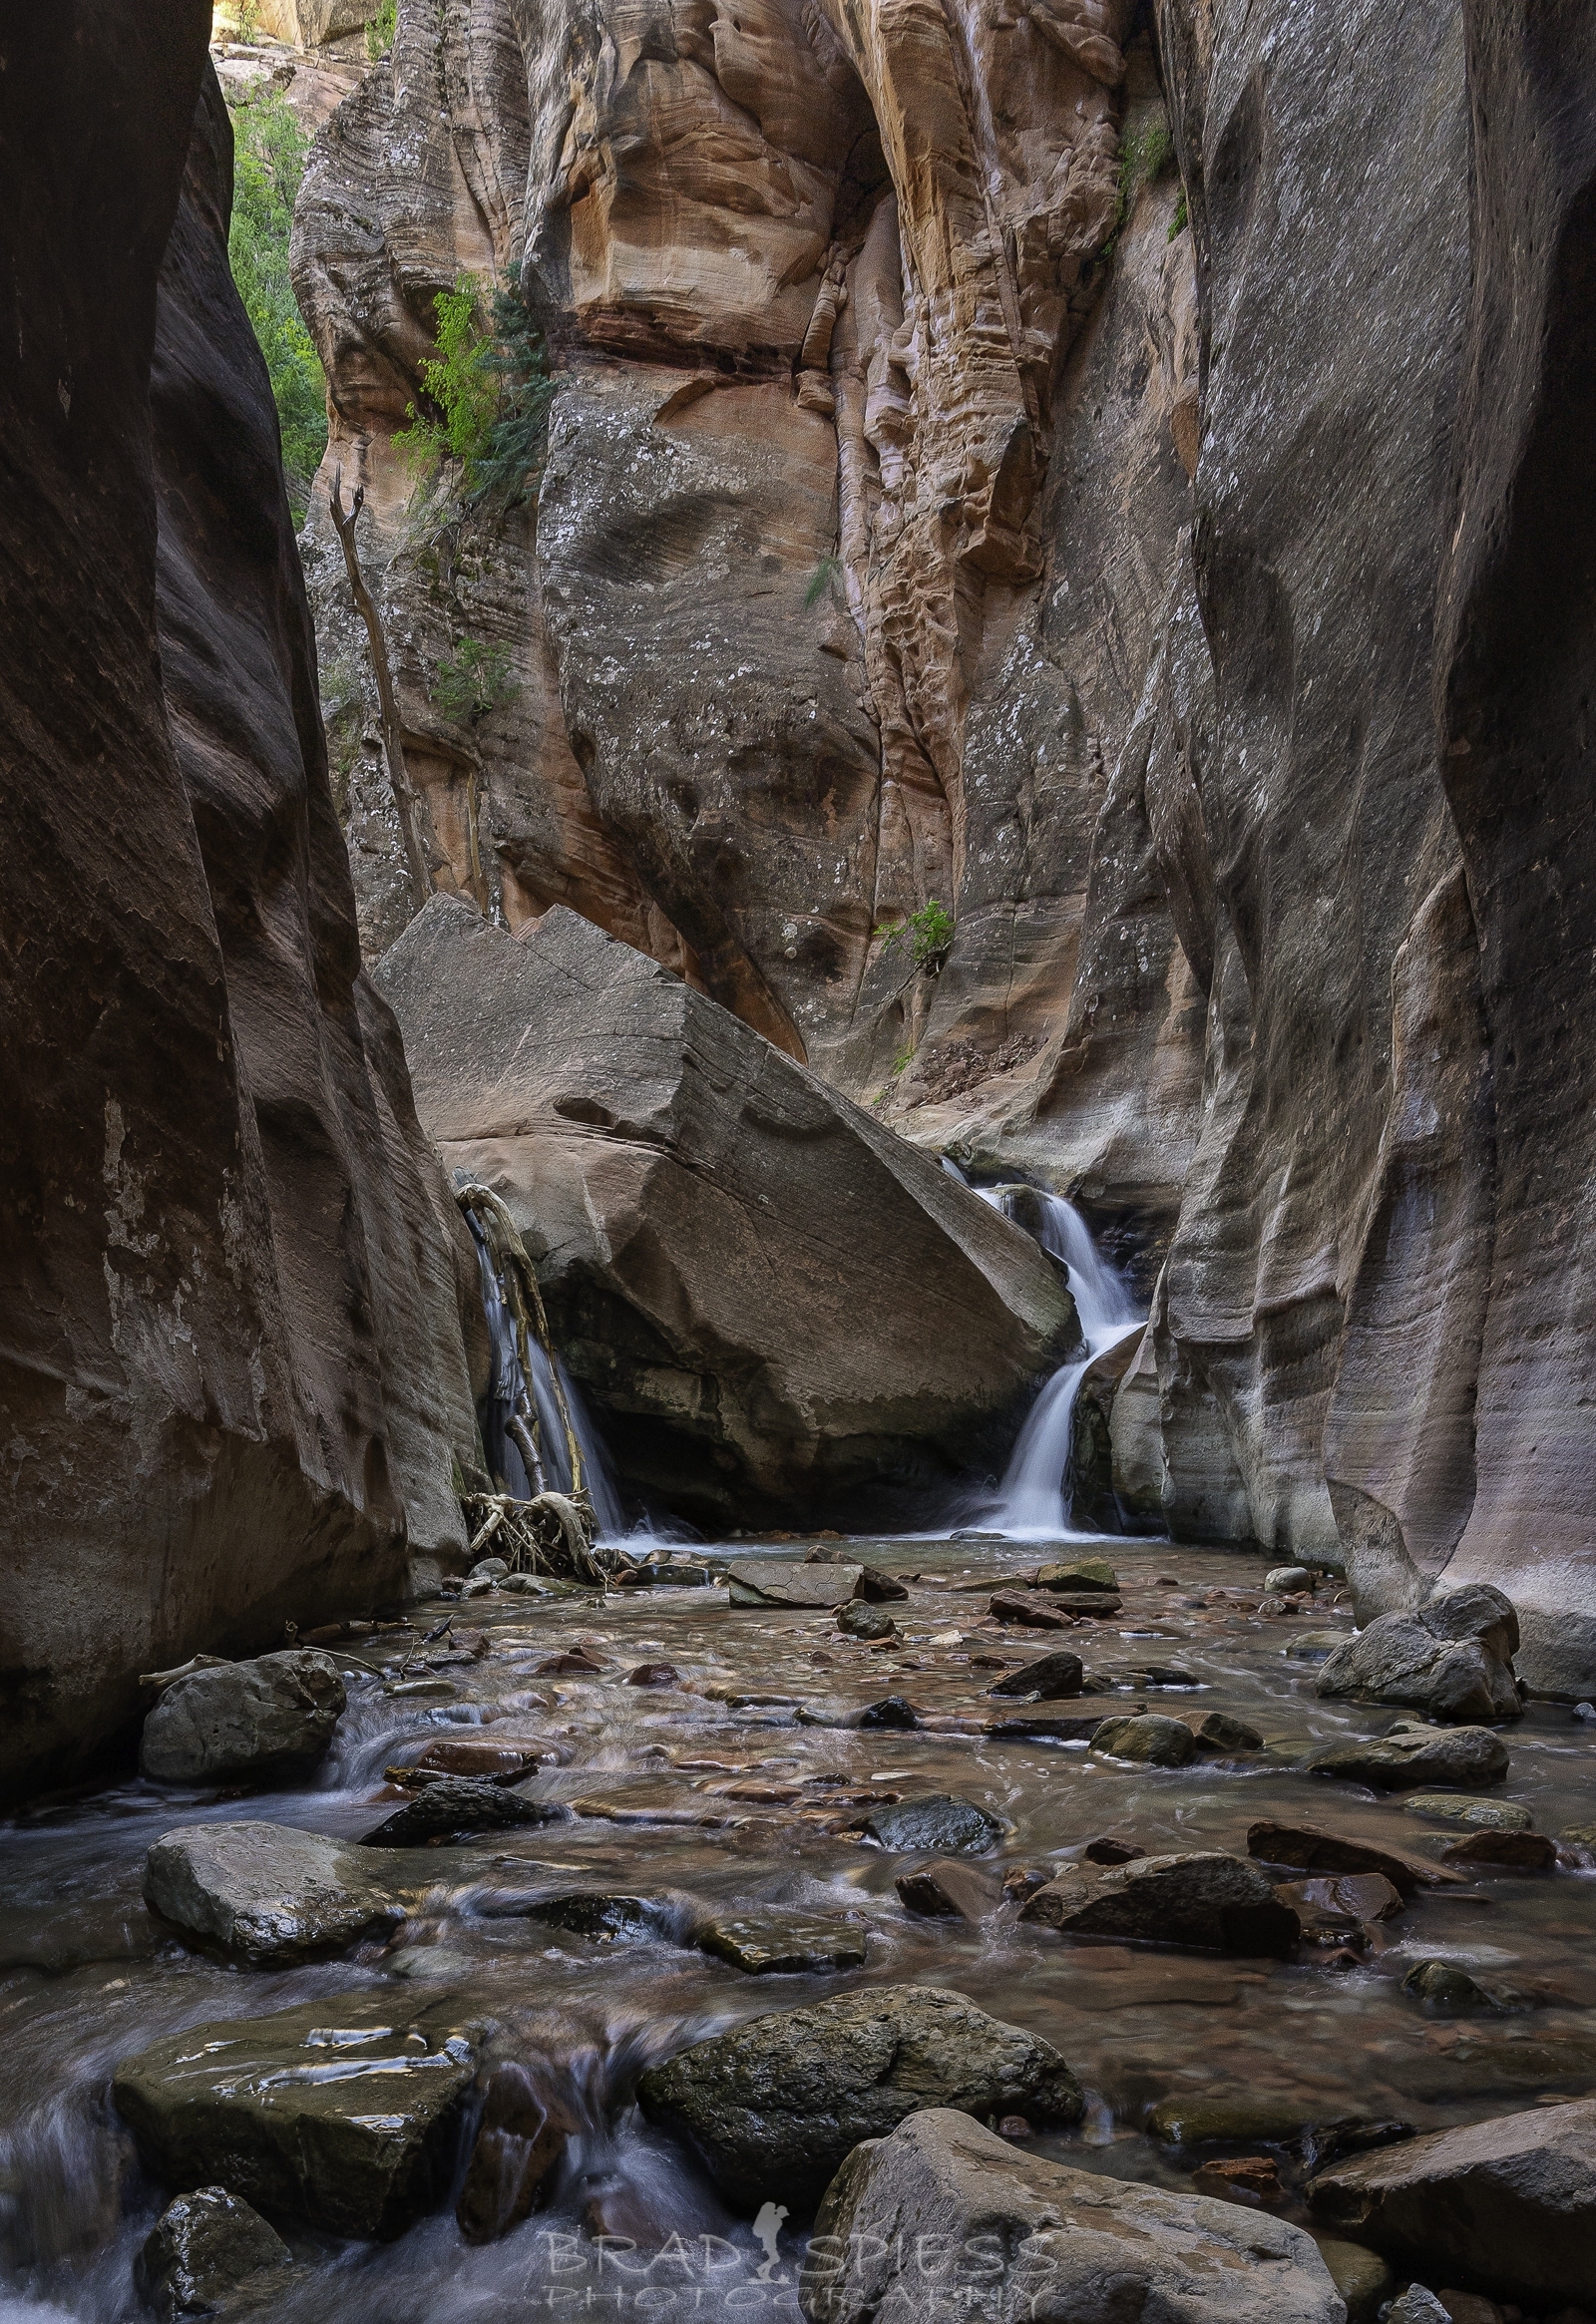
The top waterfall at Kanrra Falls Canyon.
After shooting the waterfalls we made our way back to the trail head and headed back to our hotel. We finally went out for some dinner and I know not everyone is going to like pizza, but we liked this place so much that we went there for lunch and dinner, so check out Centro Woodfired Pizzeria if you are looking for a bite to eat while staying in this town, and like Pizza.
Well that is all I have to say about this trip, I had two trips scheduled this summer, one to shoot bald eagles in the Seattle area with Photographer Mark Smith and another to shoot Glacier National Park with Joshua Snow. Both of these trips are up in the air as we all wait to see how this pandemic plays out, but I have to say that as write this up my creative juices start to flow and rather then feeling depressed at possibly loosing out on these adventures I feel blessed to have been on the adventures that I have been on and to think about what I want to get out of future trips. My hope is that reading about these adventures of mine may help you in creating our own trips and adventures and add value to your life, it is my true belief that the things that we own are not our defining reason for being, the experiences in life ( good and bad ) can never be taken from you and will help shape who you are and your outlook on life. I know I treasure these experiences. Stay safe and sane everyone. Normal life will begin again and we can get back to living rather then surviving.