My Moab Trip
The Page Arizona Section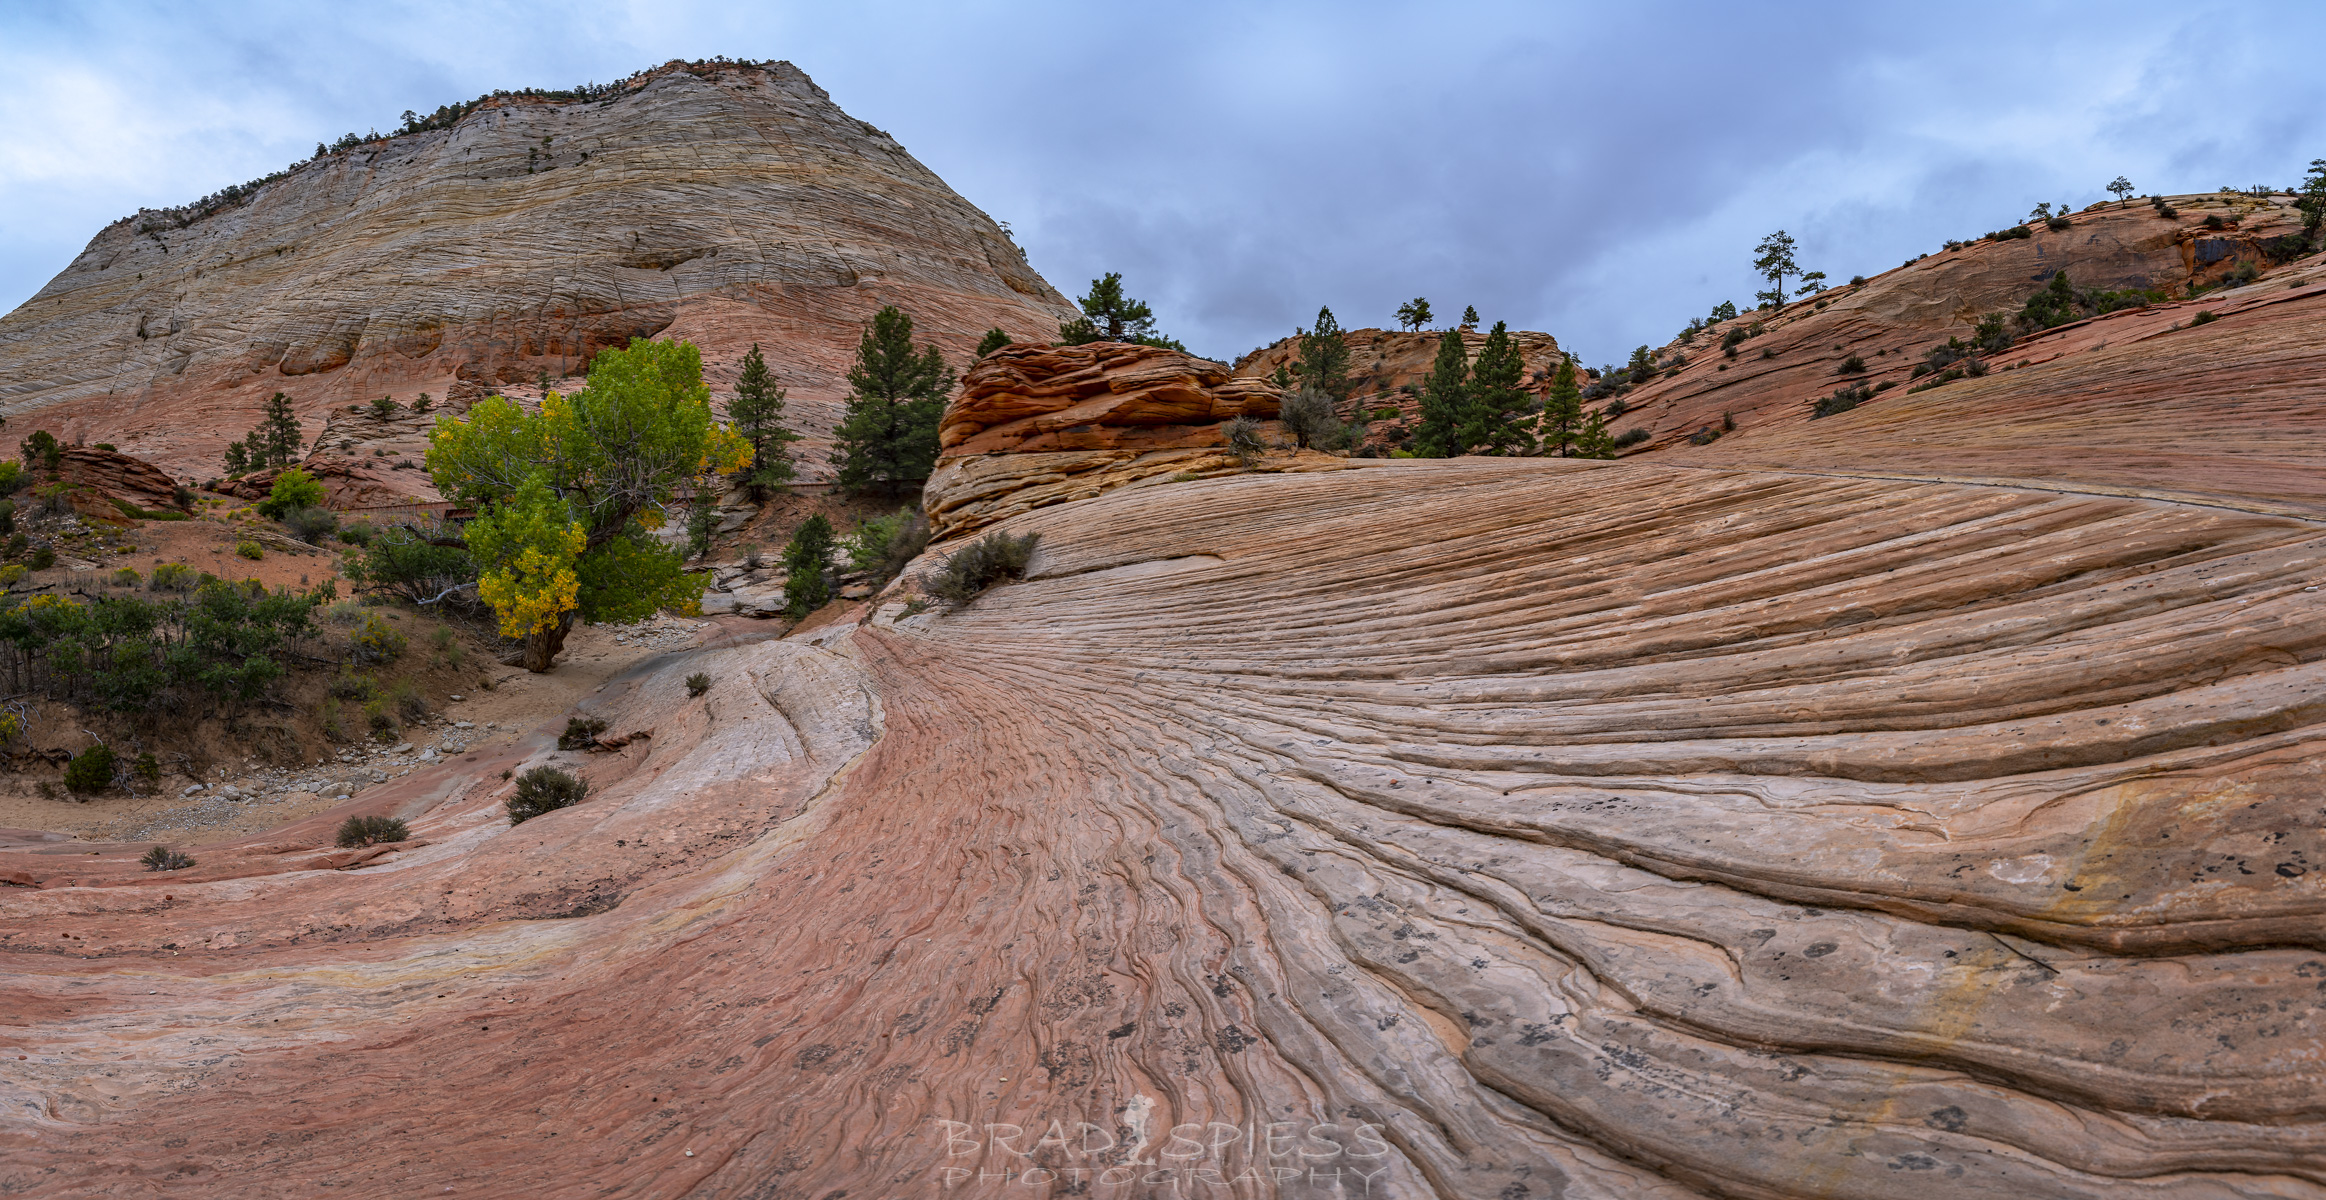
As I was leaving Zion I could not help but stop to enjoy the landscape
As I said at the end of the last write up, take your time as you leave Zion, There is so much to see. It was going to take me about 2 hours to get to Page Arizona and it was starting to rain as I was leaving Zion so I limited my time, but I felt like I could spend a lot of time around that area looking for great compositions with all the leading lines in the landscape.
When I was initially planning this trip out, part of the planning stage was trying to figure out where to set up camp in each area. There were several options around Page, but when looking at them with google maps they did not look all that great. I was left wondering if it would be better for me to set up camp close to town where I was going to be doing most of my shooting or slightly out of town in a nicer camping area. I’m glad I choose the later. I ended up camping at the Waheap RV and Campground on the shores of Lake Powell and only about a 15 minute drive into the town of Page. Looking at making that drive to do Sunsets and Sunrises at Horseshoe Bend and to get to Antelope Canyons I thought it would not really be an issue and I was right. Beyond being such a nice area to camp there also is a Resort near by with a nice little restaurant and bar that made a great place for lunch and dinner.
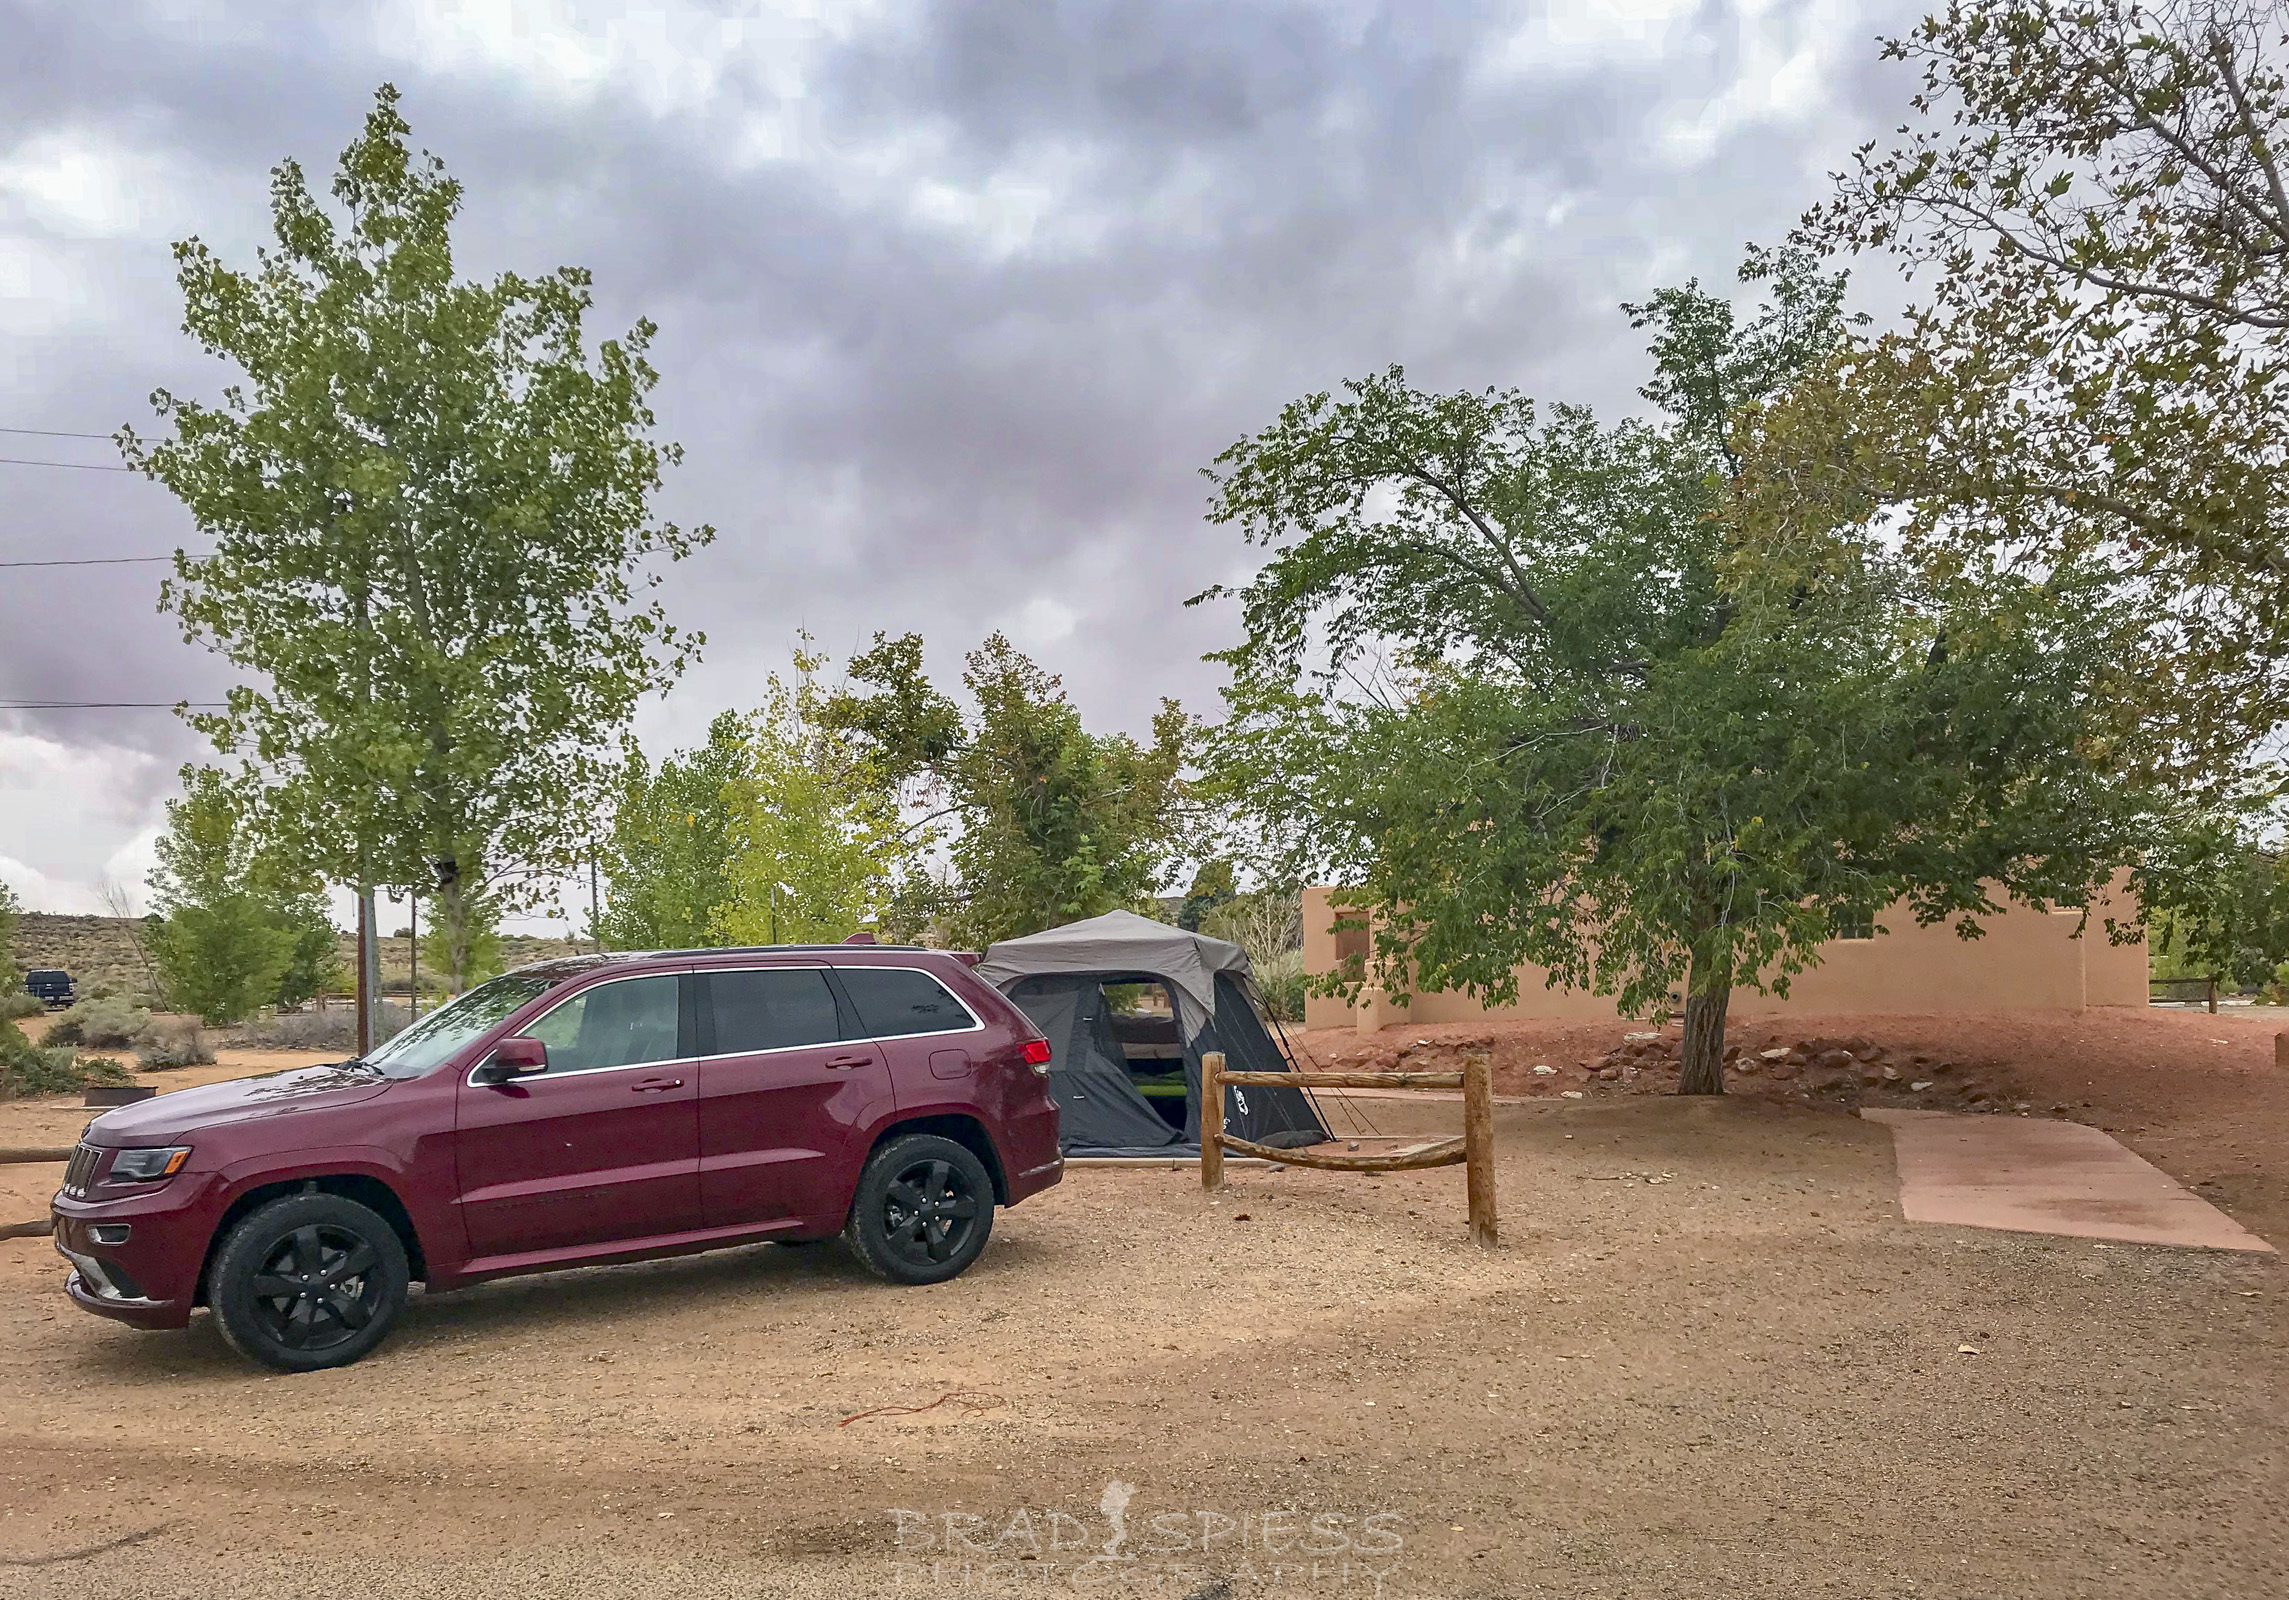
My campsite near Lake Powell in Page Arizona.
I arrived with plenty of time to set up camp, and thankfully so, because not to long after I set up camp it started to rain. I still wanted to scout out locations and my first location was Horseshoe Bend. The nice thing about Page Arizona, most of the things you want to see are not to far away from town. Its only about a 15 minute drive from my campsite into town, as you drive into Page Arizona you will cross the Glen Canyon Dam Bridge, the bridge is 700 high from the river below making it one of the tallest bridges in America, just before you cross the bridge there is a visitor’s center on the side of the highway, I came back to check that out later.
The parking lot for Horseshoe Bend is about 5 Miles after passing over the bridge. Along the way you will pass by Hwy 98, the highway you need to take to both Antelope Canyon sites if you decide to do so. When I arrived at Horseshoe Bend it was raining and I think because of that it was not to crowded. At the time I went parking was free but from what I understand you now need to pay for parking, so I would plan your trip there accordingly as you probably don’t want to keep paying the fees. Motorcycle: $5 , Passenger vehicles (car, truck, SUV, RV, motorhome): $10. I took advantage of the diminished crowds while it was raining to scout out the location and find where I wanted to come back for sunset. Even with a cell phone you can create a great photo, you just don’t have the creative control you do with a professional camera.
A cellphone shot of Horseshoe Bend while it was raining and I was scouting out the location.
After scouting out Horseshoe Bend I had plenty of time before sunset so I took off to see the rest of the town. It was still raining pretty good so I was not to excited about getting out and looking for places to shoot, and I really did not want to go back to my tent to just sit there until sunset, so I stopped by the Visitors Center at Glen Canyon Dam. I looked around inside for a while as the rain came down heavily, I knew it must be a unusual amount of rain from the fact that I saw local law enforcement pulling off the road to walk over to the bridge and capture this site of a impromptu waterfall on the side of the canyon which I decided to check out later myself.
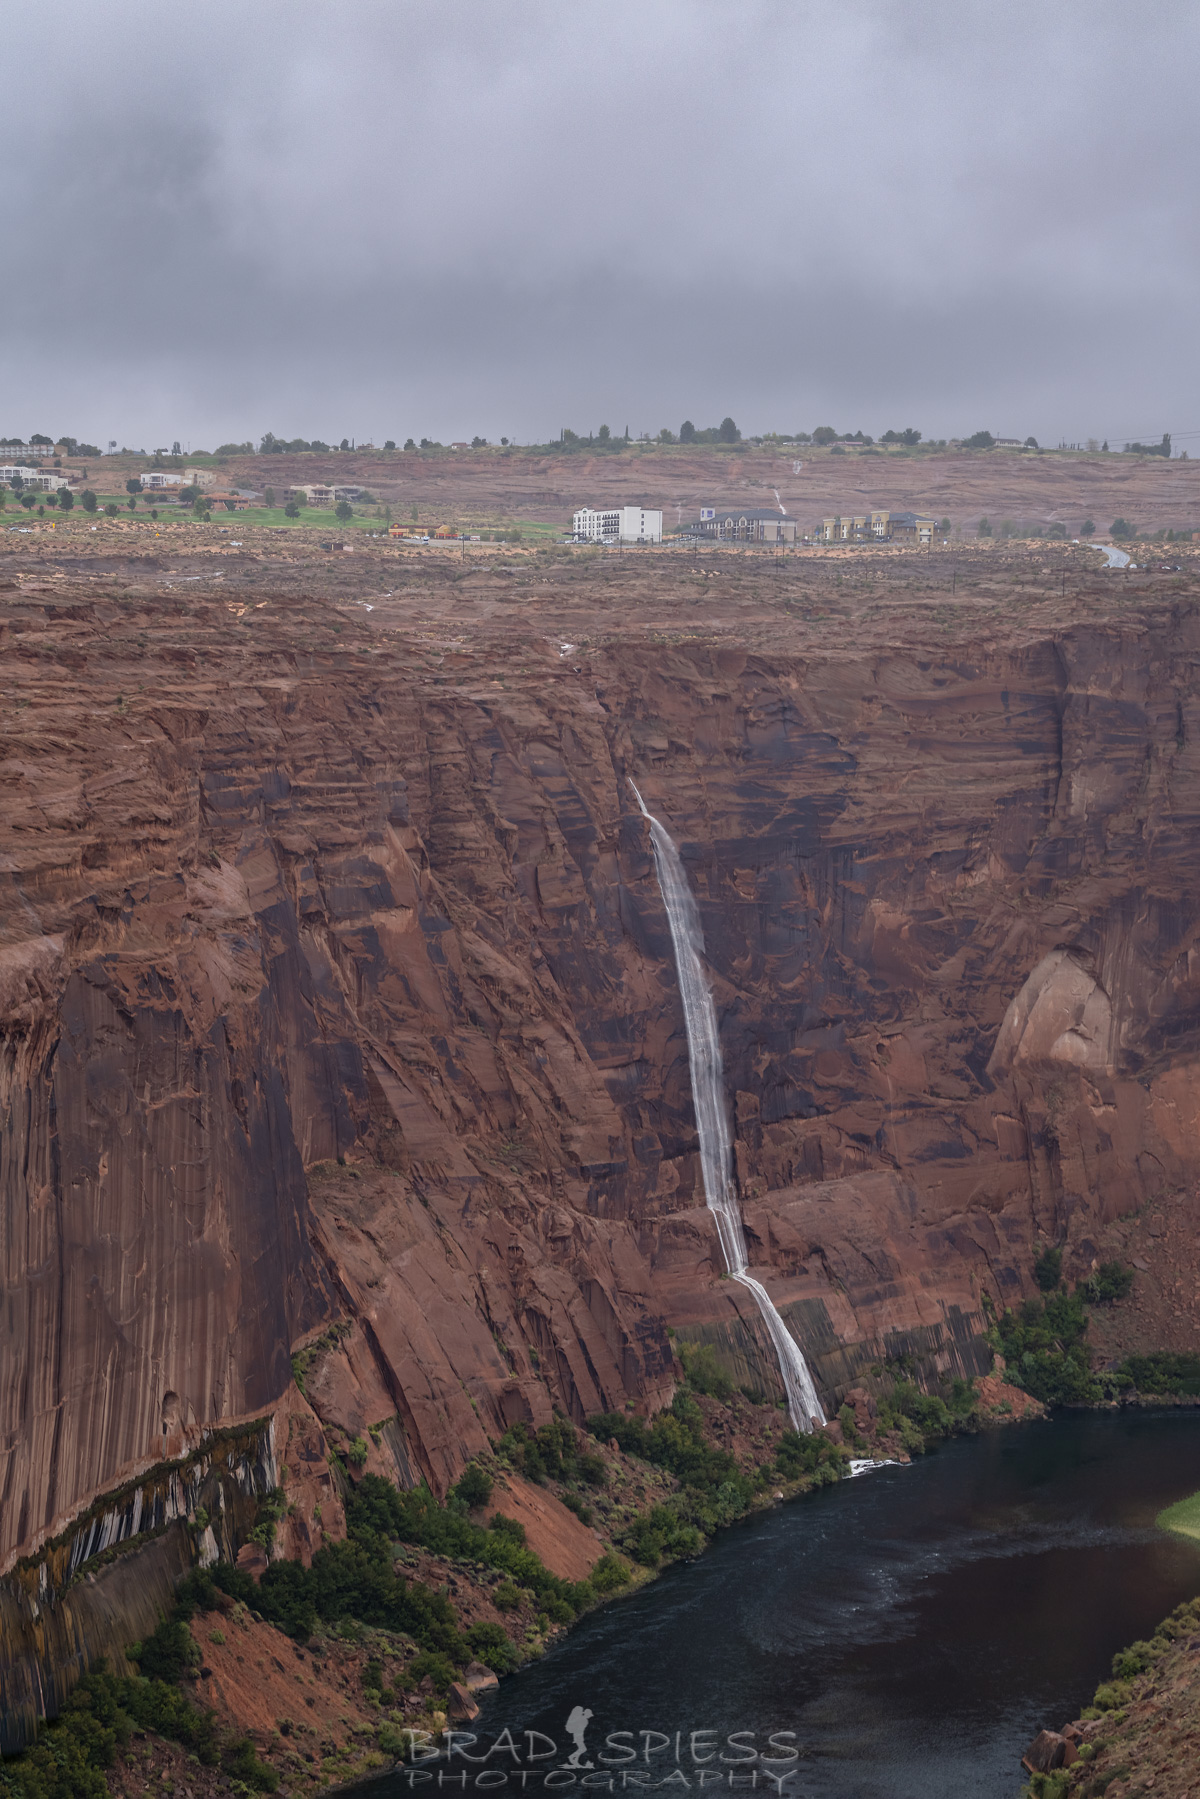
A Impromptu waterfall in the Glen Canyon Dam area of Page Arizona.
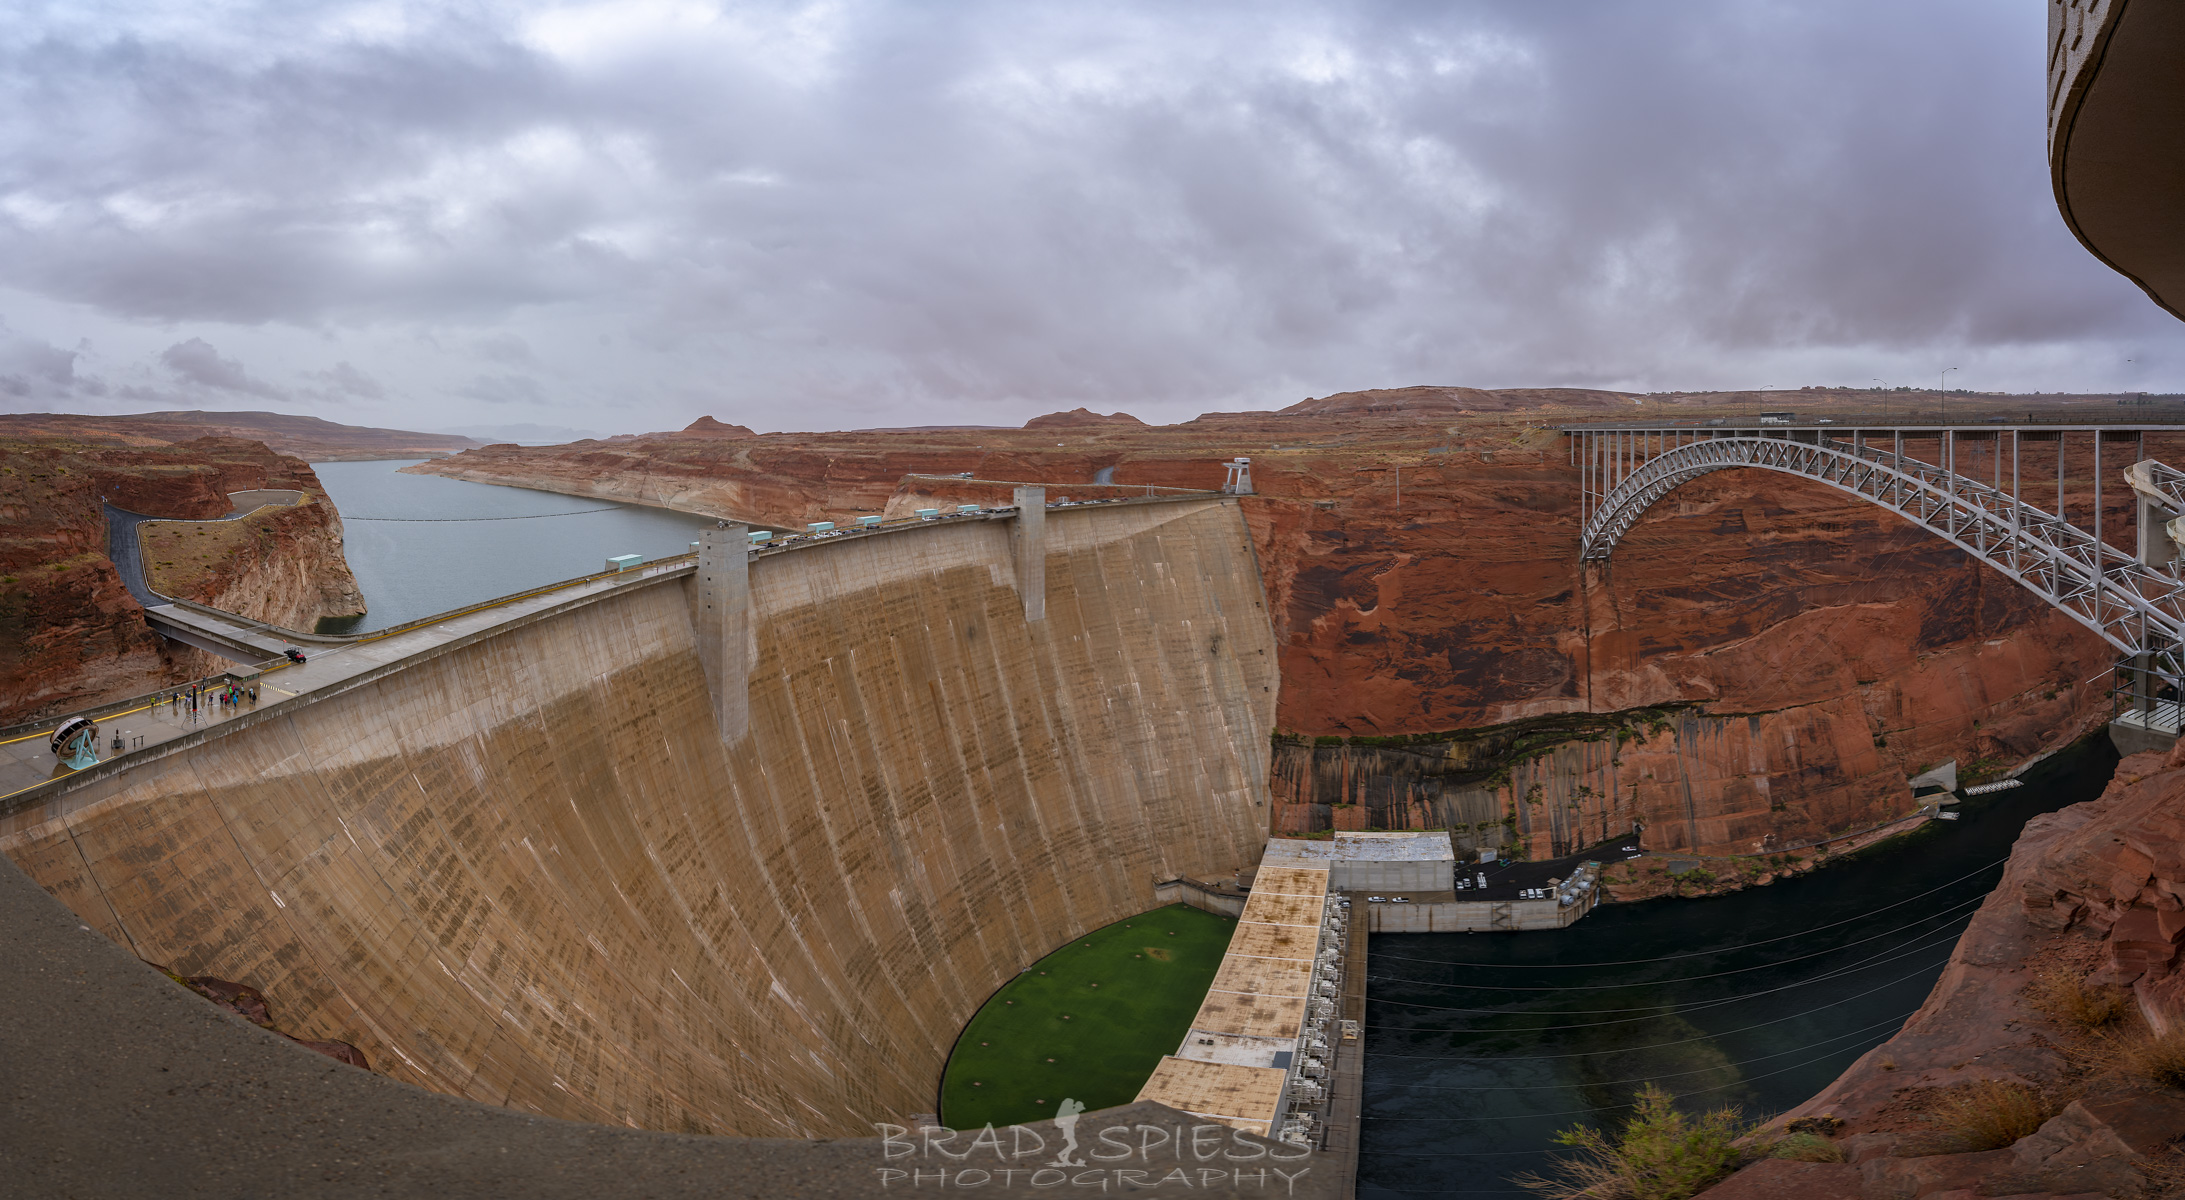
Glen Canyon Dam and Bridge
After spending some time at the Glen Canyon Dam Visitors Center I decided to go check out the area that led to the impromptu waterfall I was seeing on the side of the Glen Canyon area. The rain had diminished to some light drizzle but the sky did not look like it was going to be that great light for sunset so I decided to explore and see what else I could find. From looking across the canyon it was easy to figure out where I needed to go in order to find what I was looking for. It ended up being the Glen Canyon Dam Overlook area. After checking out the official overlook area I noticed a number of trail cairns leading away from the parking lot. I started to follow them only expecting to scout things out, so I only took my cellphone. I soon realized that I had found the drainage area that led to the waterfall I was seeing on the side of the Glen Canyon wall so I started to follow it towards the cliffs. I got some nice shots with my cellphone and got very close to the edge of the cliffs before deciding that was far enough, I thought about heading back to the car and getting my gear so I could set up and get some interesting shots, but as I did so the sky started to open up and I got excited. I decided that I needed to high-tale it over to the Horseshoe Bend area because the sky was looking promising so I never came back to this area but the landscape was very interesting.
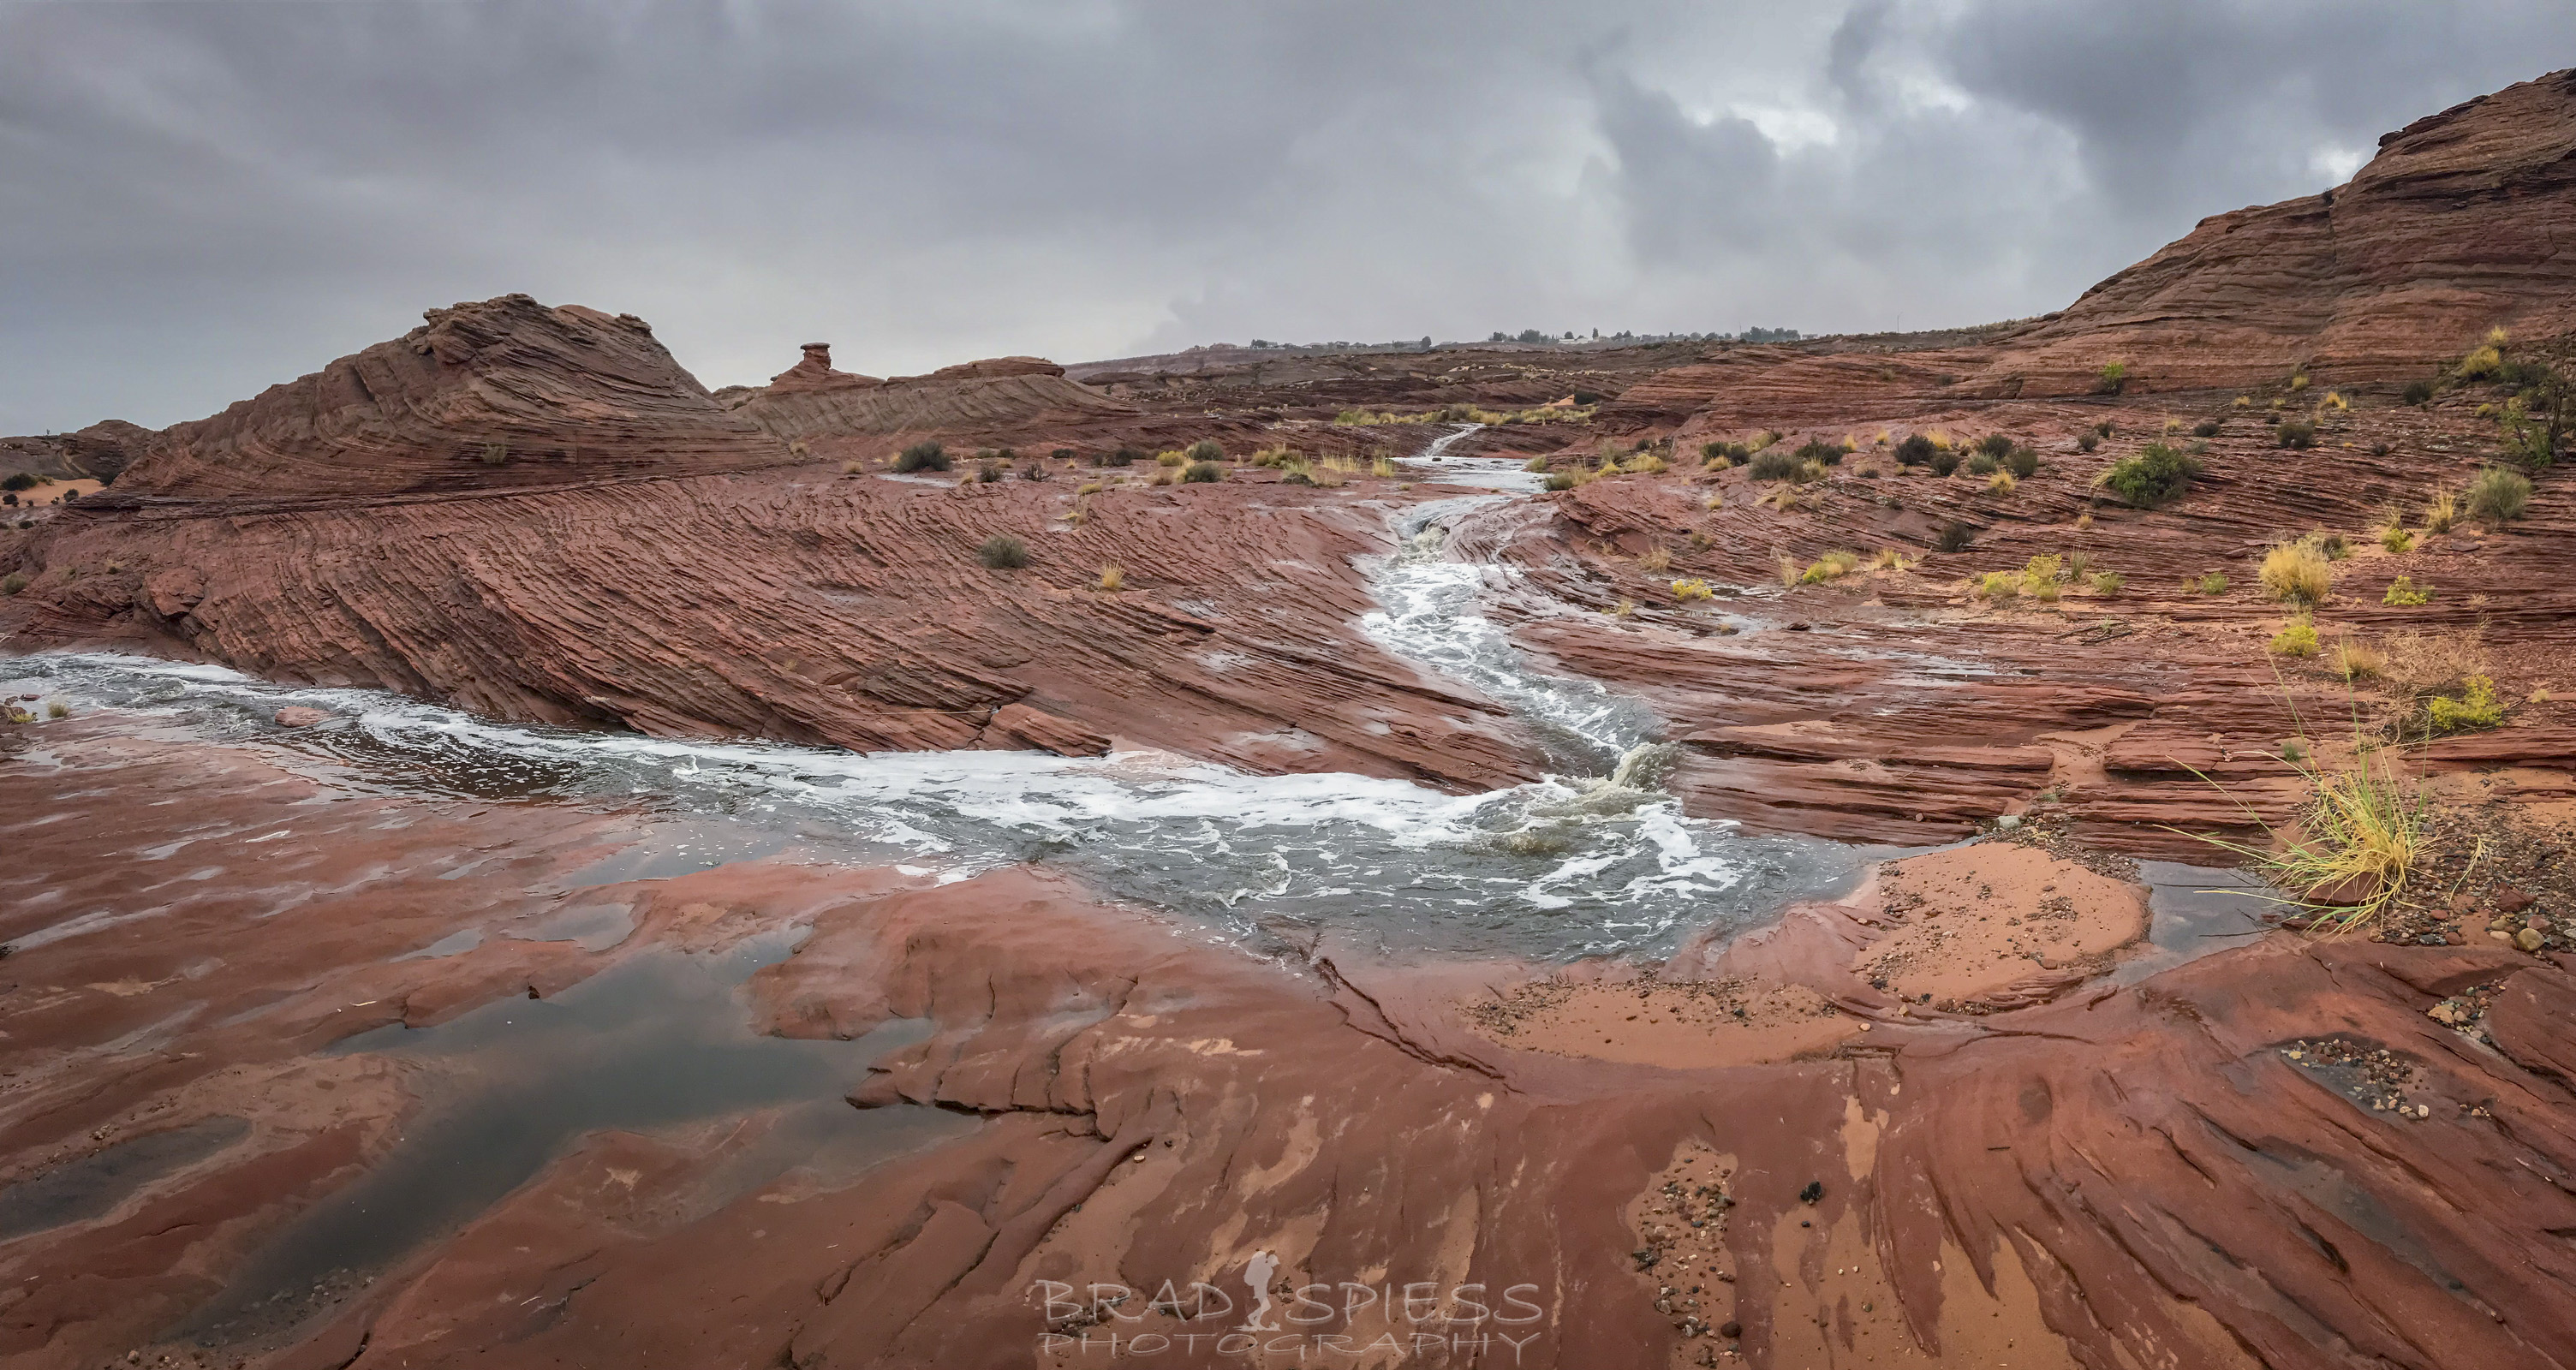
Cell phone shot of the drainage area leading to the waterfall that I was scouting out.
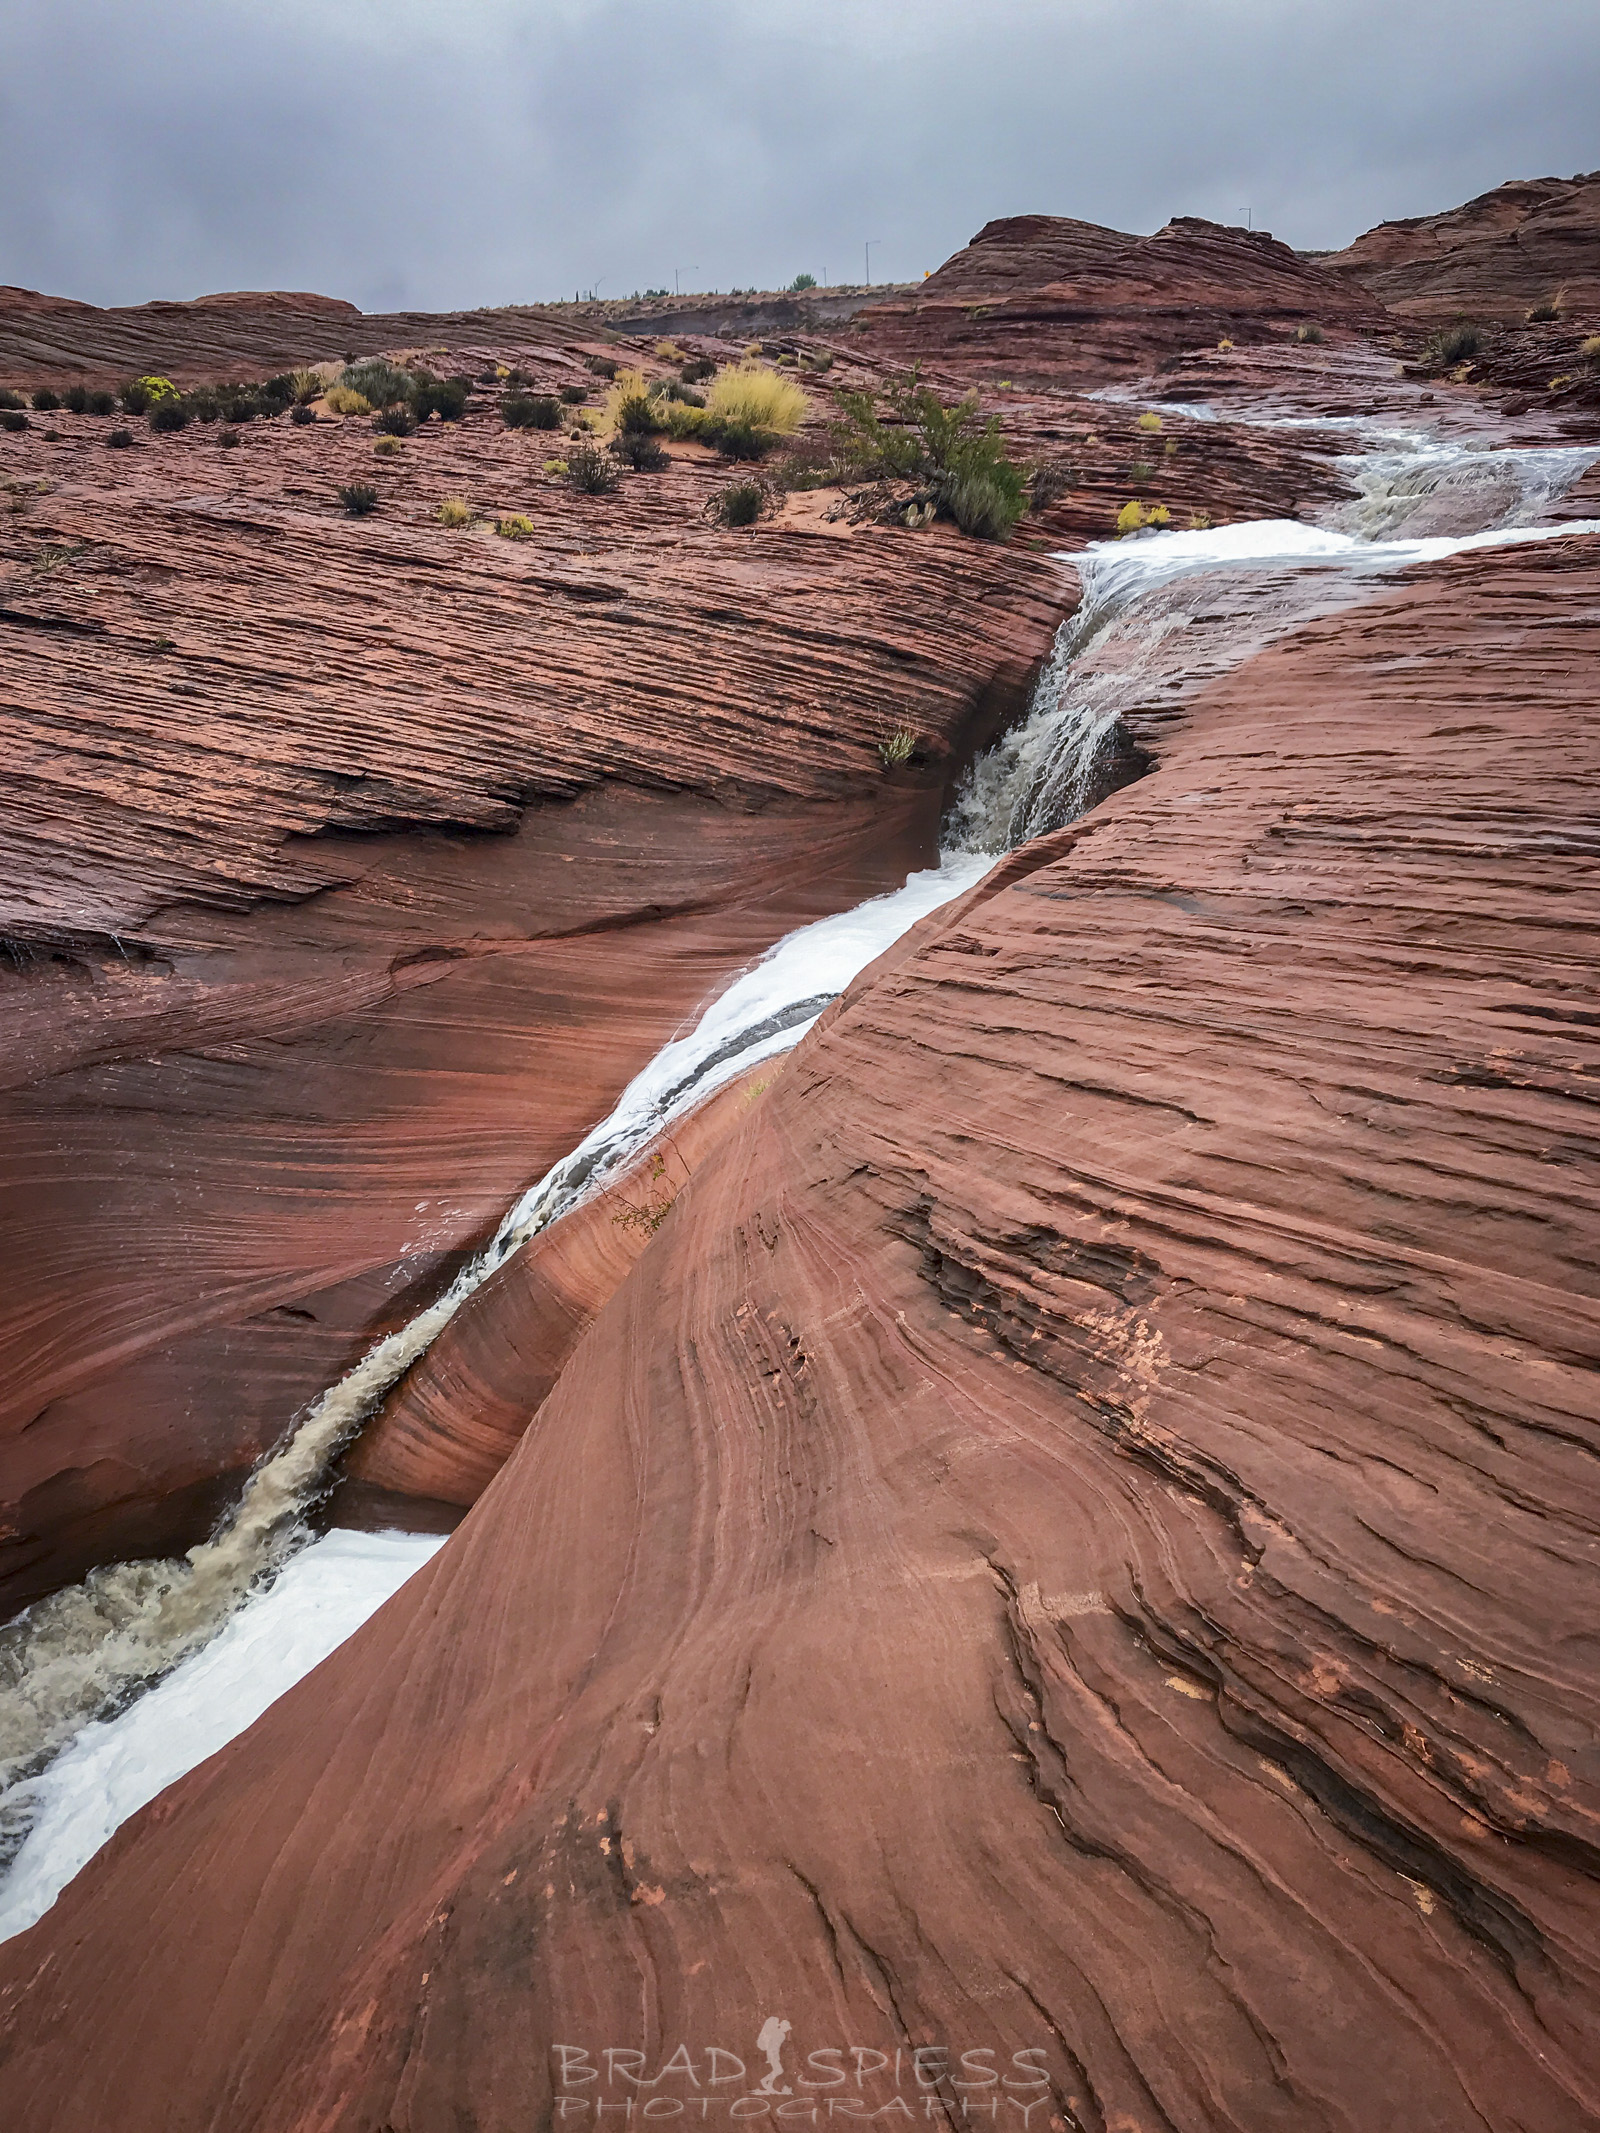
Another cellphone shot of the drainage leading to the waterfall, not bad, I wonder what kind of shots I could have gotten with my gear.
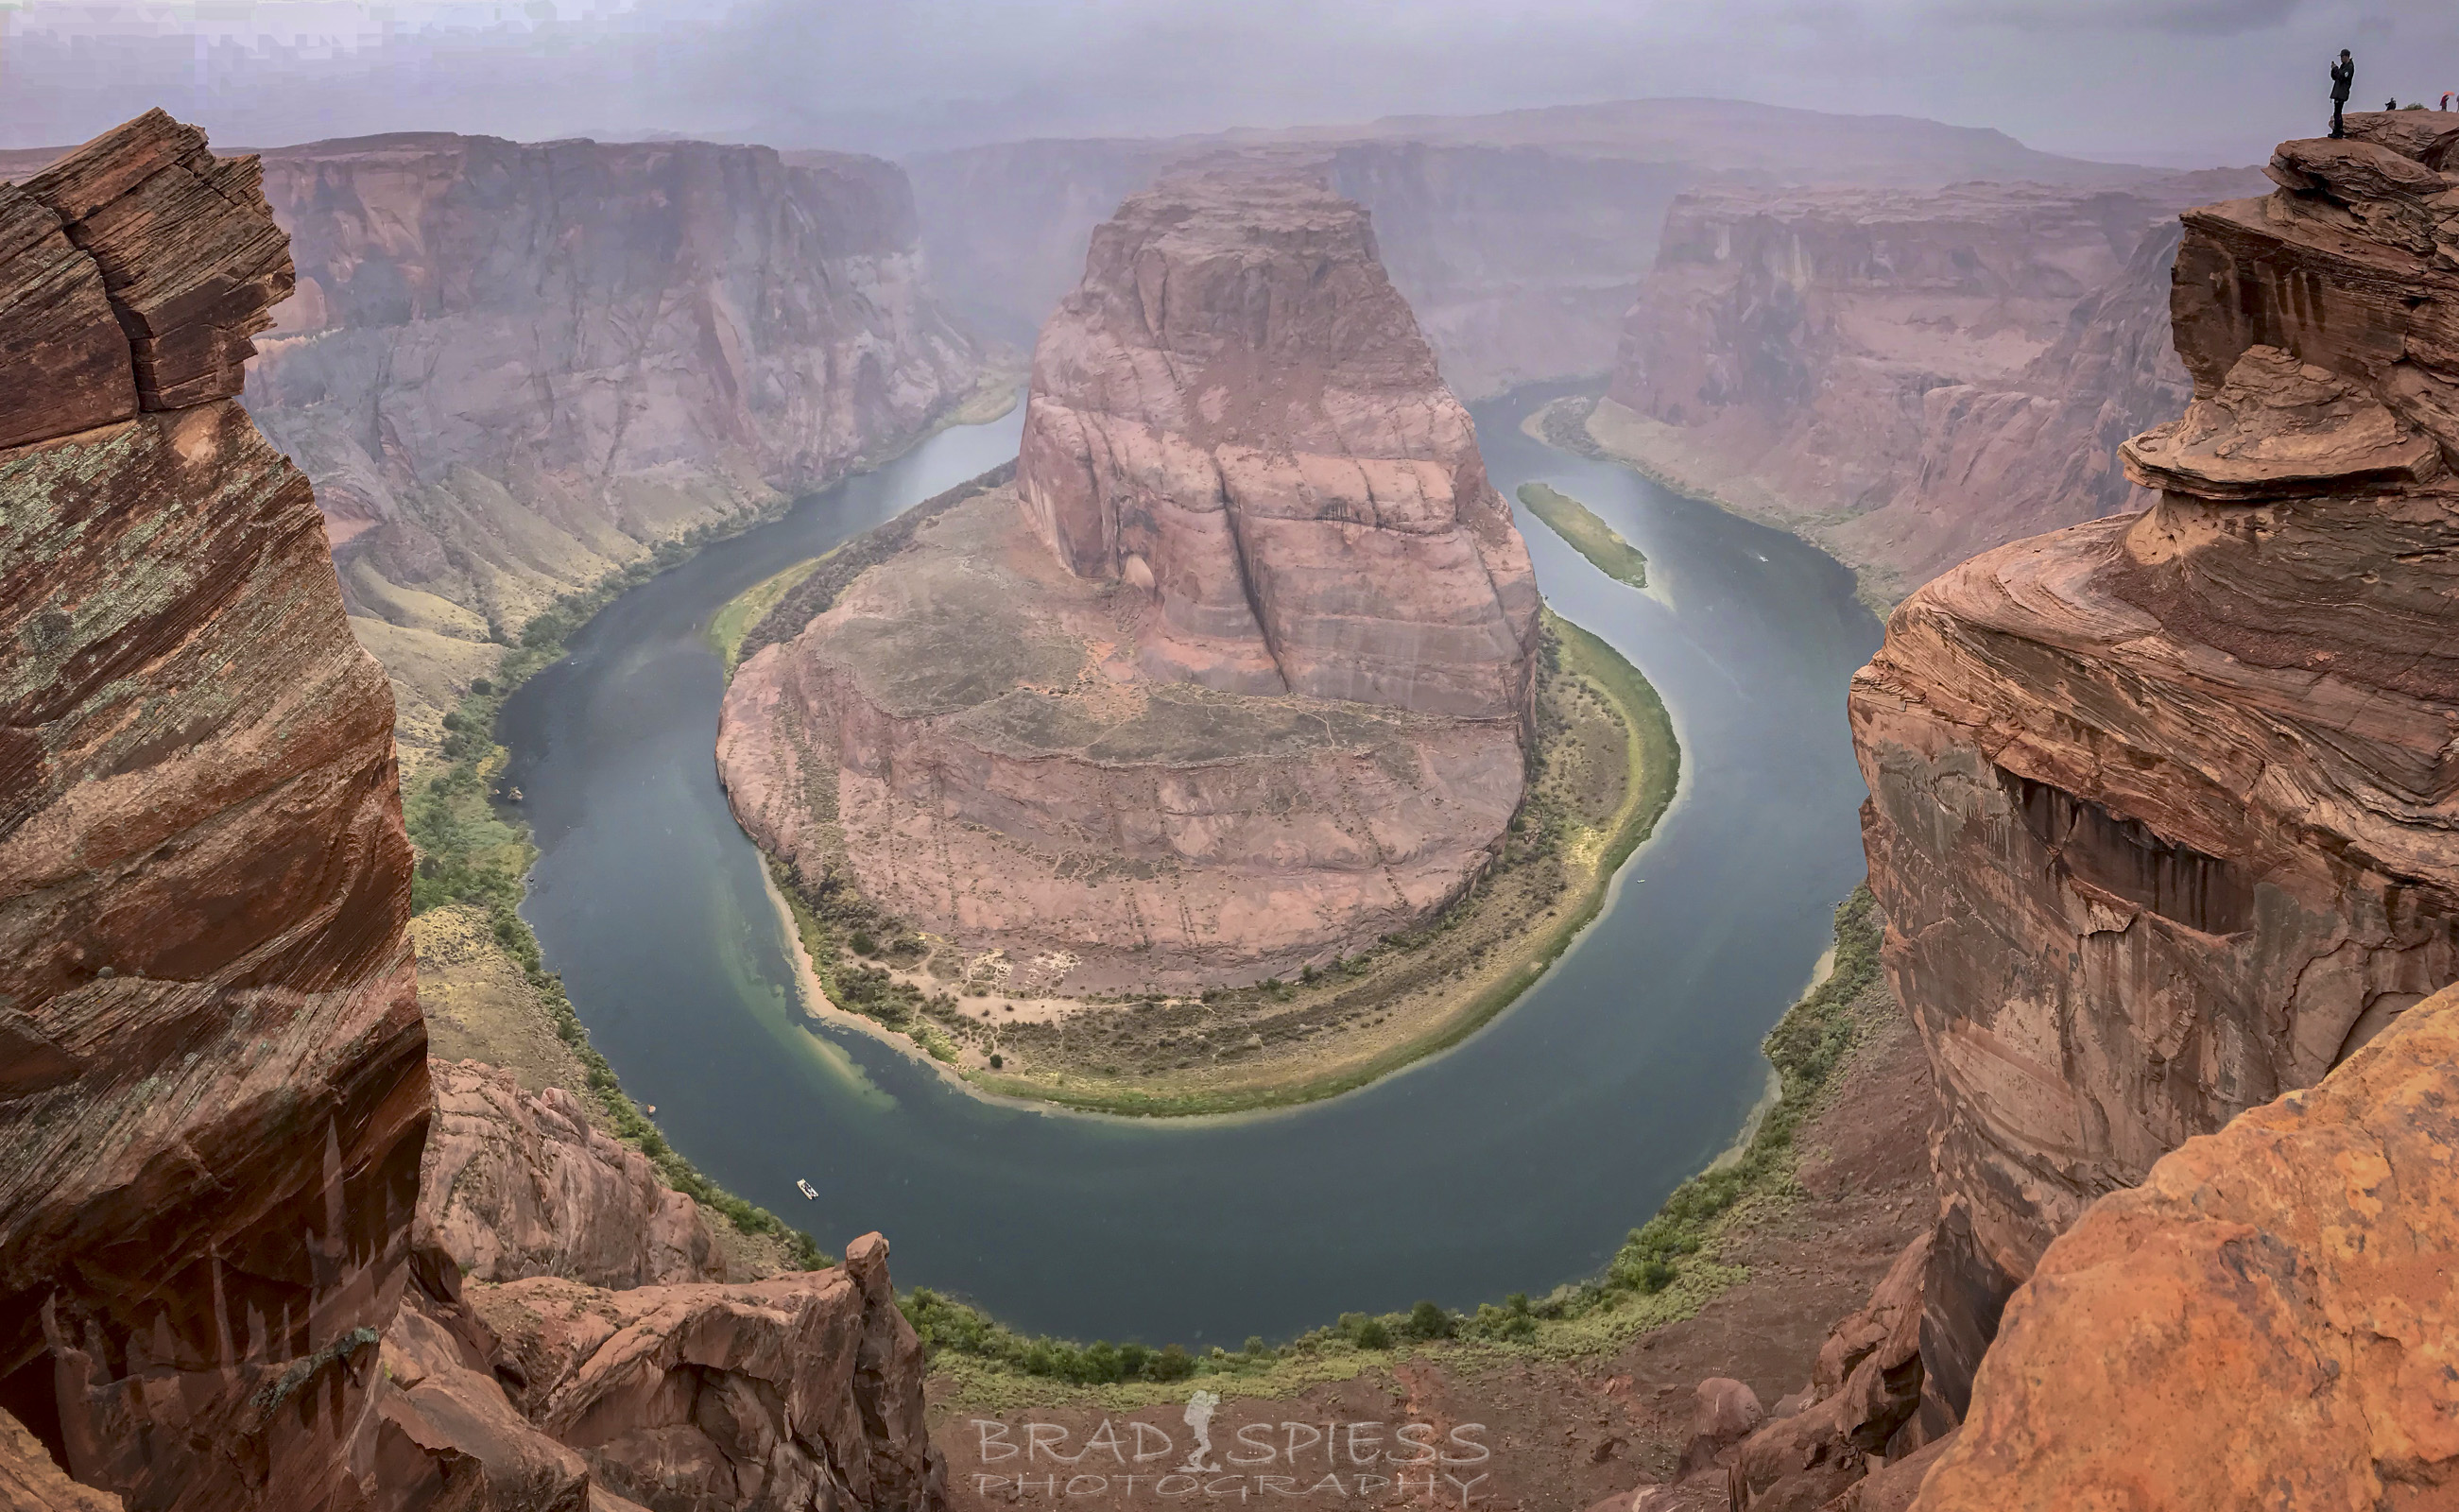
It drove back to the Horseshoe Bend area and hiked over to the overlook and quickly found the area that I had scouted earlier in the day. I set up my gear and waited for the light to give me a show. It always amazes me how some of these popular areas can be virtually empty when I arrive to set up my gear and then right at sunset become complete zoos. I placed my tripod set up very near the edge of the cliff where I could get the composition I wanted, but I was afraid someone might bump it off of the cliffs, so I held onto my tripod by one of its legs and put my backpack behind me to give myself a little buffer zone. I kid you not, even with that set up at one point I felt someone looking over my shoulder and someone had their cellphone over my shoulder looking to capture what I was shooting, I am afraid of heights so that kind of gave me the willies. I was very happy with my location and nature did not disappoint, giving us a great show towards sunset with the clouds first obscuring the view and then lifting to give us a fabulous view as the sun light up the clouds in the background.
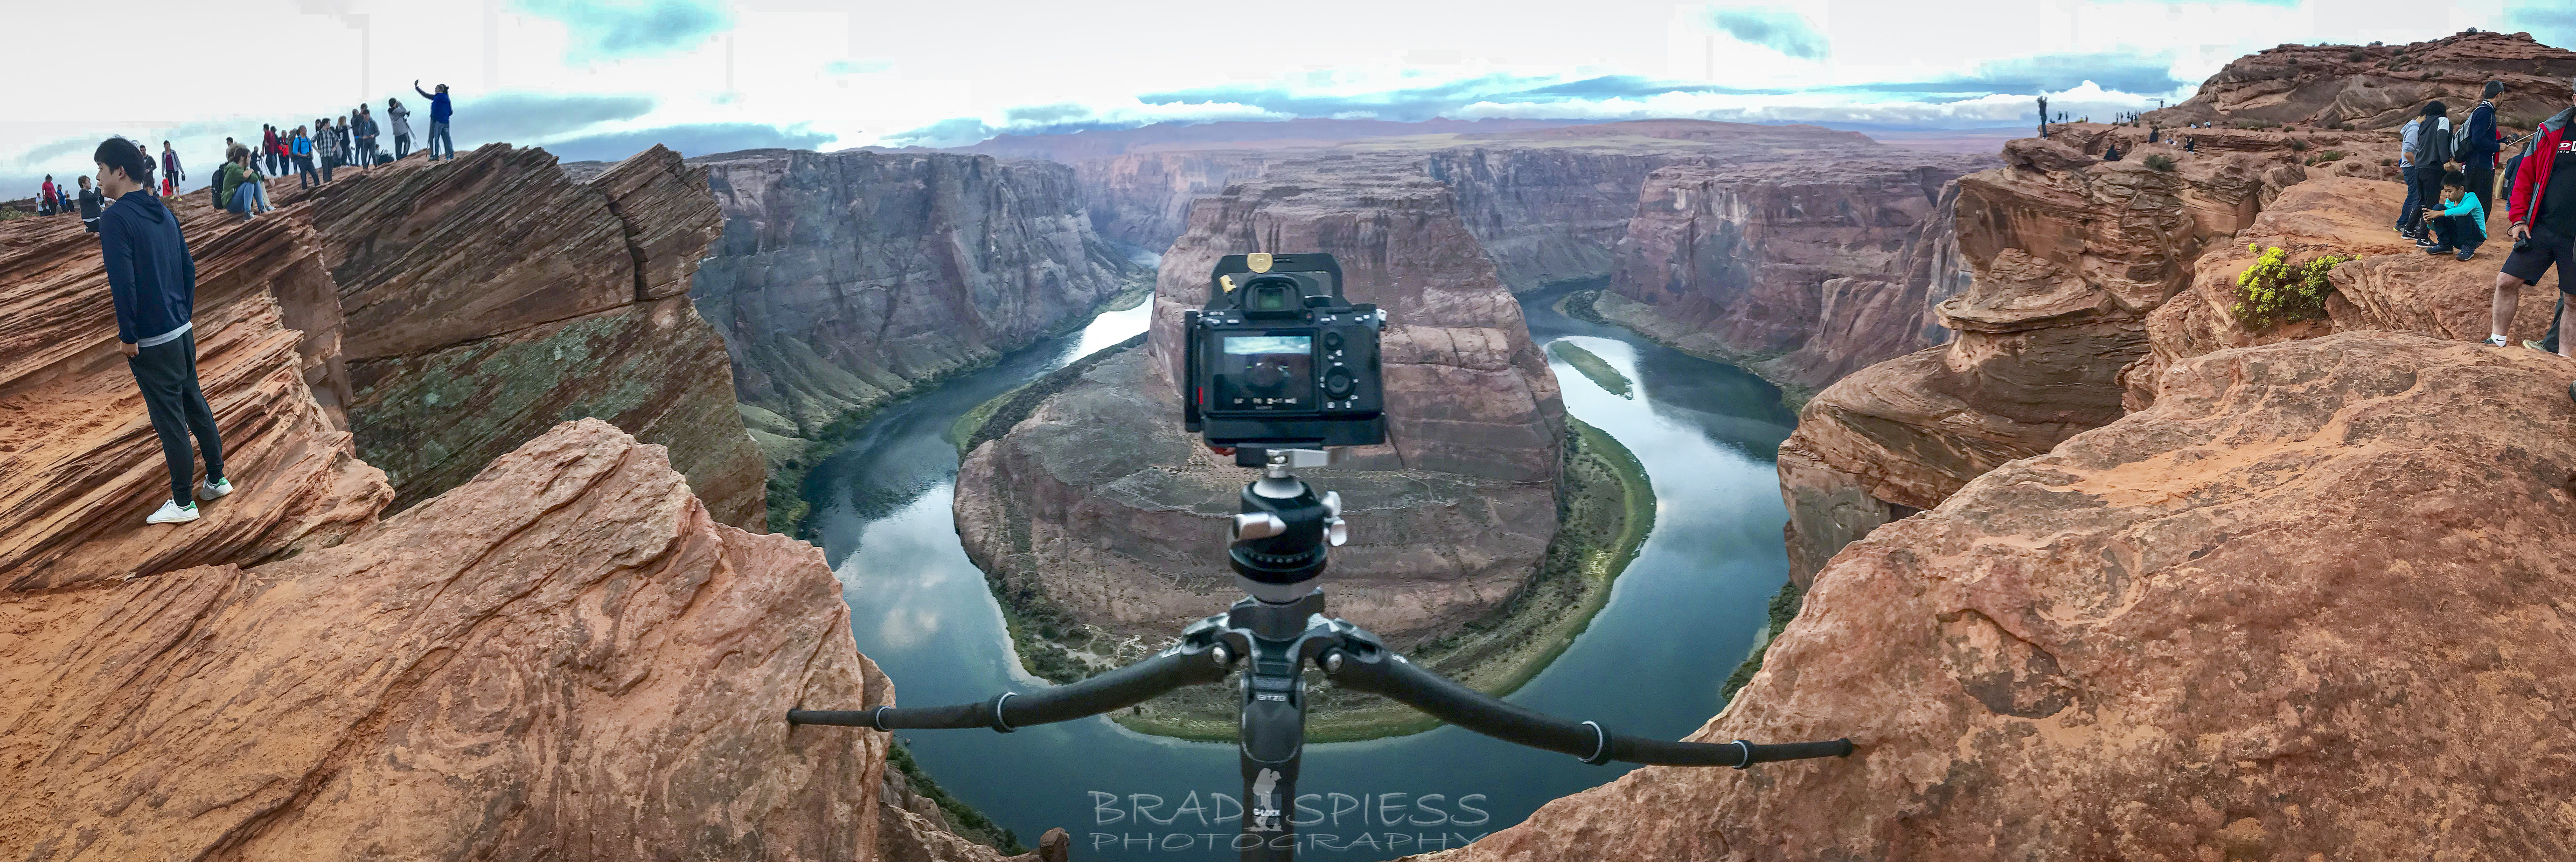
My camera gear set up on the edge of the cliff looking out at Horseshoe Bend.
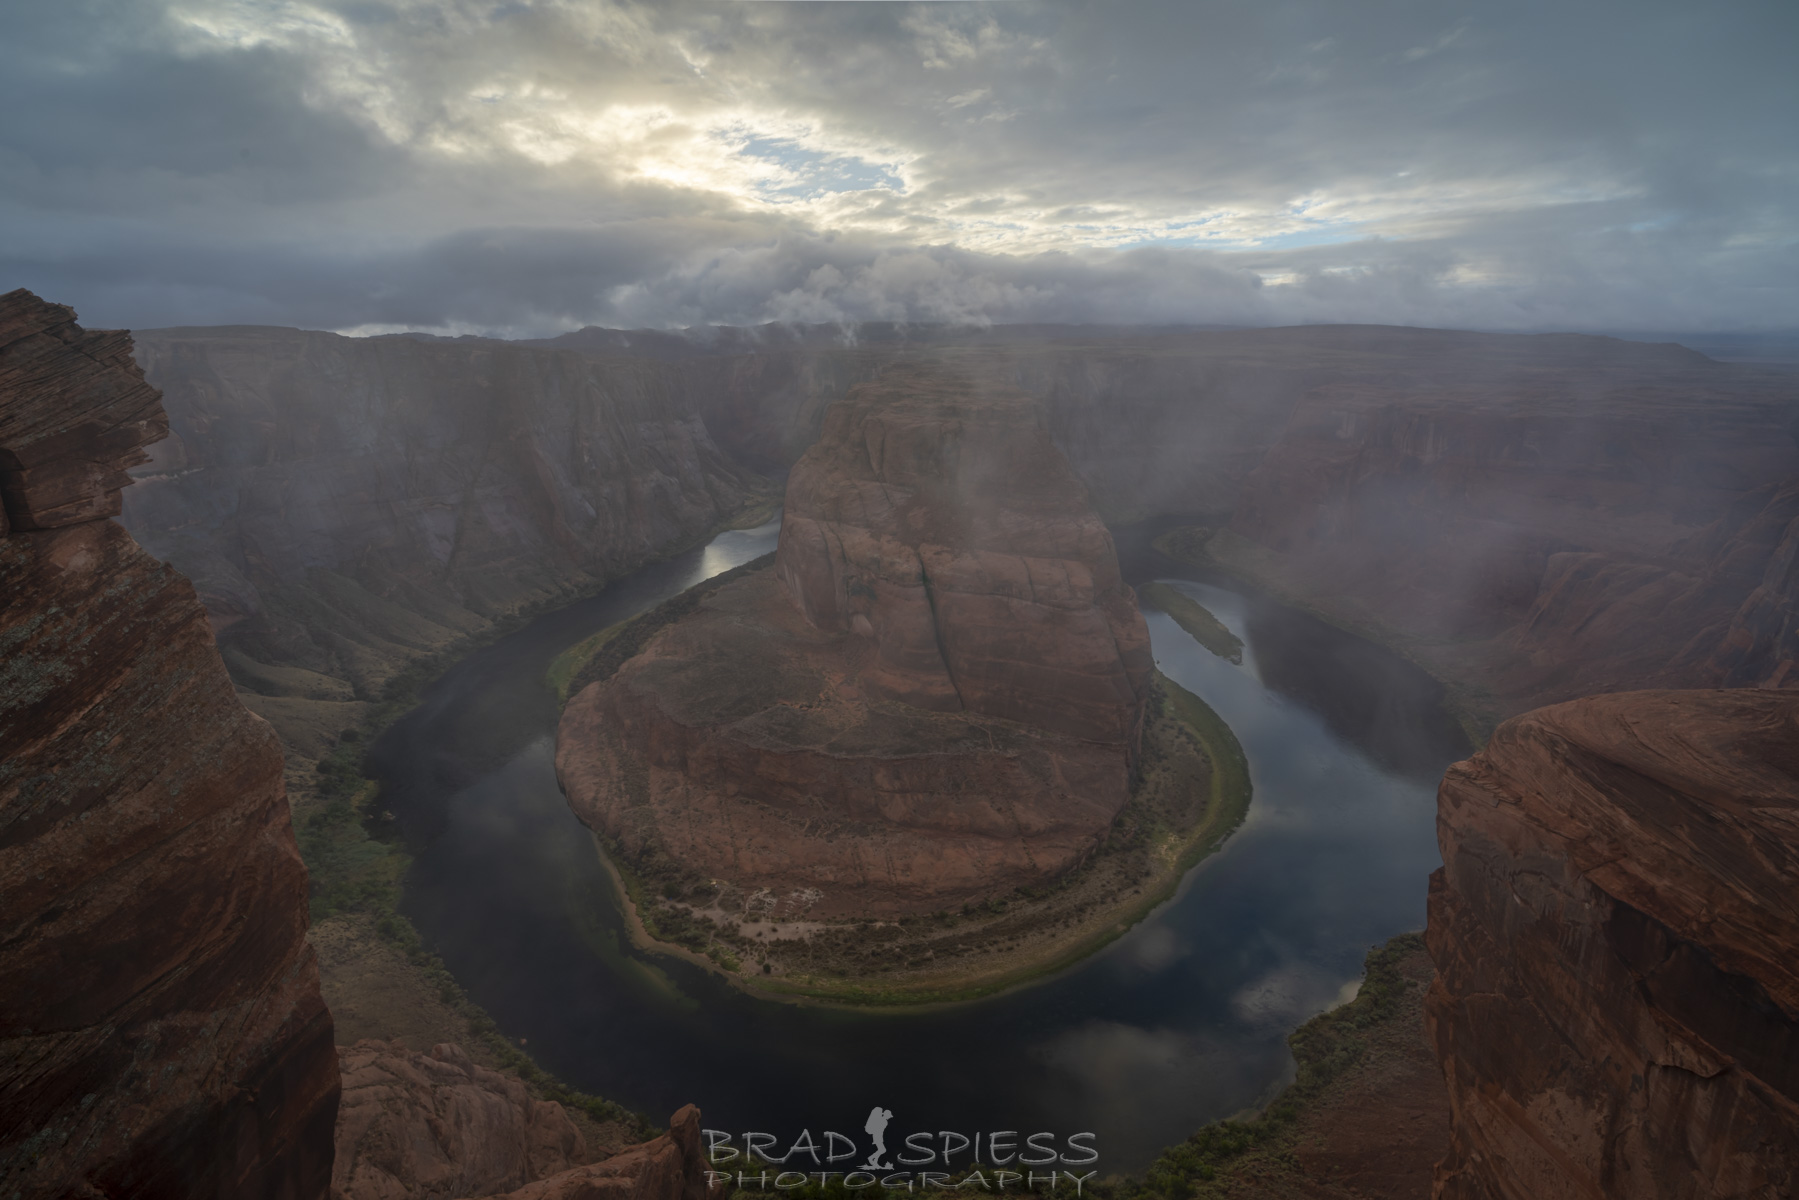
Waiting for the clouds to lift out of the Horseshoe Bend area just before sunset.
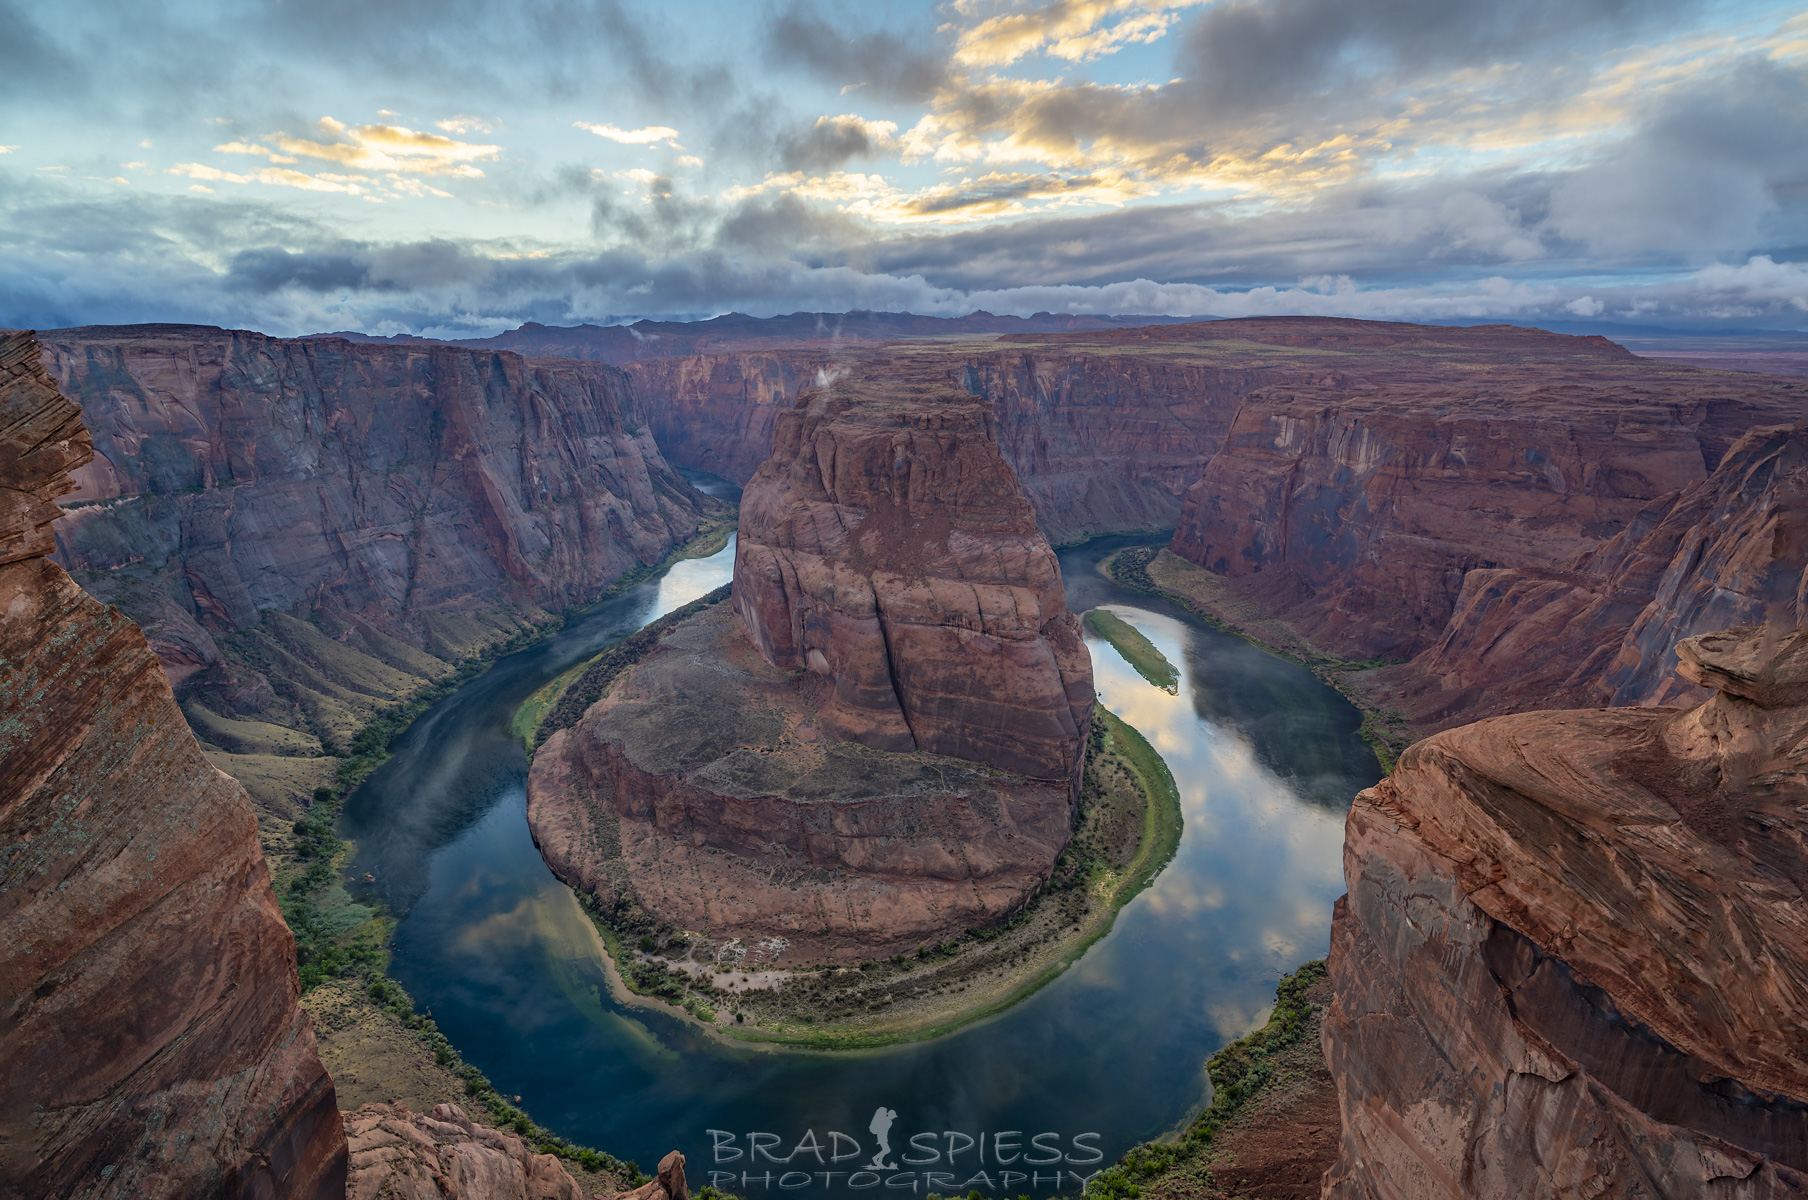
Rewarded with a great sunset at Horseshoe Bend after the storm clouds lifted.
After shooting the sunset at Horseshoe Bend I headed back to camp but I decided instead of having a camp dinner I would have something nice, remember that resort that was right next door. It was a little crowded, I don’t think anyone wanted to head out in the rainy weather, but that was fine, I brought my memory card and laptop and that gave me time to work on some photos as I ate dinner in a perfect corner spot that opened up for me. I had thought about shooting the Milky Way back at Horseshoe Bend but those clouds didn’t seem like they were going to go anywhere, so instead I headed back to my tent and got some shut eye so I could get ready for the next morning.
I originally thought about shooting sunrise at Horseshoe Bend for sunrise and then I would head back to camp to pack it up and head out for Antelope Canyons, but I decided not to because I thought it was going to be bit of a tight of a squeeze time wise, I think I had forgotten about the time difference, Arizona does not use the national Day Light Savings time, but the Navajo Tribe areas around Page Arizona do, so it can get very confusing sometimes. Anyways I arrived at Upper Antelope Canyon for my Photography Tour in what I thought was the nick of time, only to figure out that I was about an hour early,…well better early then late I thought.
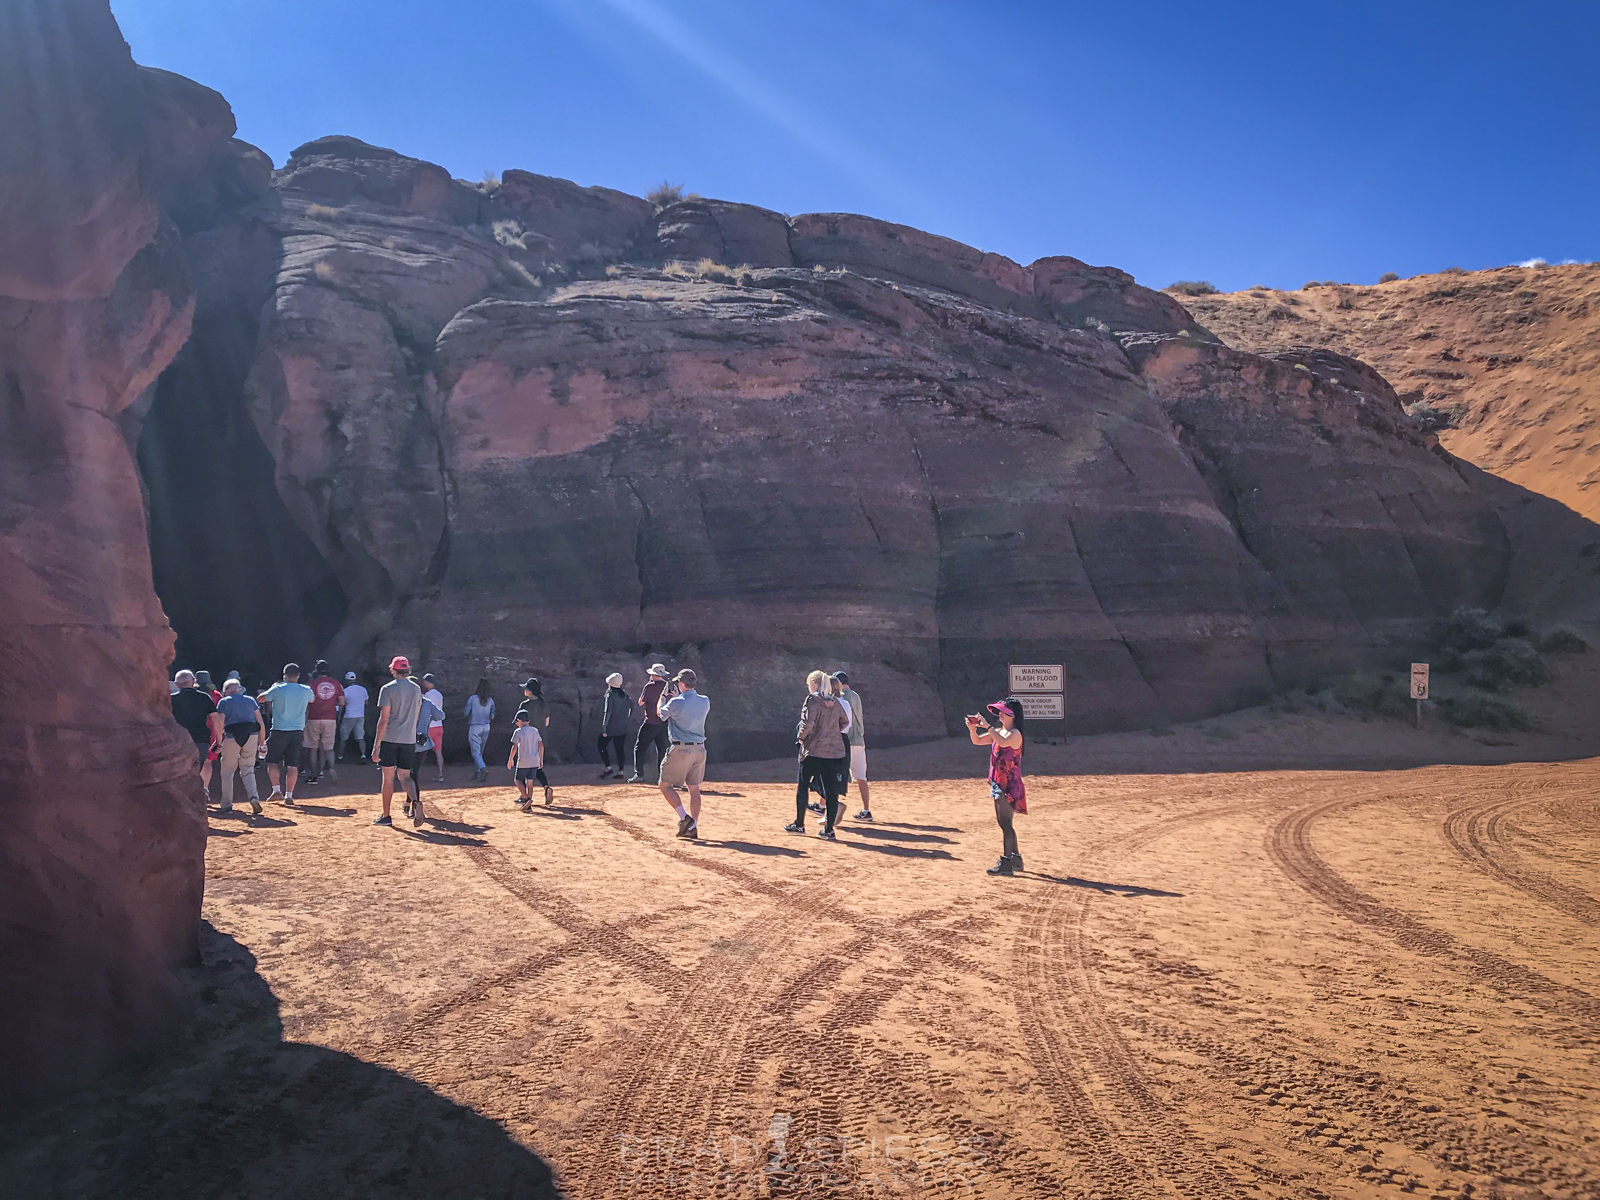
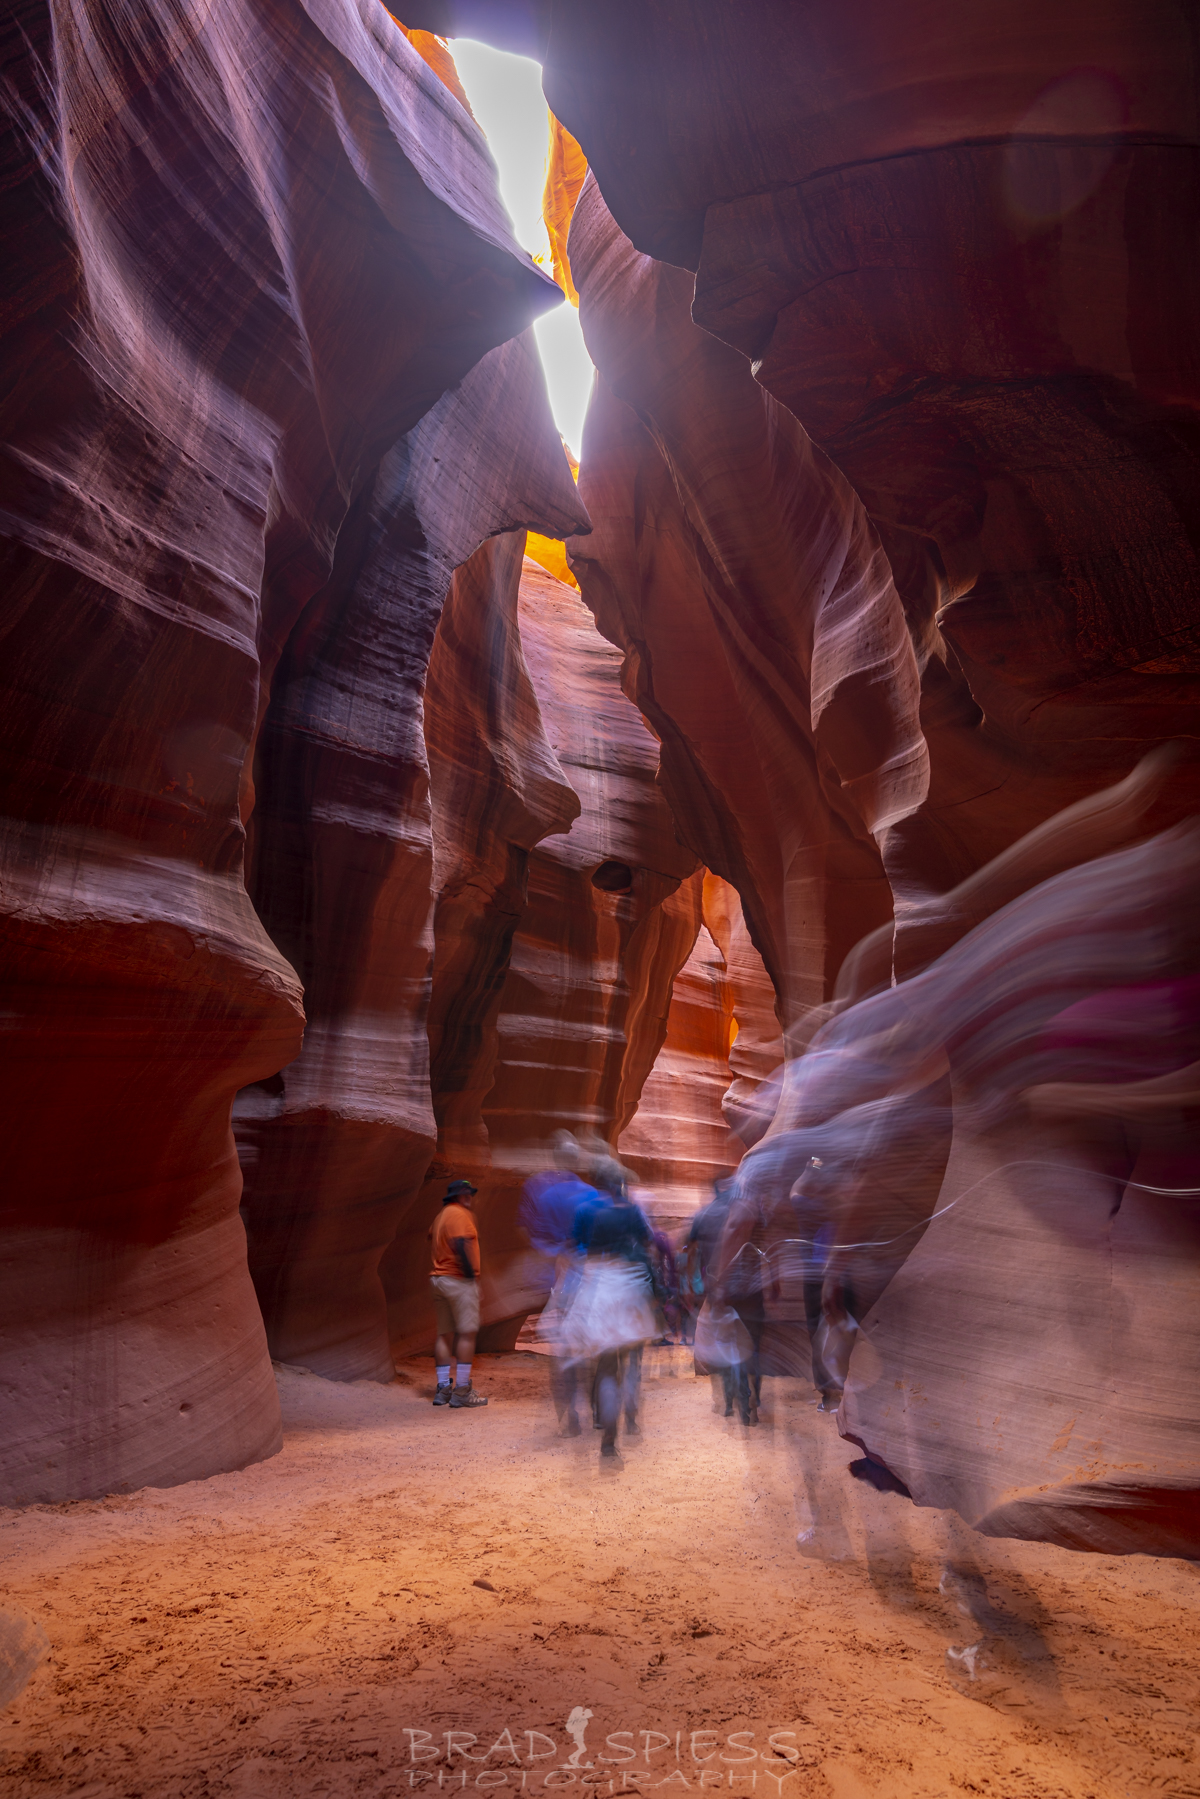
The normal tourist tour of Upper Antelope Canyon heading into the canyon.
You can choose a regular tour or the “Photographic Tour” for Upper Antelope Canyon, the Photographic Tour requires that you do have a camera ( not just a cellphone) and allows you to bring a tripod, a must have for such dark locations where you will need to do longer exposures and usually bracket your photos in order to get the exposure you want. Despite the advantages to a photographer that the Upper Canyon Tour gives you I find it a bit to structured. You will all meet at Upper Canyon Tour area and then split up to take a SUV ride out to the entrance of the canyon. Once there your guides will go over some rules and what to expect, depending on the equipment you have, half of the people on your tour will put their tripods in the lowest position possible while the other half will keep them at the tallest position possible. When you go into the Canyon, the lower half will be kneeling in front, while the upper half will be standing behind them. I understand the need for this but it just feels to constrained for my tastes.
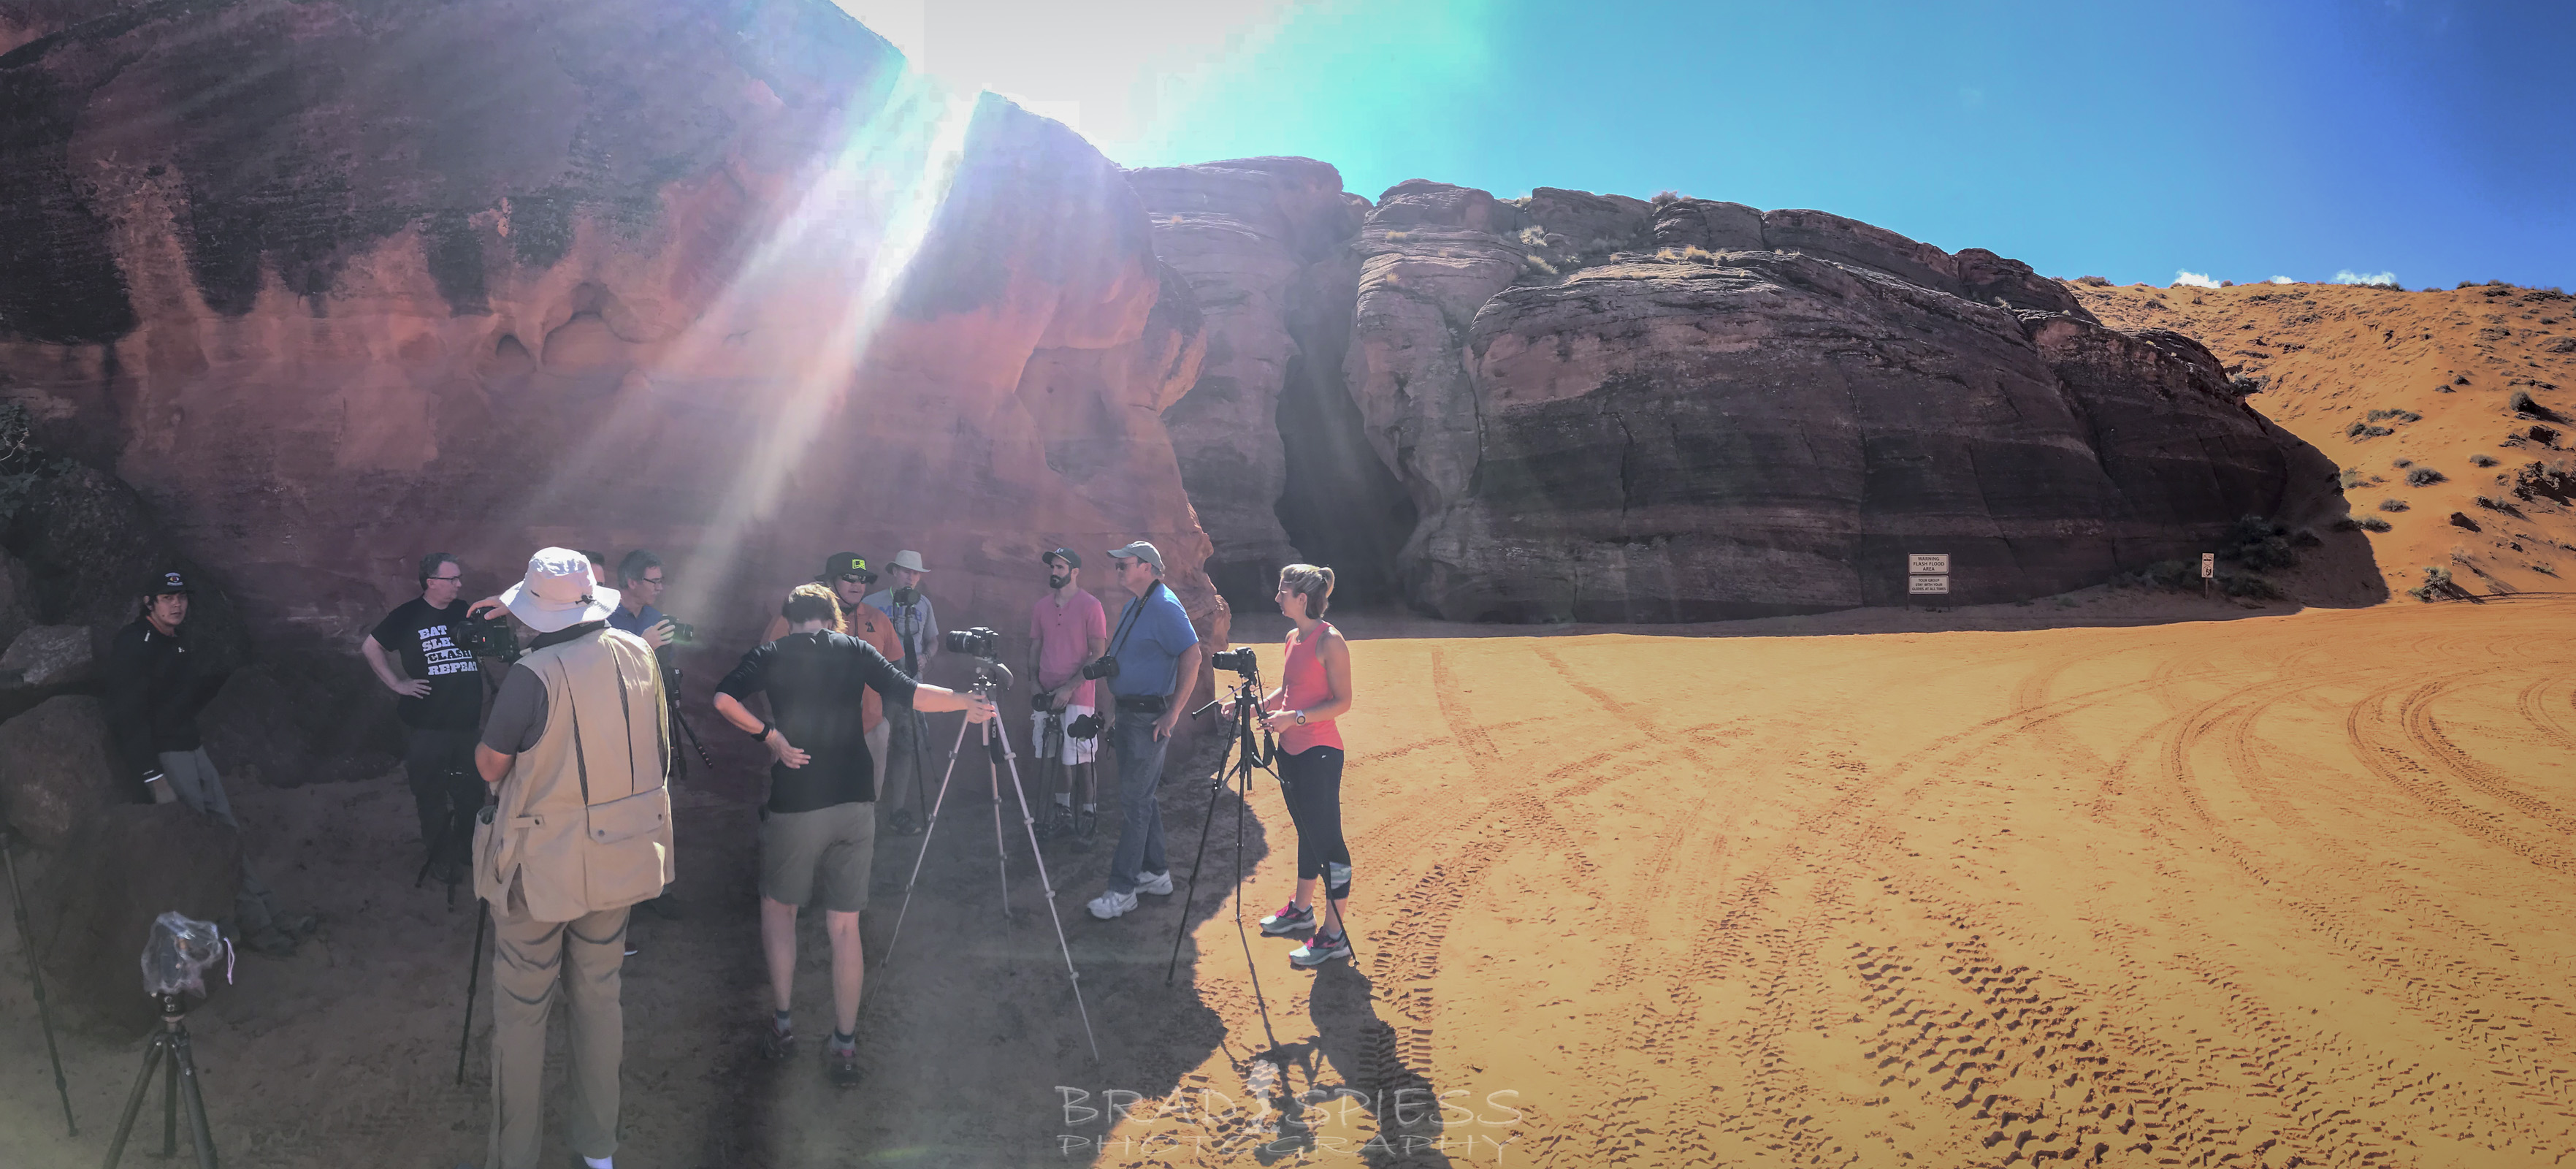
Our group getting last minute instructions from the guides before heading into the Upper Antelope Canyon Photographic Tour.
You will be sharing the canyon with other “normal” tourist groups. Your guides will get you to a specific location, then they usually will draw a line in the sand with their feet and tell half of you to kneel behind this line while the other half stand behind waiting for the groups of tourists to past buy, giving your group a short amount of time to snap off pictures before the next group comes buy, usually your guide will tell you, ” you have 30 seconds to get your shots in” and as you get close to the end of that time the guide will start a count down, “10, 9, 8… etc”. Again, like I said it feels a little to structured for me, but it does give you a chance to get some great photos.
A guide waiting on his group to pass through on the Upper Antelope Canyon Tour.
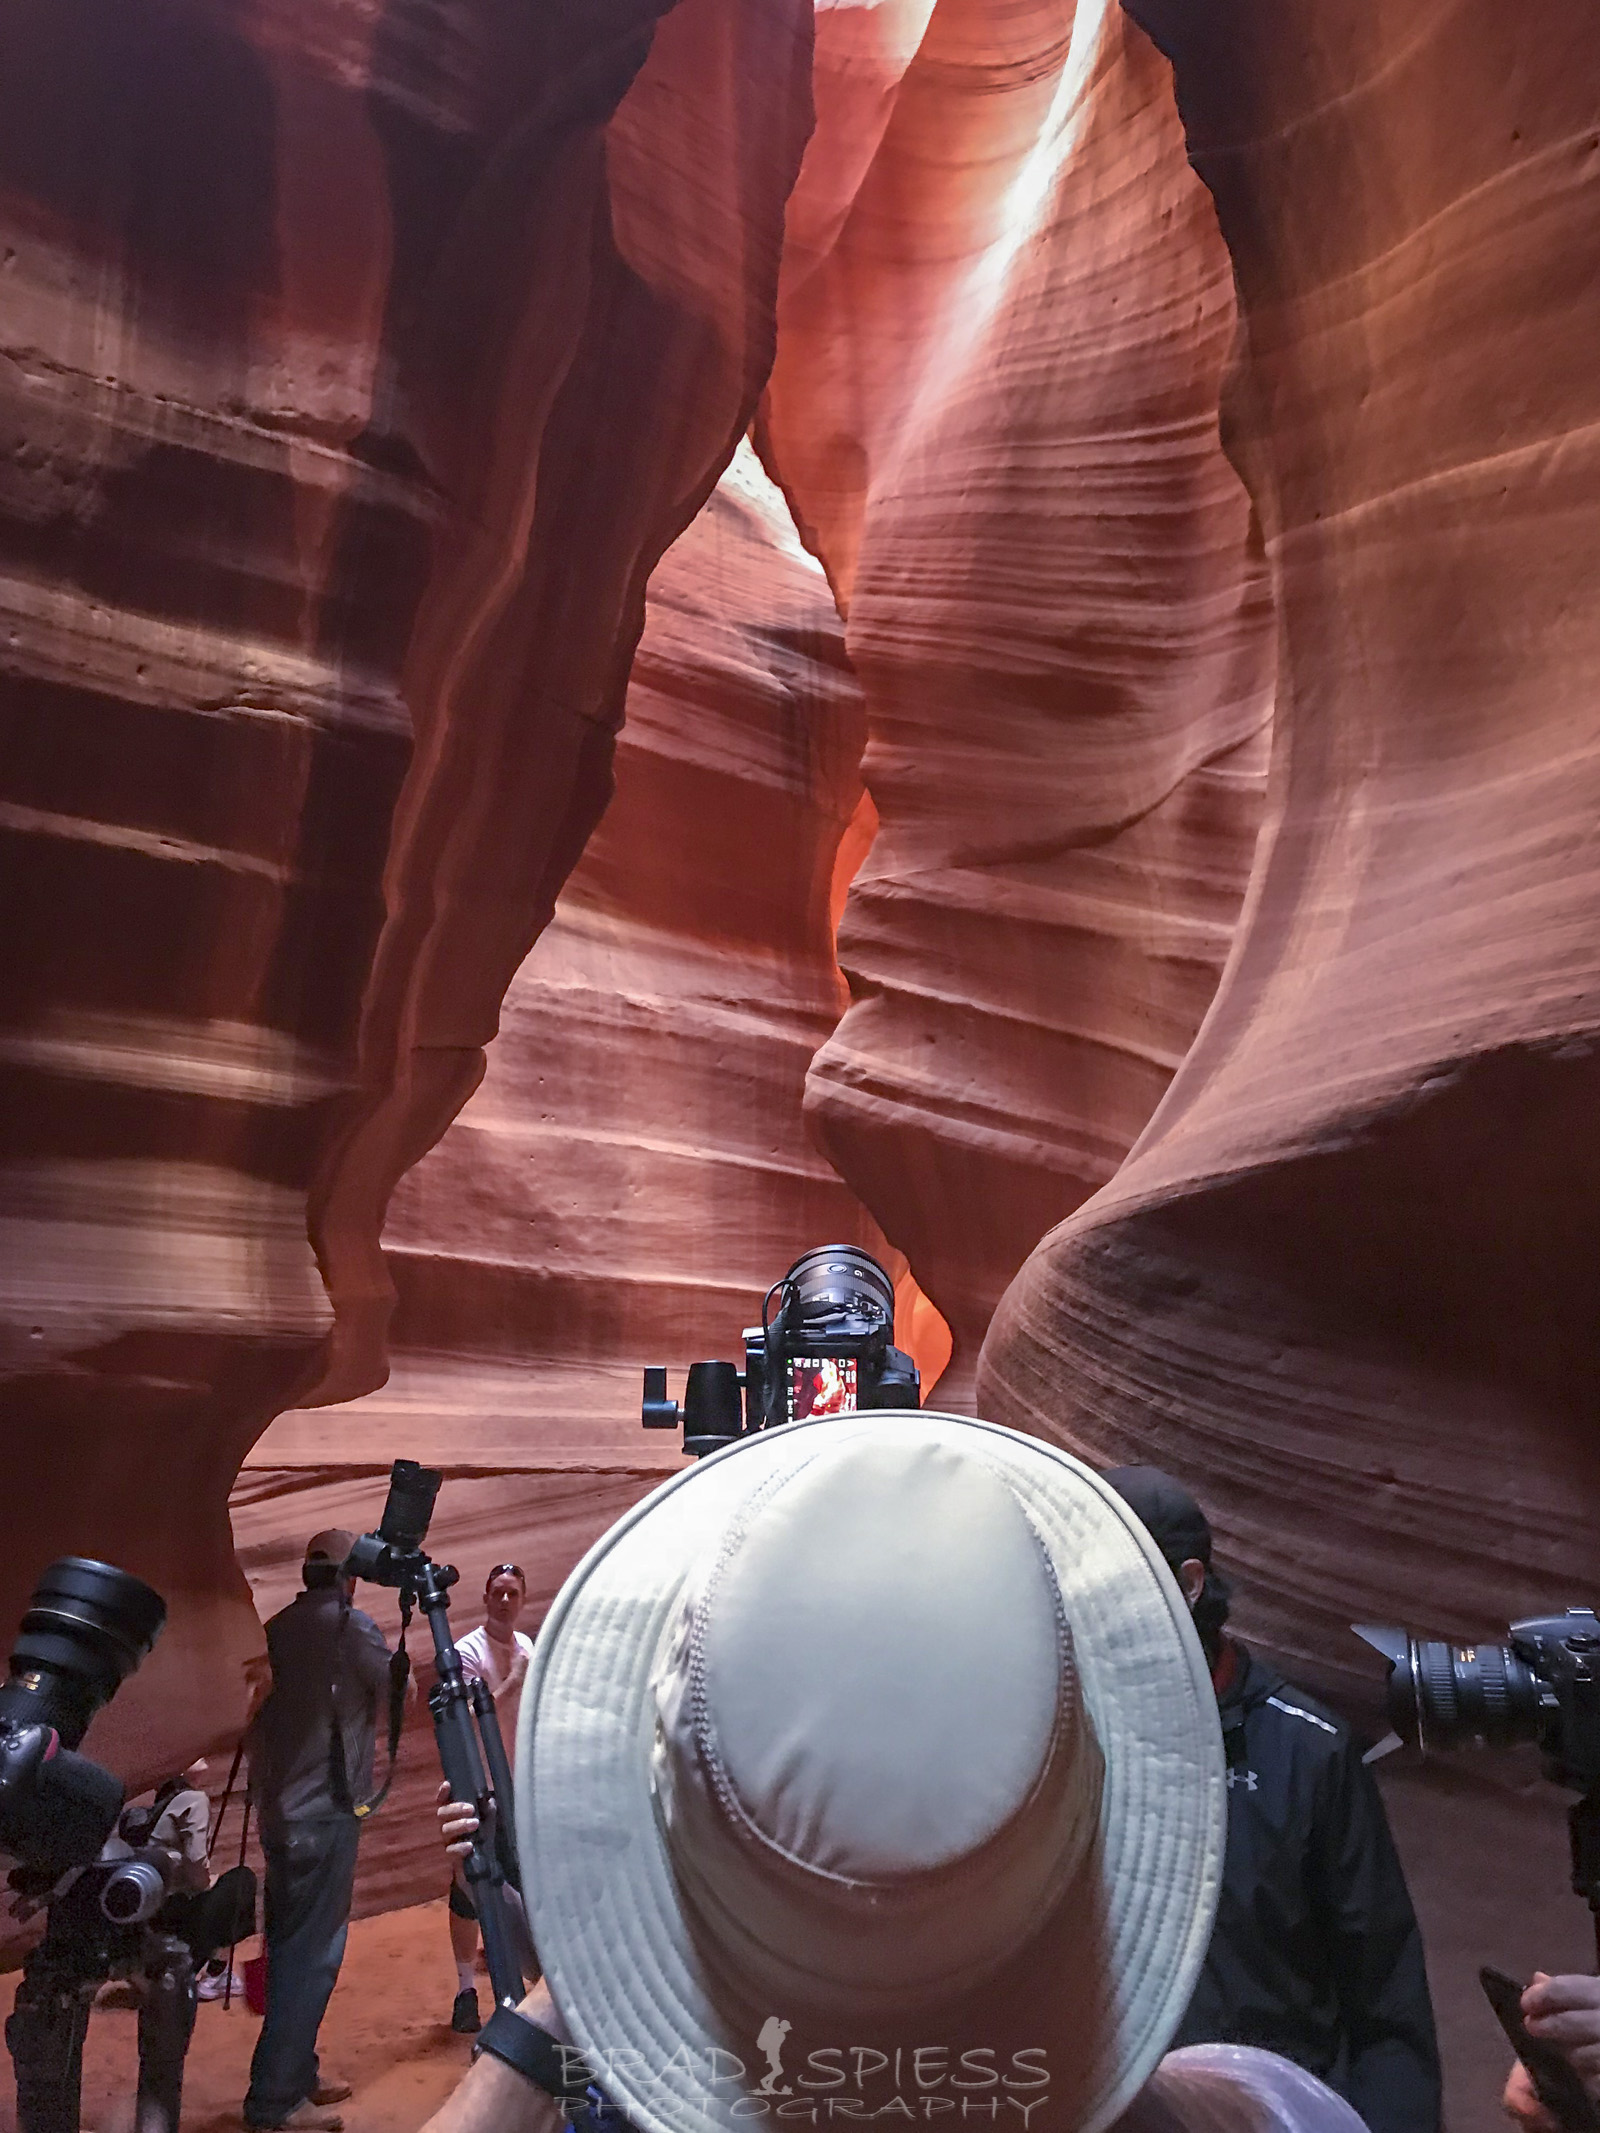
Grabbing a shot with my cellphone in Upper Antelope Canyon as we all get situated for our next shot.
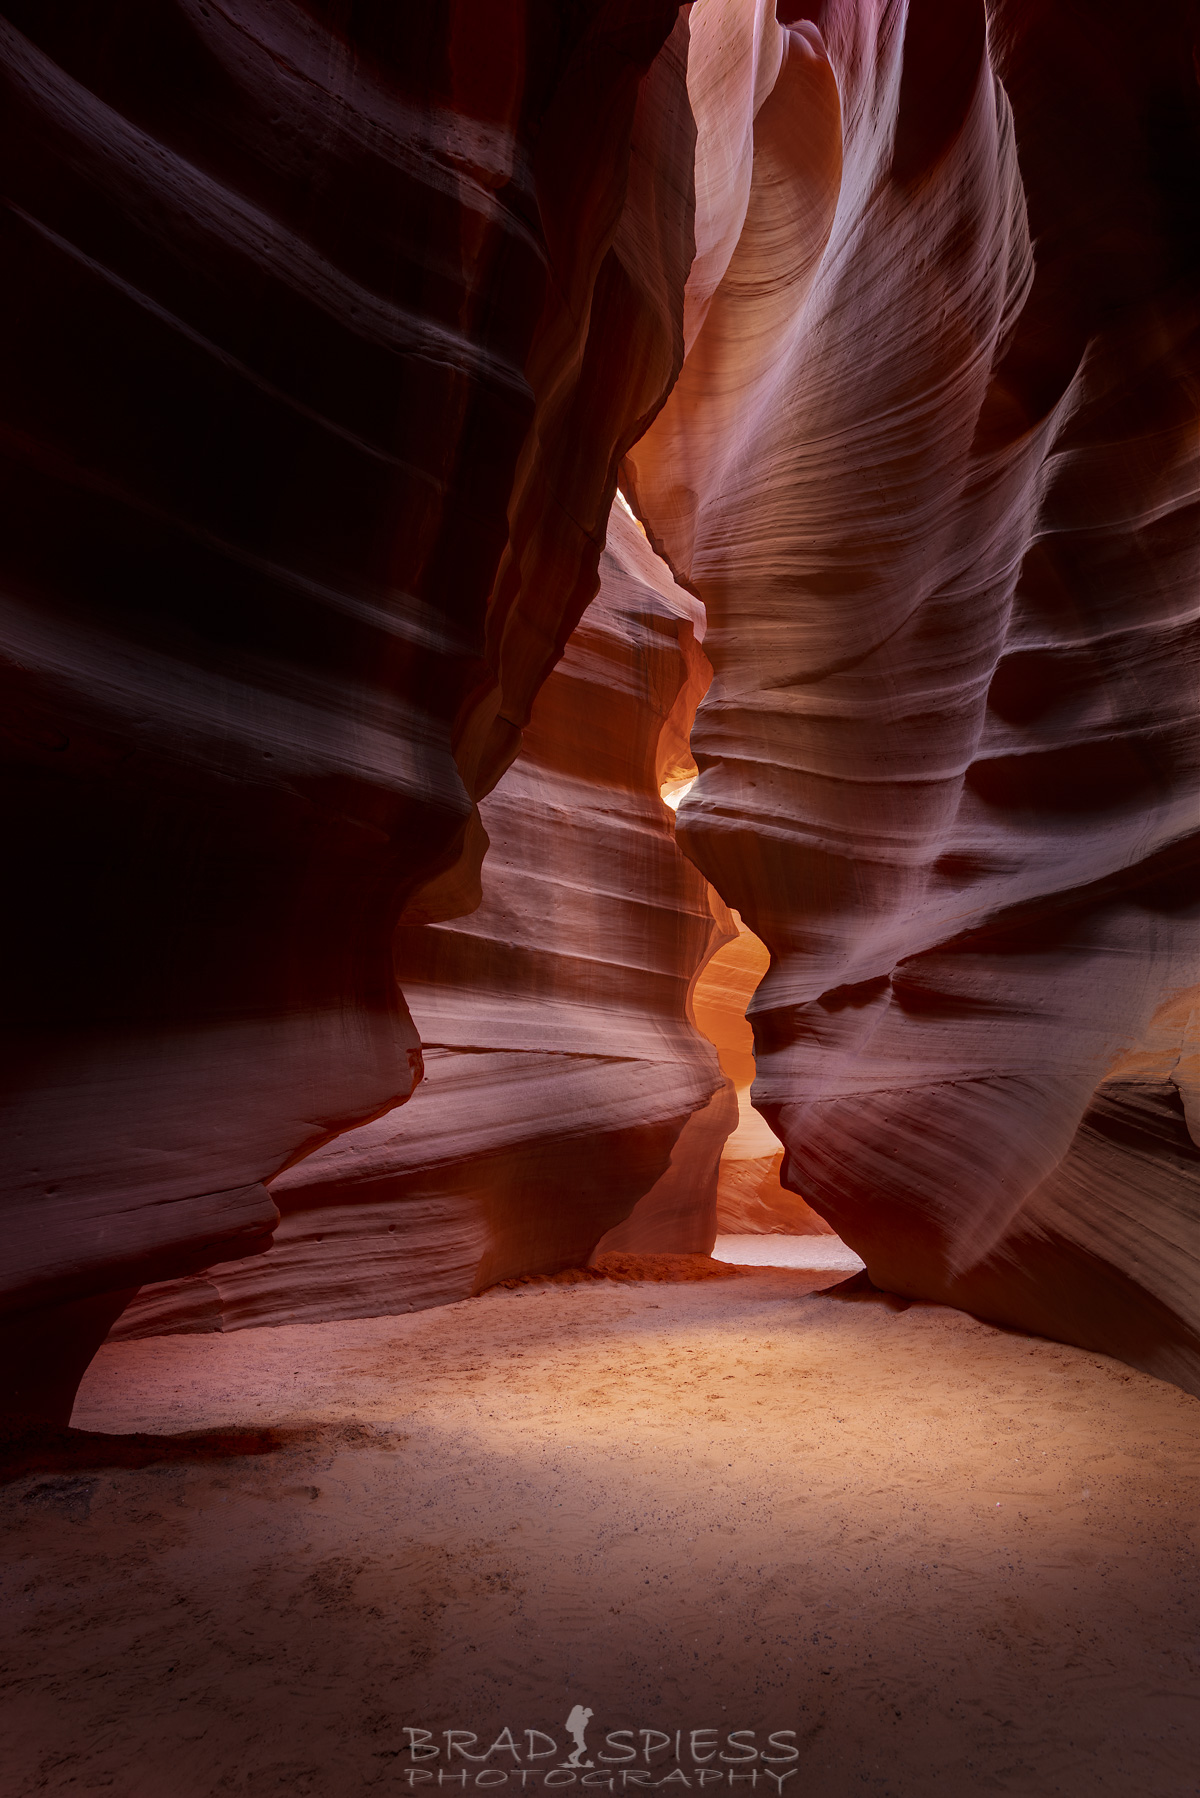
Upper Antelope Canyon Path once the normal tourist group has passed through and we have had a chance to get our shot.
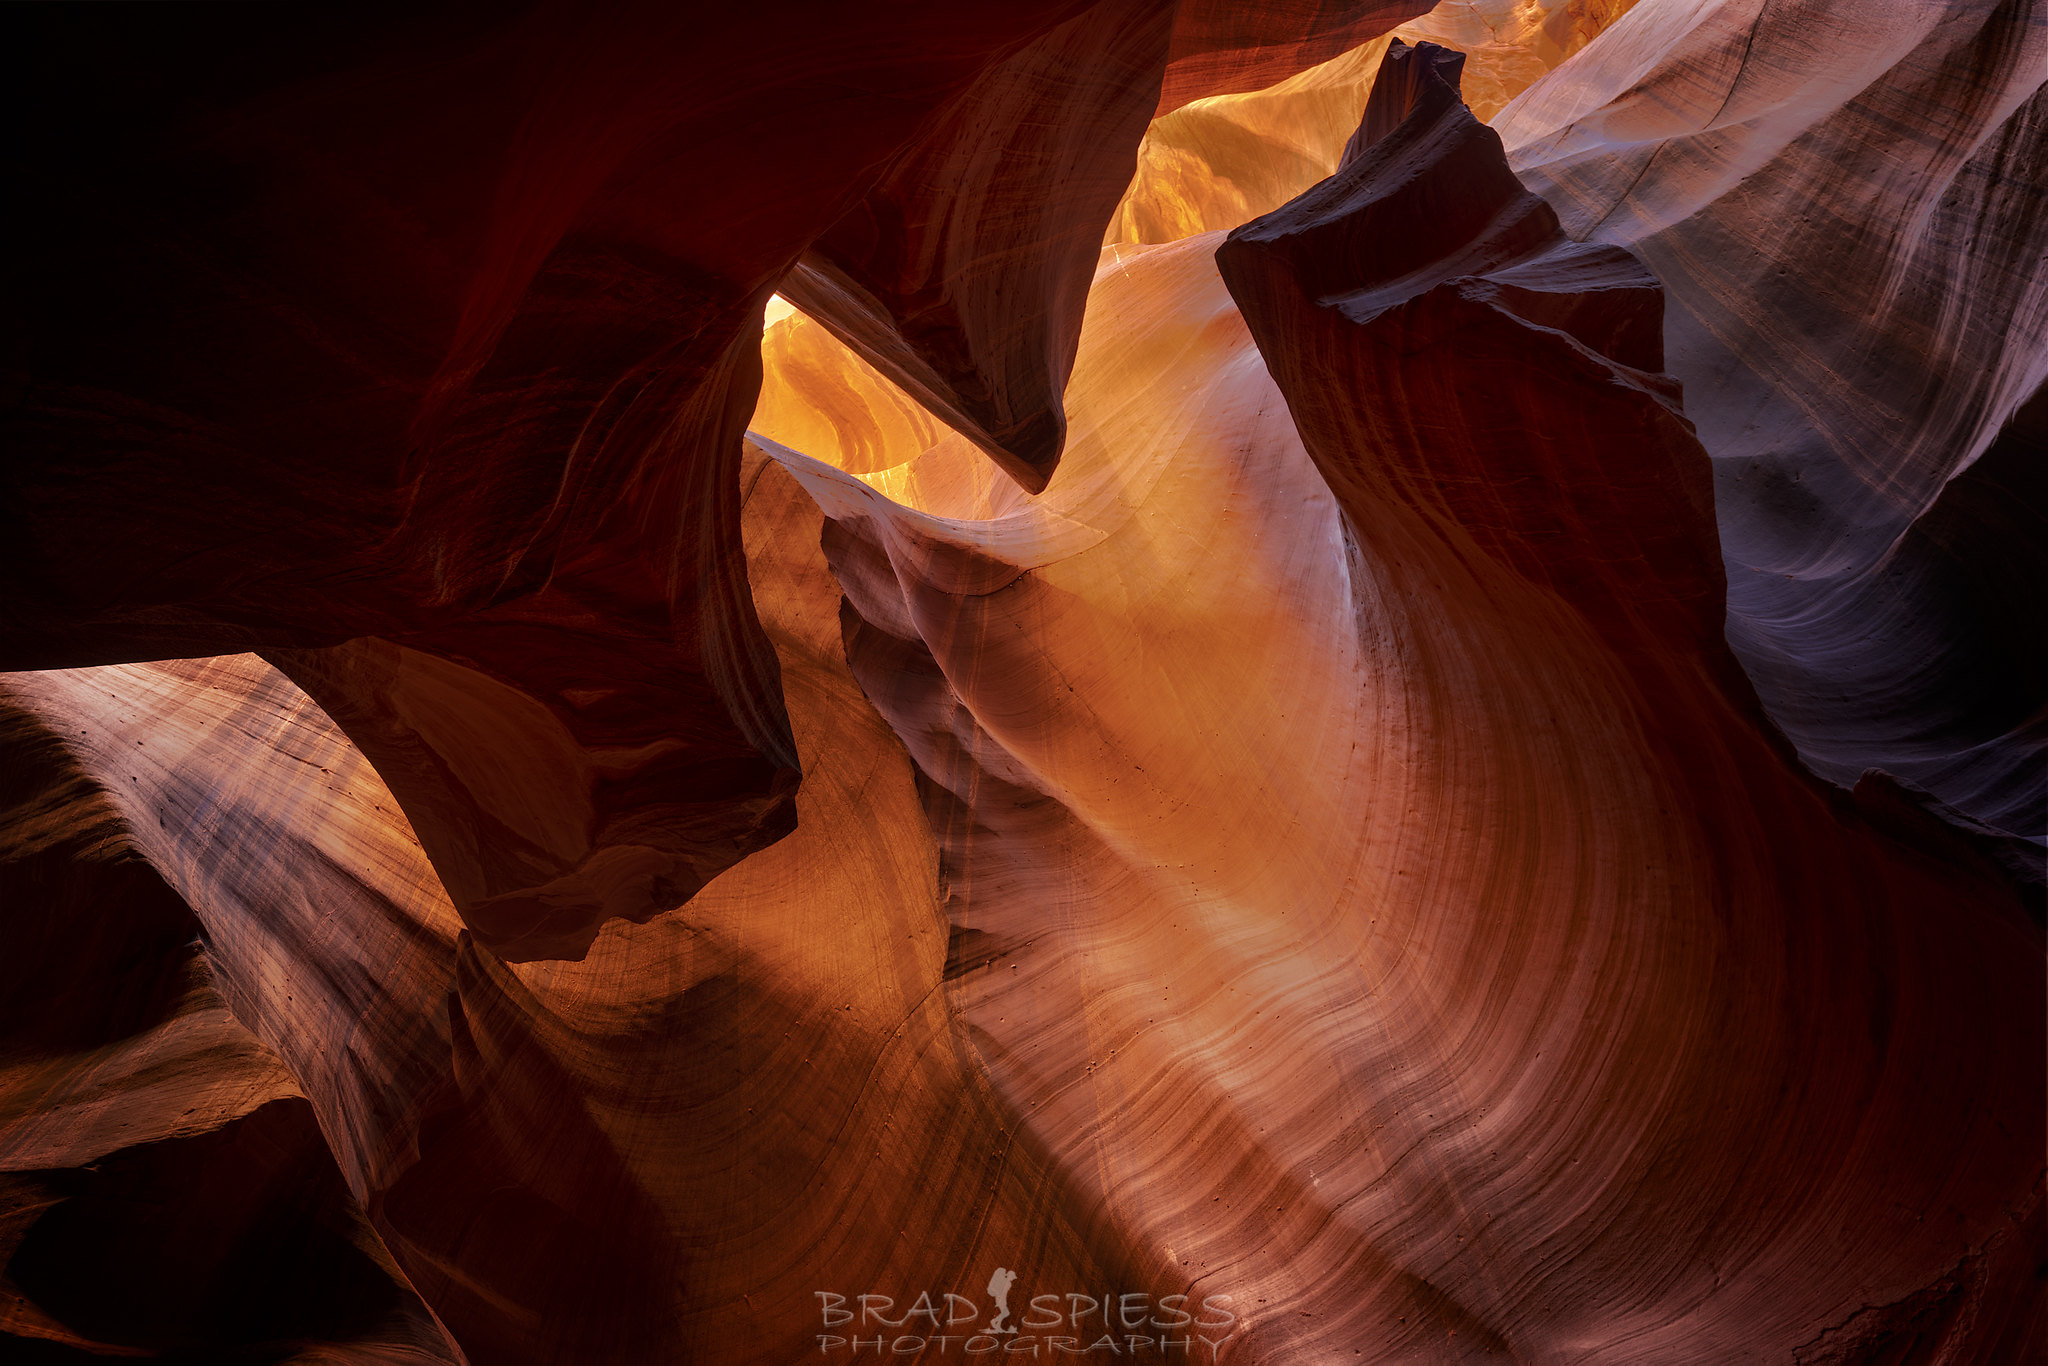
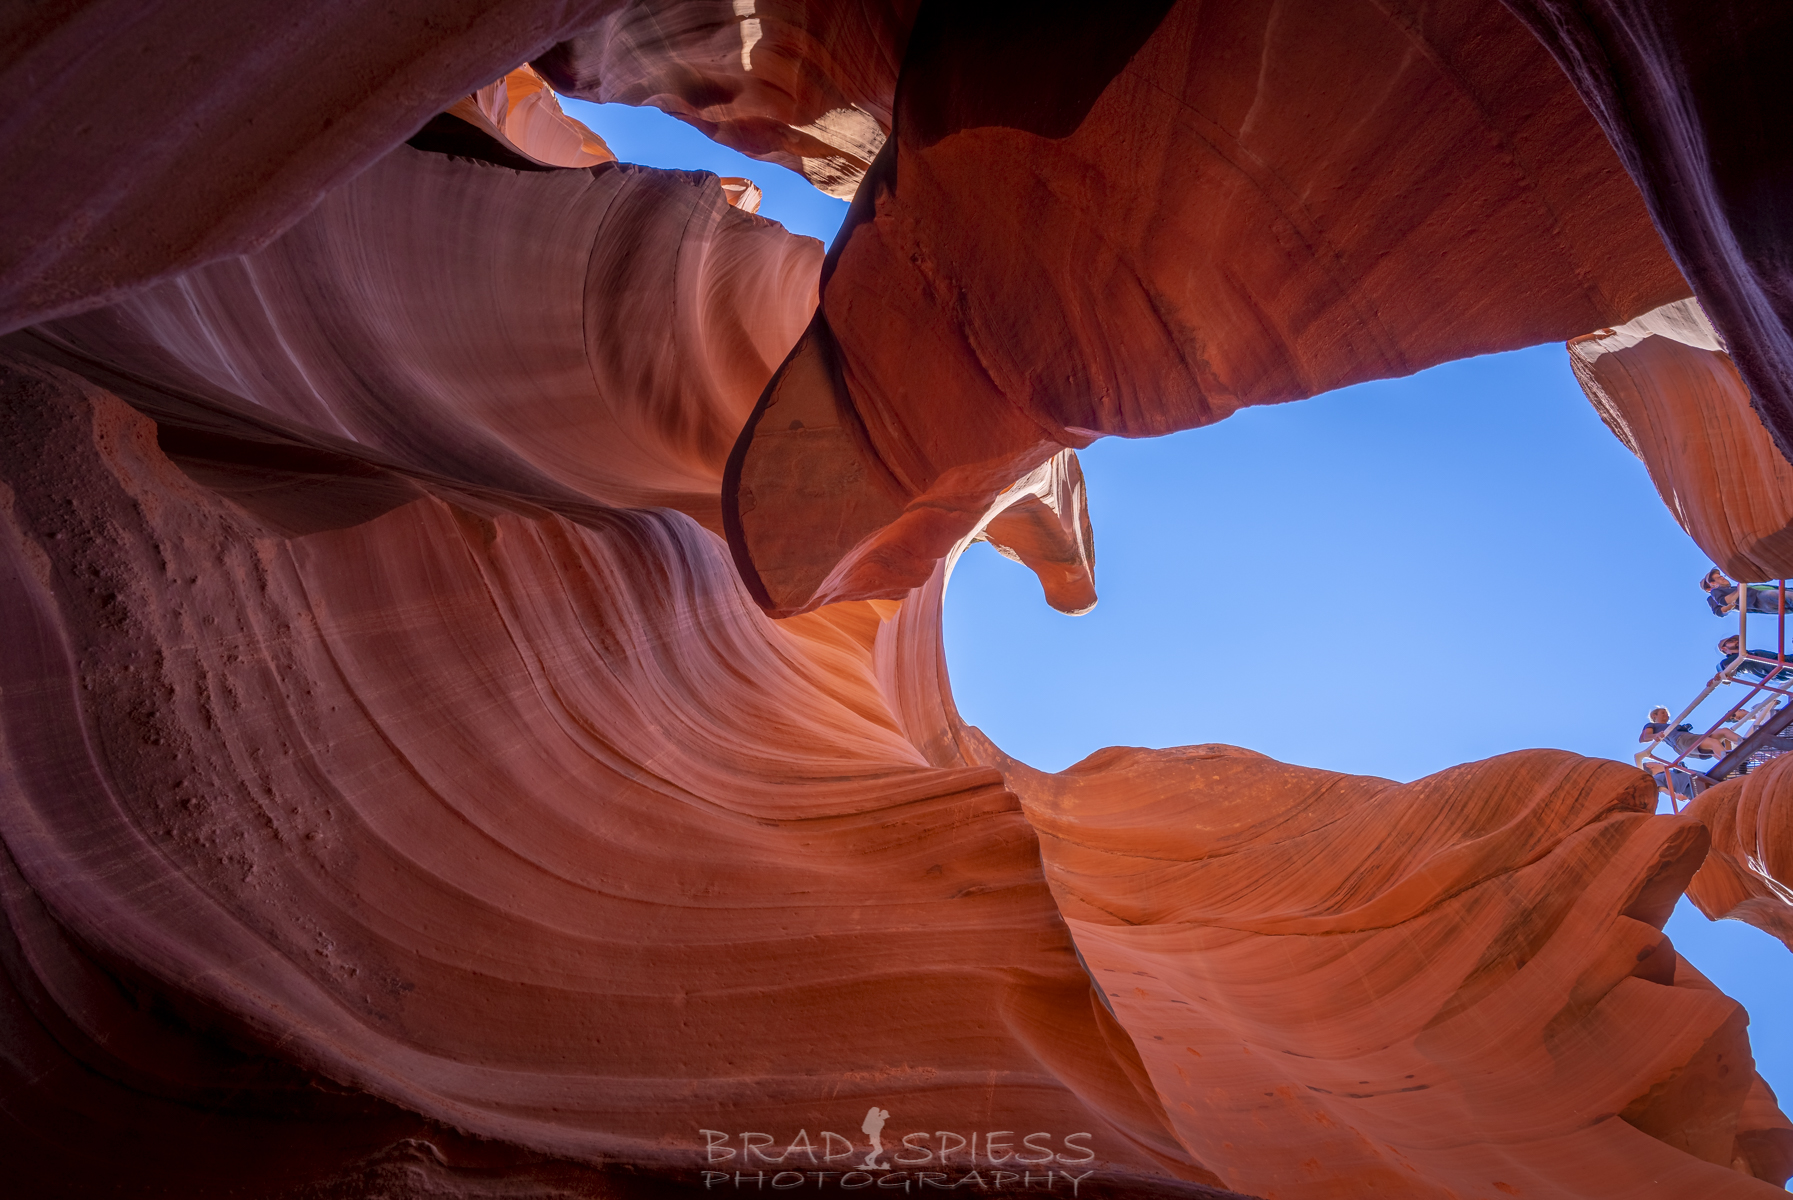
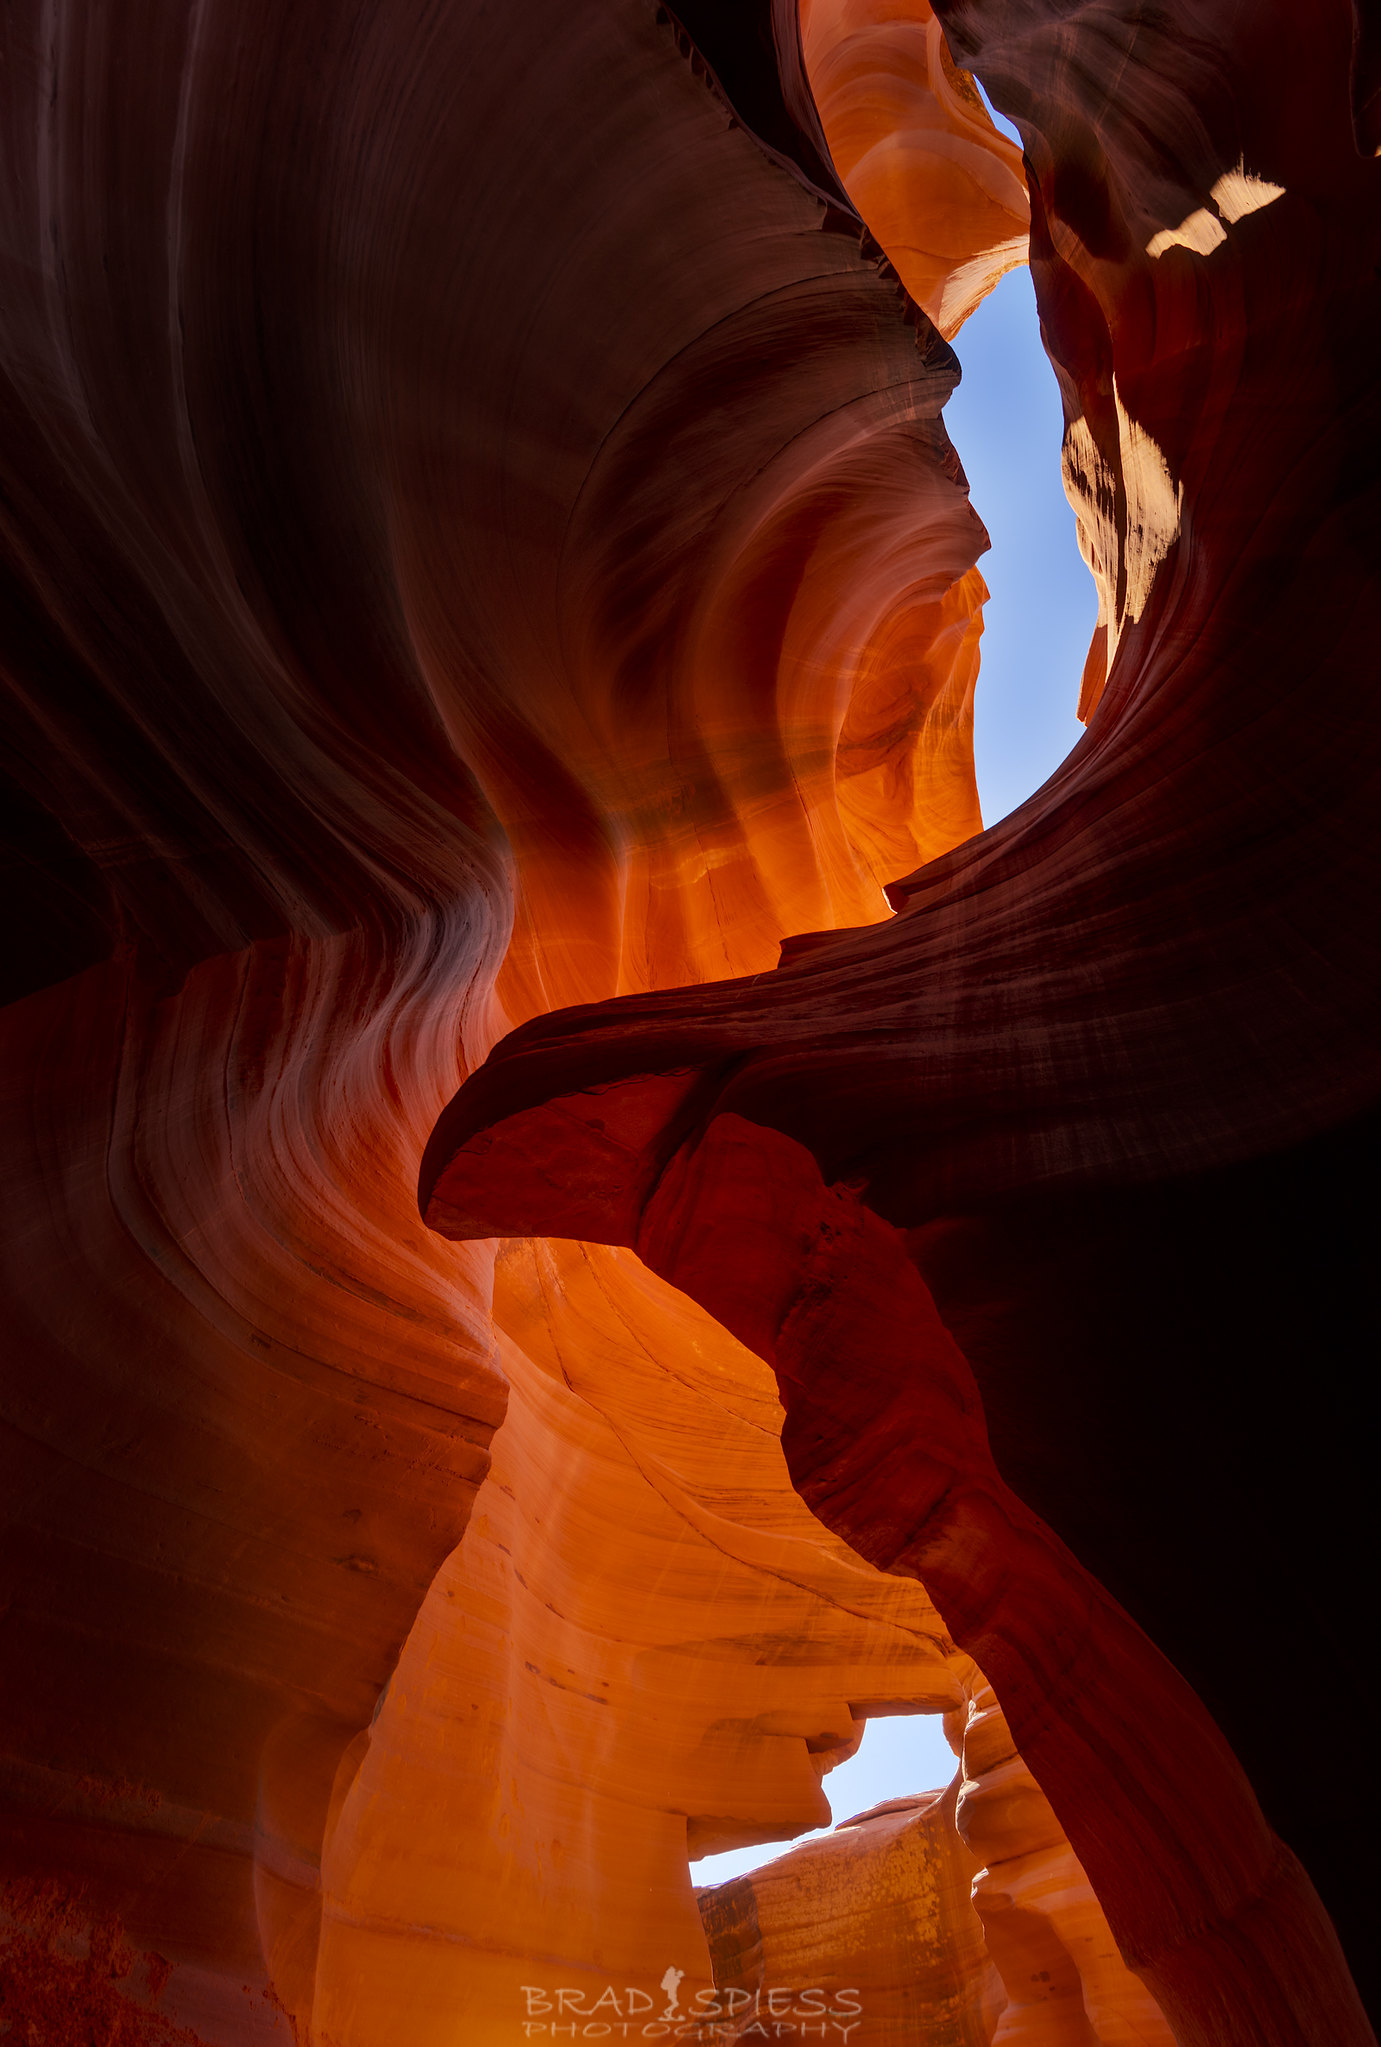
An example of what you can achieve when you have a tripod and enough time to do some bracketing and longer exposures with your shots.
After your time in Upper Antelope Canyon your Photographic tour group will head back out the way you came in and drive back to where you first meet. I made sure to make my appointment for the “Deluxe Lower Antelope Canyon Tour” with about an hour or so in between so I would have enough time to drive to the next location and check in and get ready. I used Kens Tours for the Lower Antelope Canyon Deluxe Tour. The spot where they are located has plenty of parking space and a nice little area to sit and have a bite to eat ( there is a little cafe there ) before starting the tour. The Deluxe Tour is supposed to have about 6 people per guide, at this point they advertise it as having 4 people per guide, I got lucky when I went and I only had 2 other people with me and the guide and they were a couple who needed more attention so I felt like I had much more time to myself to figure out what composition I really wanted to shoot, in fact sometimes I felt like I was taking to much time as I would be shooting for a while before noticing I was by myself as the guide was trying to keep up with the other couple, which was fine by me, in fact preferred. The guide did try to give me some attention as well, asking me if I wanted my picture taken, which I finally accepted at one point. Also the guide would point out certain areas that he thought I might be interested in. Even though you could not bring a tripod and I had to do all my bracketing while holding on to the camera, I felt much more free on this tour and I feel like I had much more fun being creative with my composition on this tour as compared with the Upper Canyon Photographic Tour.
Looking up as tourists make their way down the last bit of the steep staircase to start their tour of Lower Antelope Canyon.
When you and your tour start your adventure you will take a small hike back to the lower portion of “Lower Antelope Canon” and descend a steep metal staircase in order to start at the bottom of the canyon. Remember all that rain that I experienced the day before ?, well the guide pointed out to me that the staff had to shovel sand back into the canyon because all the sand had washed out from the rains the day before. Evidently its much easier to walk through the canyon on a sandy floor rather then the bare rock.
One of the many rock formations in Lower Antelope Canyon, this one is known as the “Lions Head”.
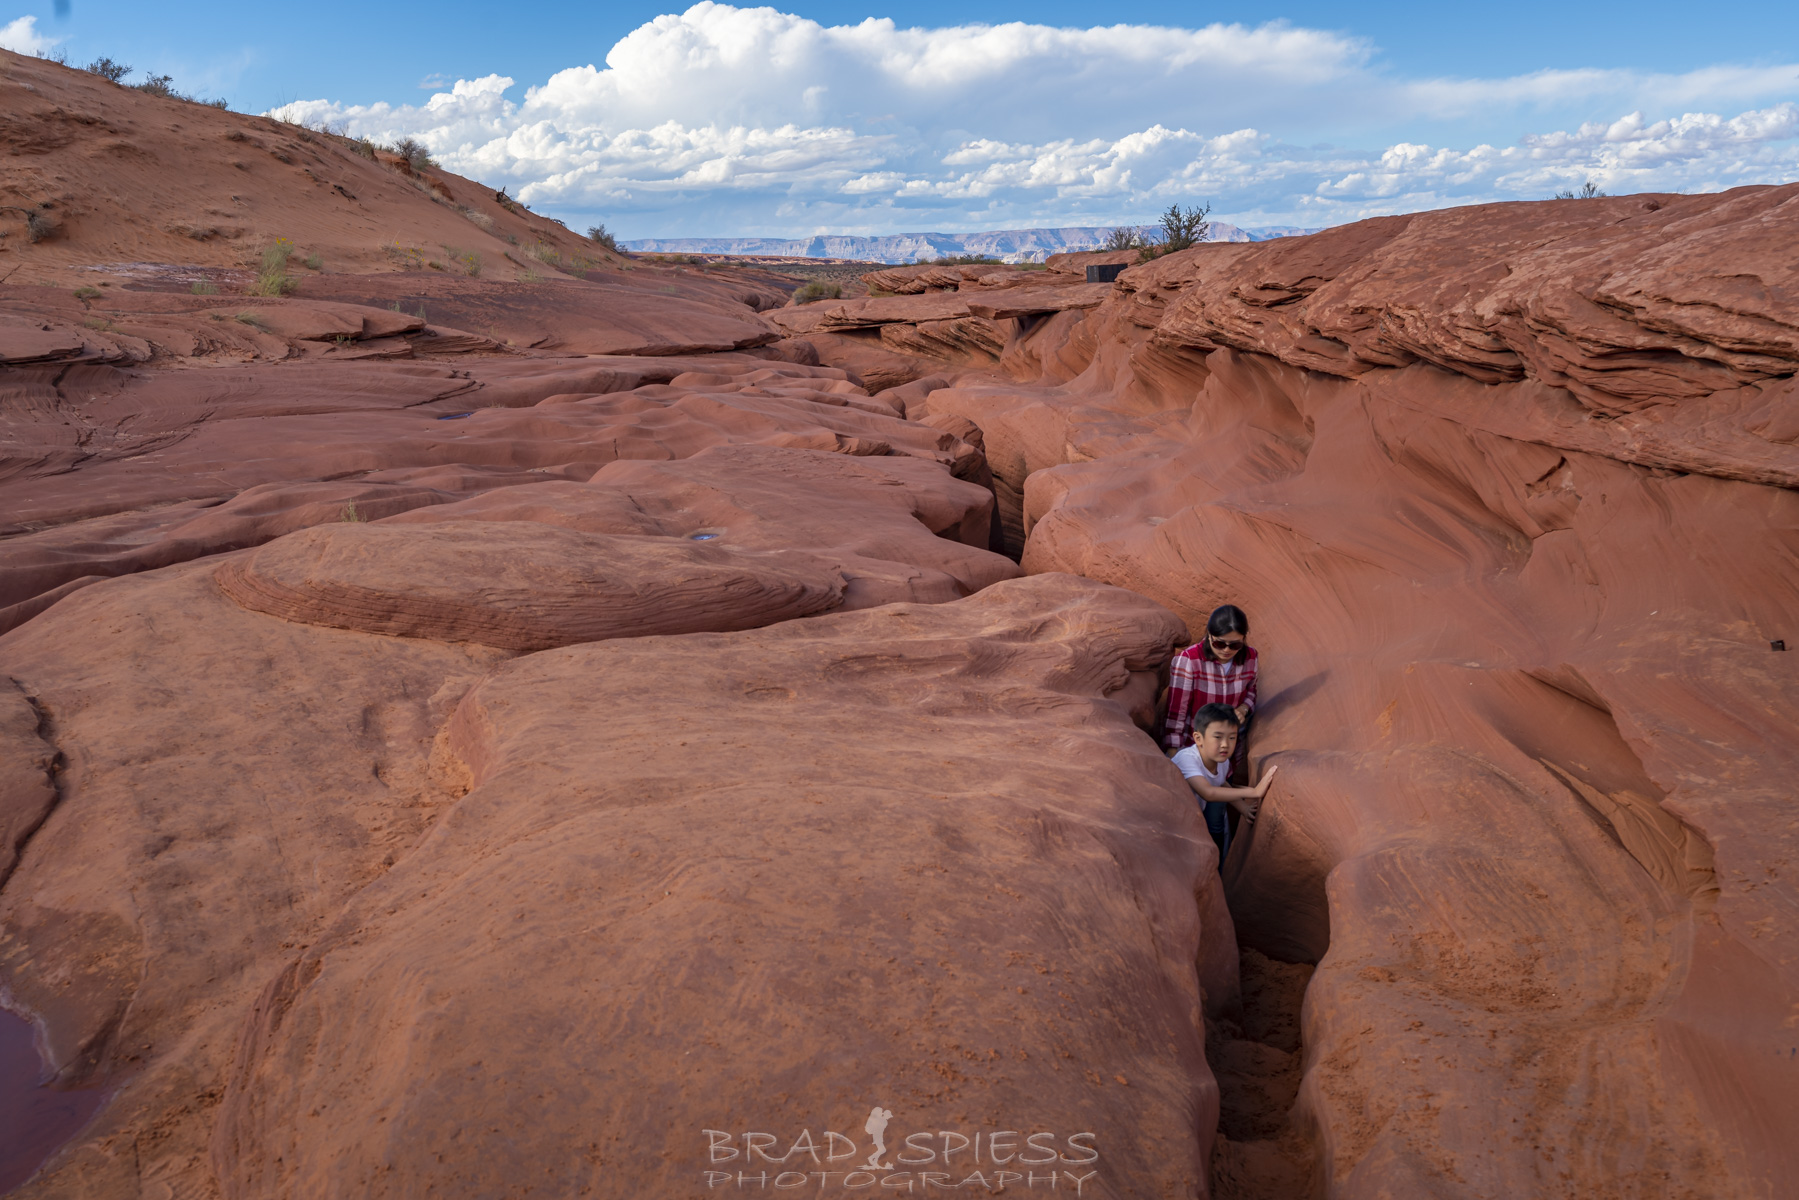
Unlike the Upper Antelope Canyon which is flat, this canyon tour requires you to do a little climbing. For most people the amount of climbing that you will be required to do is not difficult, nor is it technical, instead you will have a number of steep ladders along the way that you will need to climb. Climbing the steep ladders isn’t difficult for the “normal tourist” that can just stick their cellphone in their pocket so they can use both hands, for you as the photographer you may want to have a strap to hang the camera around your neck or some other way of attaching the camera to your self, just keep in mind you can not bring any bags on the tour, and you really don’t want your camera to be swinging around into a sandy, rocky cliff face as you are moving around.

This rock formation looks like an eagle head from a certain angle.
There are so many cool rock formations in this canyon. Take your time, look all around you, especially straight up. Eventually you will finally climb your way out of the canyon, when looking back its amazing to think that little trail leads down into that canyon. Our guide pointed out what he said where dinosaur tracks in the rock just after exiting the canyon. After doing both canyons, it was time for me to pack everything up and drive off to my next destination, Monument Valley. It would take me about 2 hours to drive to Monument Valley from this location and I wanted enough time to get there, check in, set up my tent, and explore for compositions before sunset.
Tourists exiting Lower Antelope Canyon.
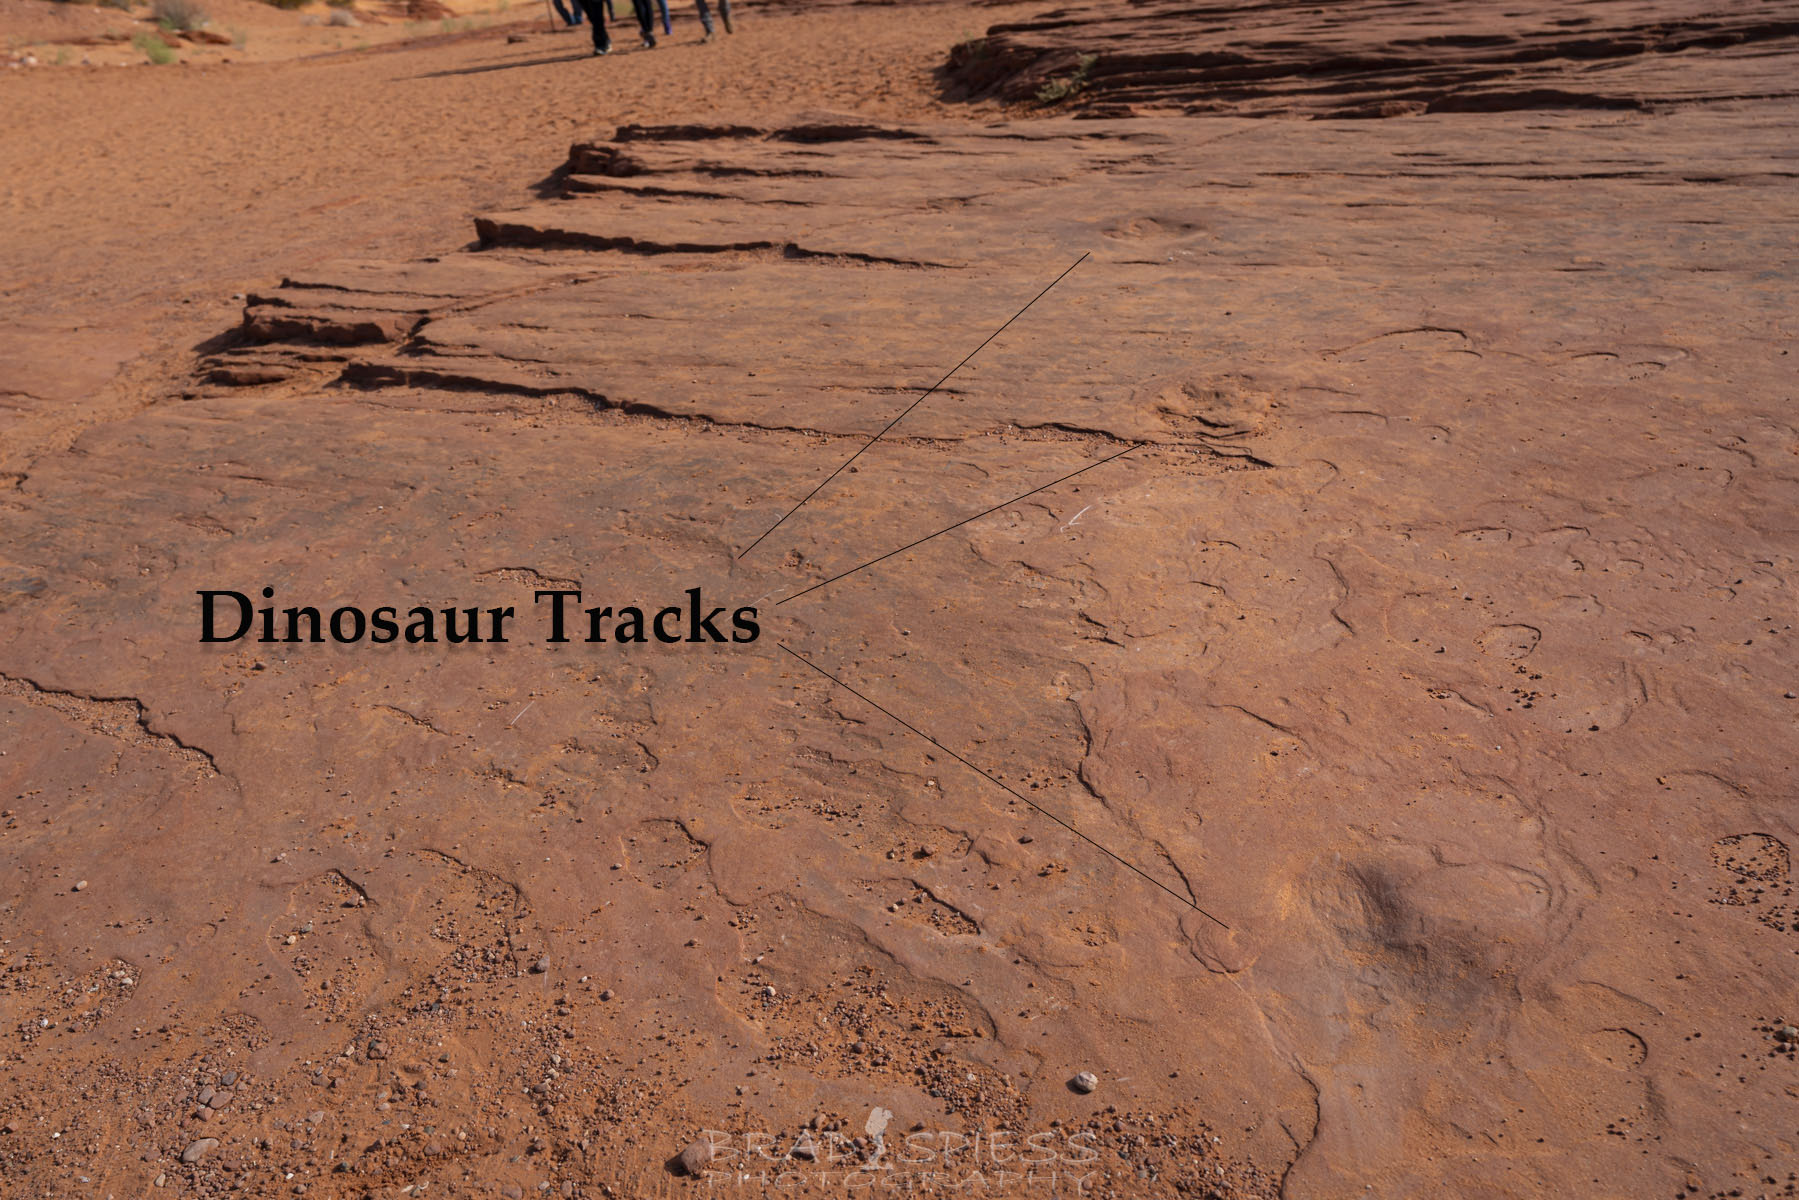
Dinosaur tracks you will see when exiting Lower Antelope Canyon